
Batching Workflow
- Open Podhero → Batching → Backorder Queue
- Select how many of what size you want to batch
- Confirm those selections to create the batches
- Go to Batching → Production Board
- Print all tags for the batches you just created — open the batch and click "Print Batch Sheet"
- Check if anything needs to be cancelled (items we're out of stock on) — look at the tag and check colors
Example: buttercream unis — if out of stock, click "Open in ShipHero"
- Once the unboxed SKUs auto-change to the correct ones, cancel the ones that need to be cancelled
- In ShipHero, go to Shipping → Wholesale
- Find your batches by looking for the batch name and "Default" status
- Click into the batch you need to set locations for
- Select picking locations manually — always use level "-1"
- Type "C" in the search bar to filter and show only what our side has
- If we don't have enough — call for replenishment
- Select the staging location
- Click "Ready to Pick"
- Go back to Podhero → Unboxing tab
- Start & stop the timer on all batches
Picking
Full step-by-step picking workflow using ShipHero on the iPad.
- Grab a scanner (worn on the hand/wrist).
- Grab a tablet (iPad) from the custom room — if not there, ask a leader.
- Log in with your username and password. If you don't have access, ask a supervisor.
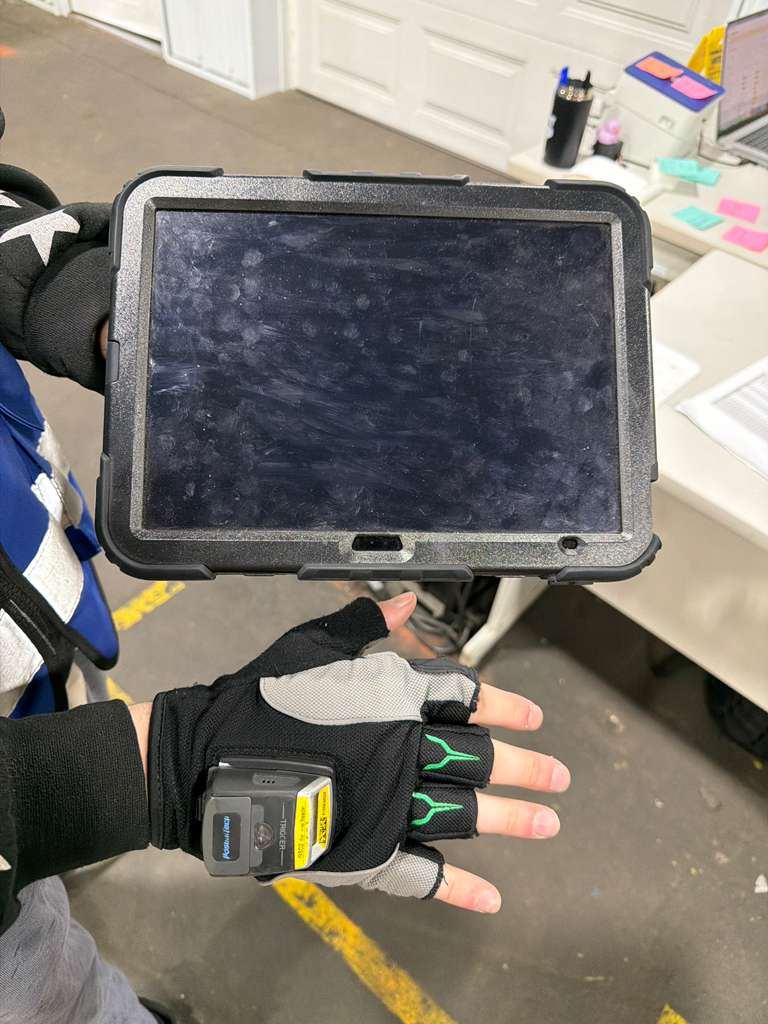
- Once logged in, tap the ≡ bars in the top-left to open the side menu.
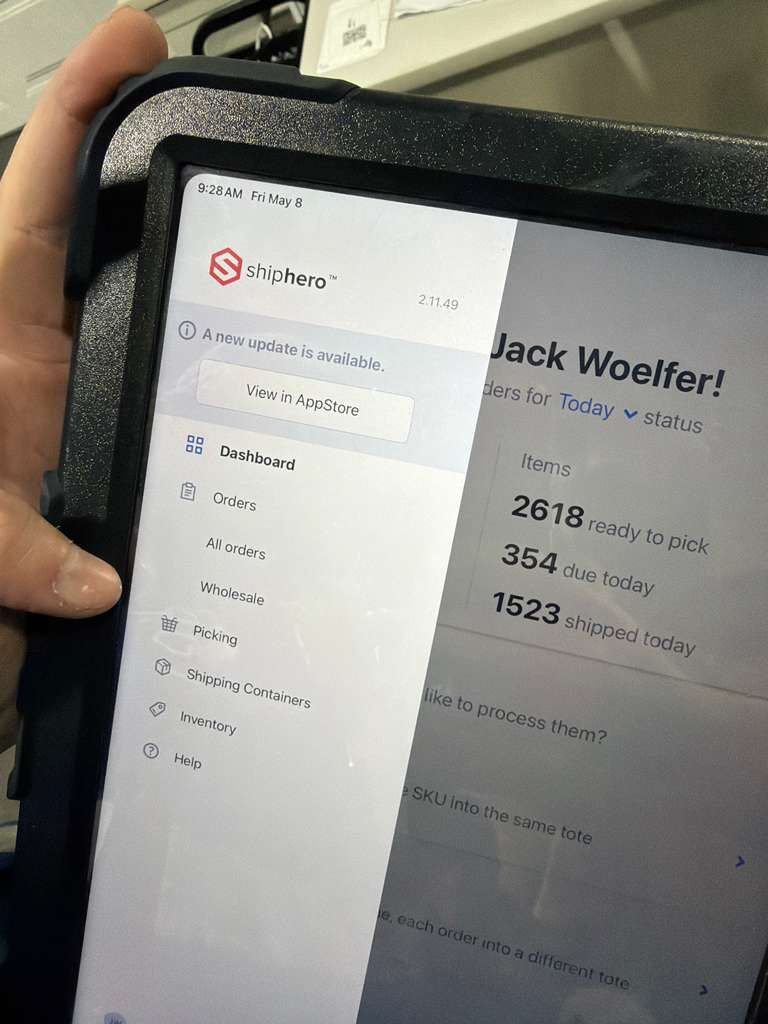
- Tap Orders → then tap Wholesale.
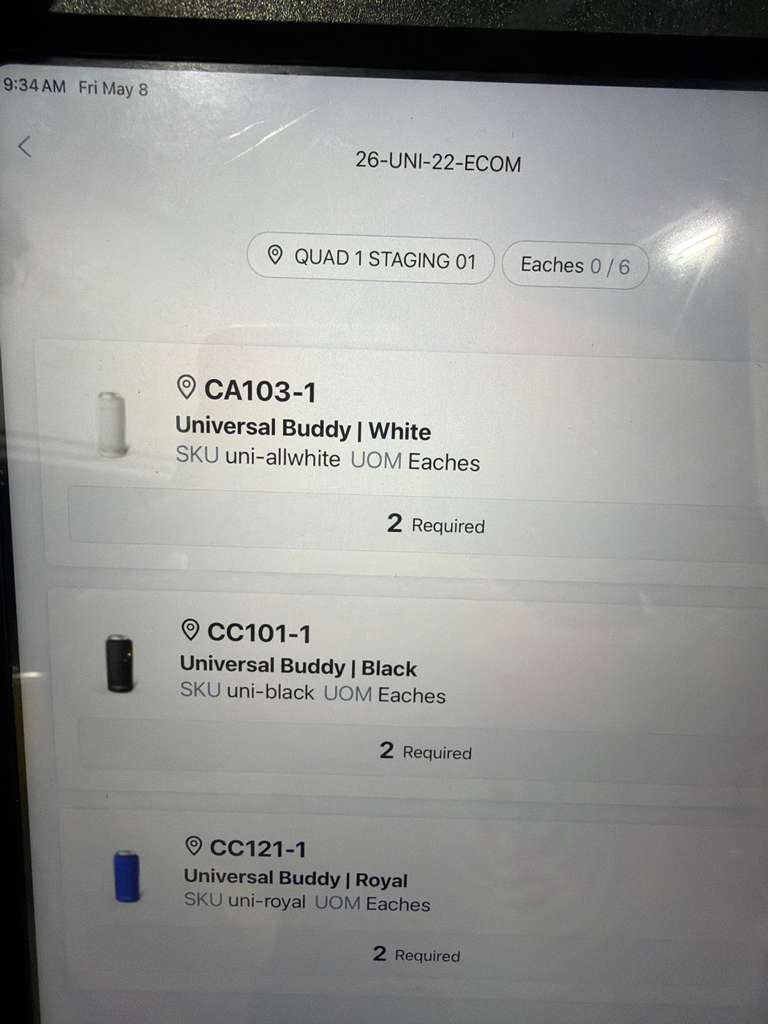
- Grab a batch tag at the supervisor table and find the matching batch in the list (e.g. 26-UNI-22-ECOM).
- Tap the batch to open it.
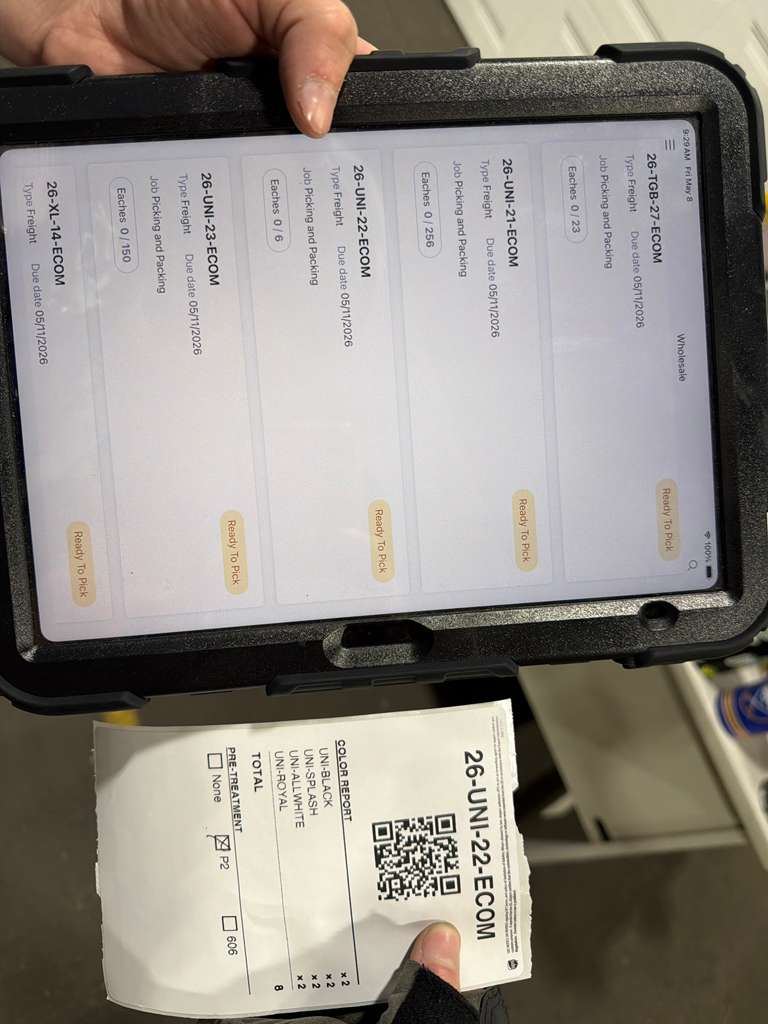
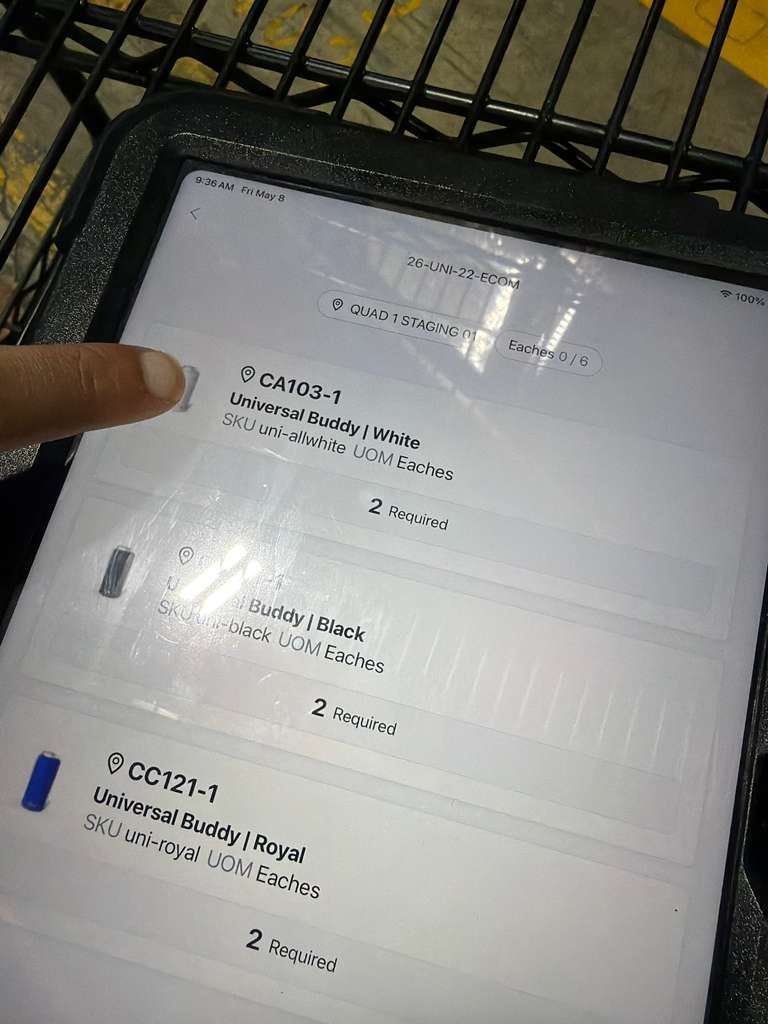
- Tap the batch and it shows all the cans you need with their shelf locations and quantities.
- Each row shows the location code (e.g. CA103-1), product name, SKU, and how many are required.
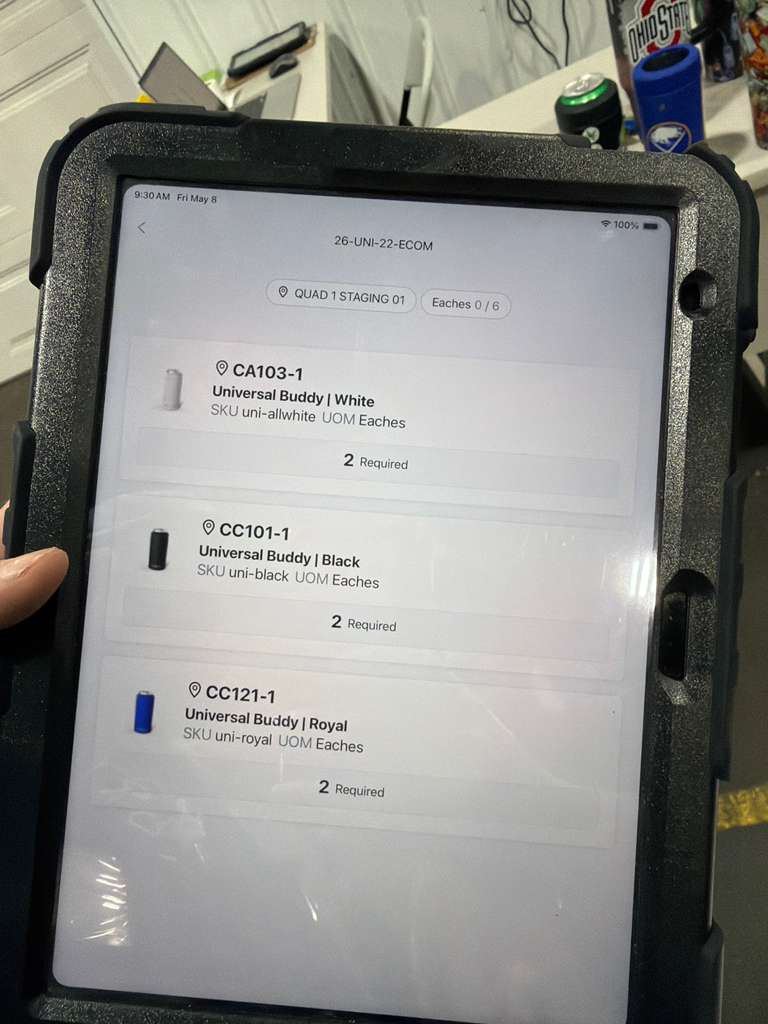
- Head to the cleaning area and grab an LPN (white barcode label bag).
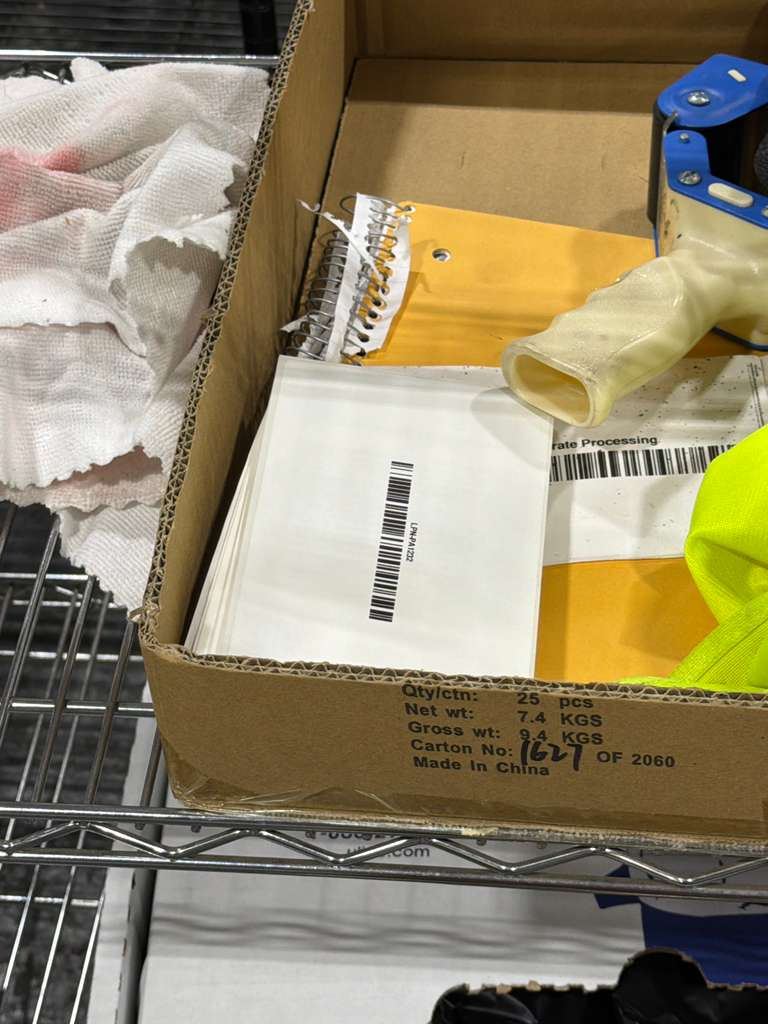
- Stick the batch tag and LPN into your box — you are ready to go pick the cans.
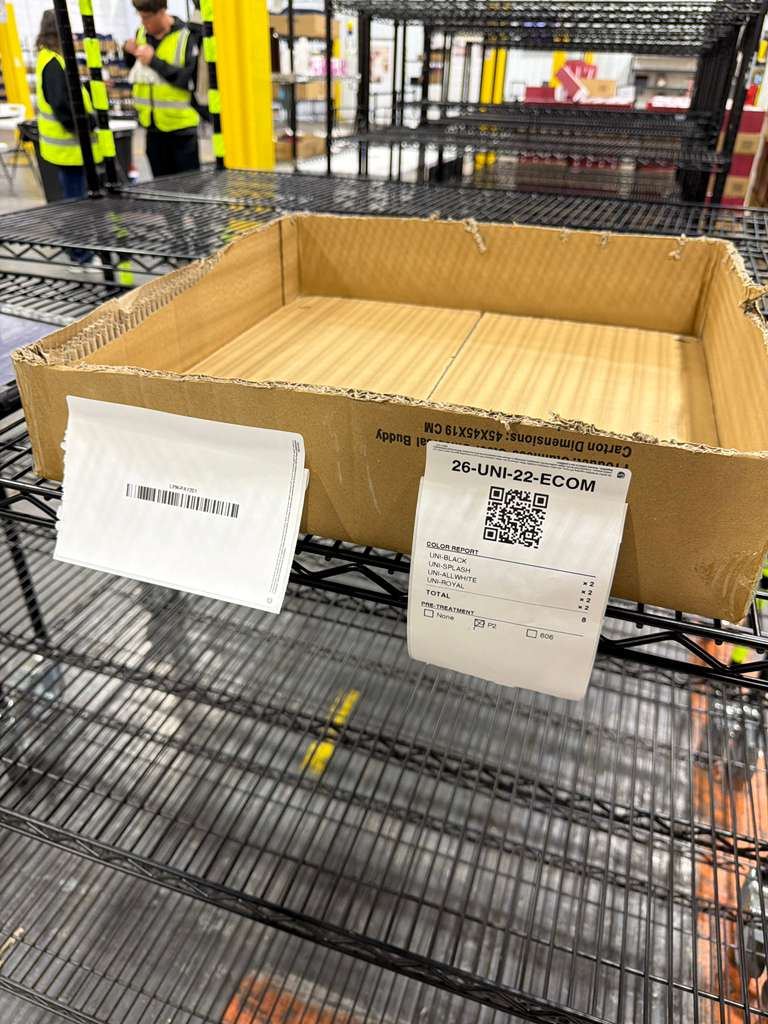
- Grab a rolling cart to move the cans.
- If necessary, grab an empty box to keep the cans from rolling — this is not required.
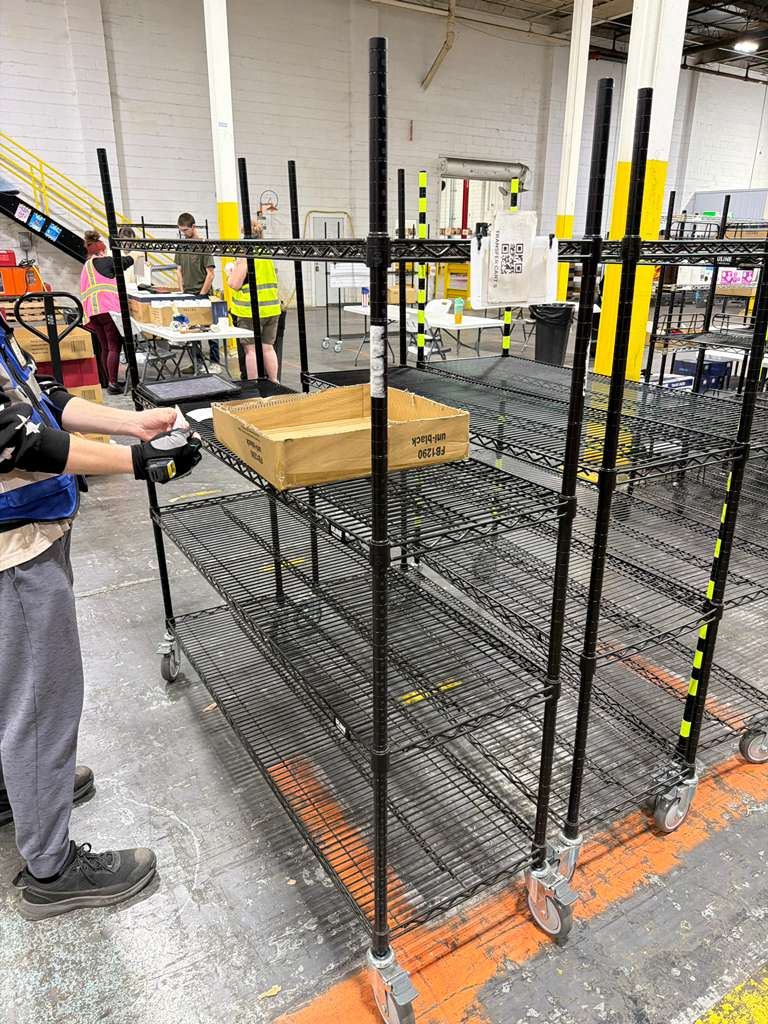
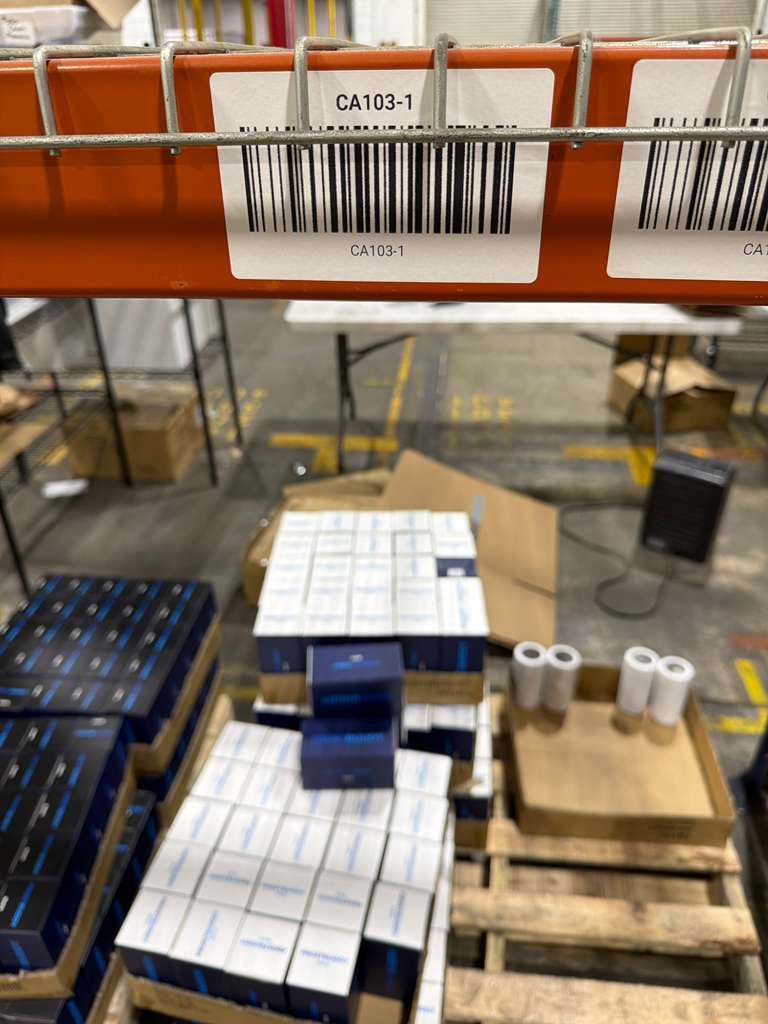
- Look at the location on the iPad — e.g. CA103-1.
- First letter — Warehouse side: C = Custom Warehouse (printing room side) | M = Main warehouse (other side).
- Second letter — Aisle: ranges from A to Q depending on where you are in the warehouse.
- Three numbers — Location: the specific location number along that aisle (e.g. 103).
- Number after the dash — Level: the shelf height from the ground — 1 is the lowest, up to 4 or 5 at the top.
- Look for the large green CA sign hanging from the racks — that is your aisle.
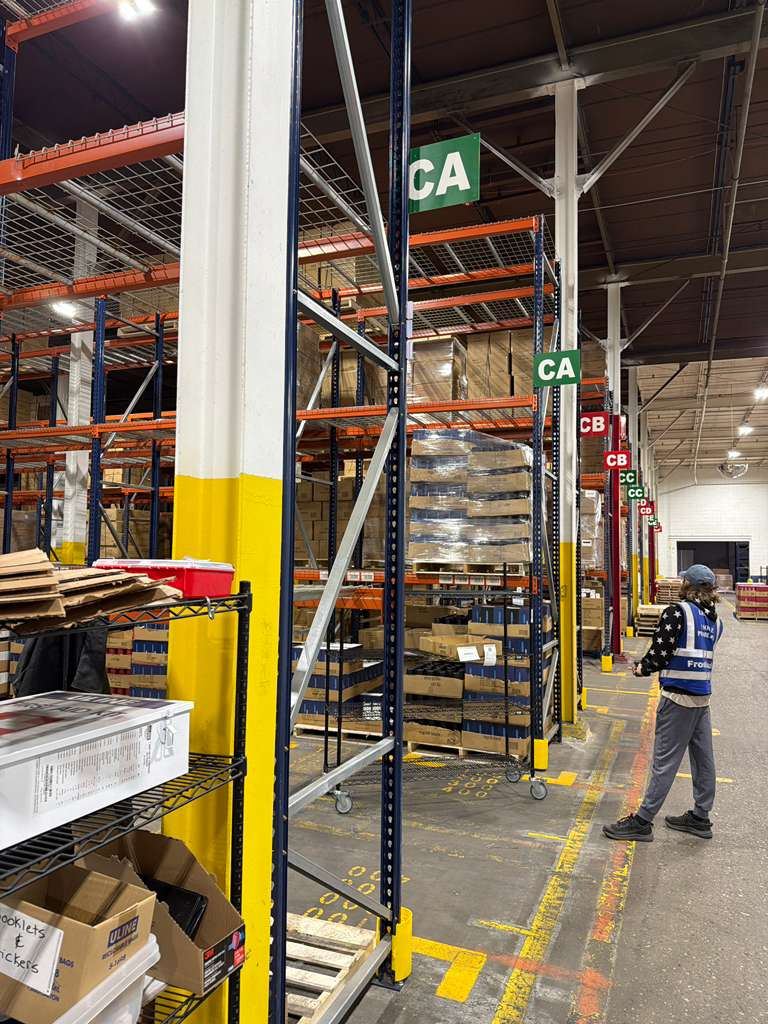
- In the aisle, find the 103-1 barcode label on the orange shelf beam. Your cans are right there on that shelf.
- Tap the first item on the iPad list to begin picking it.
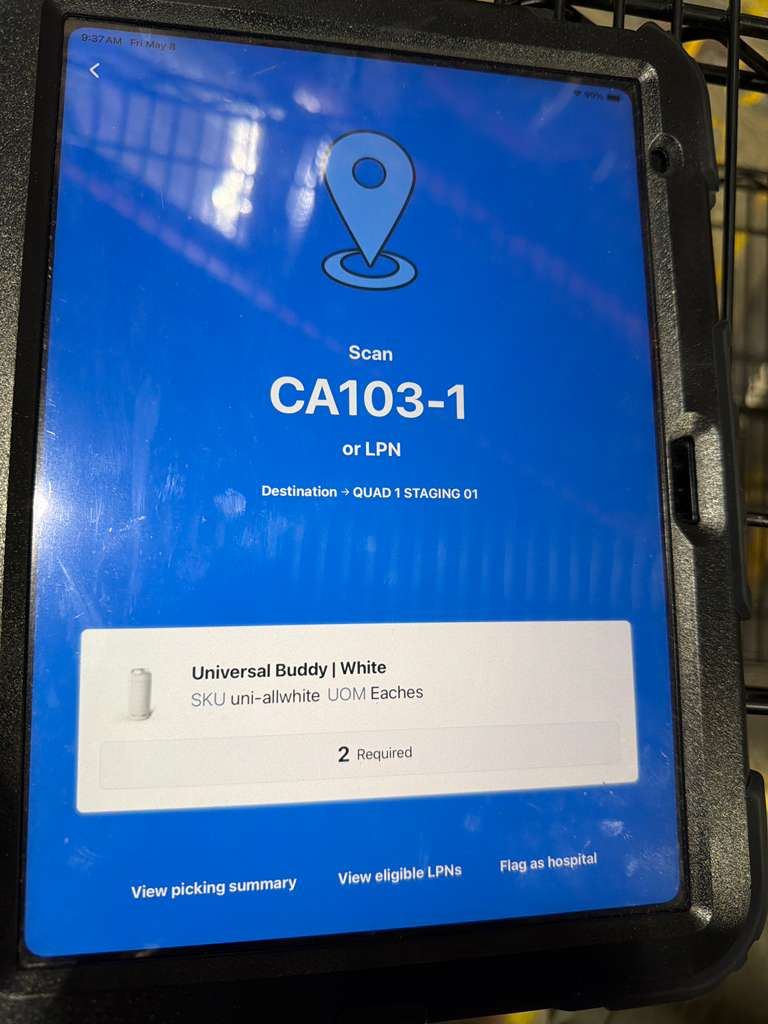
- The iPad shows a blue screen: Scan CA103-1 or LPN.
- Use your wrist scanner to scan the barcode label on the shelf.
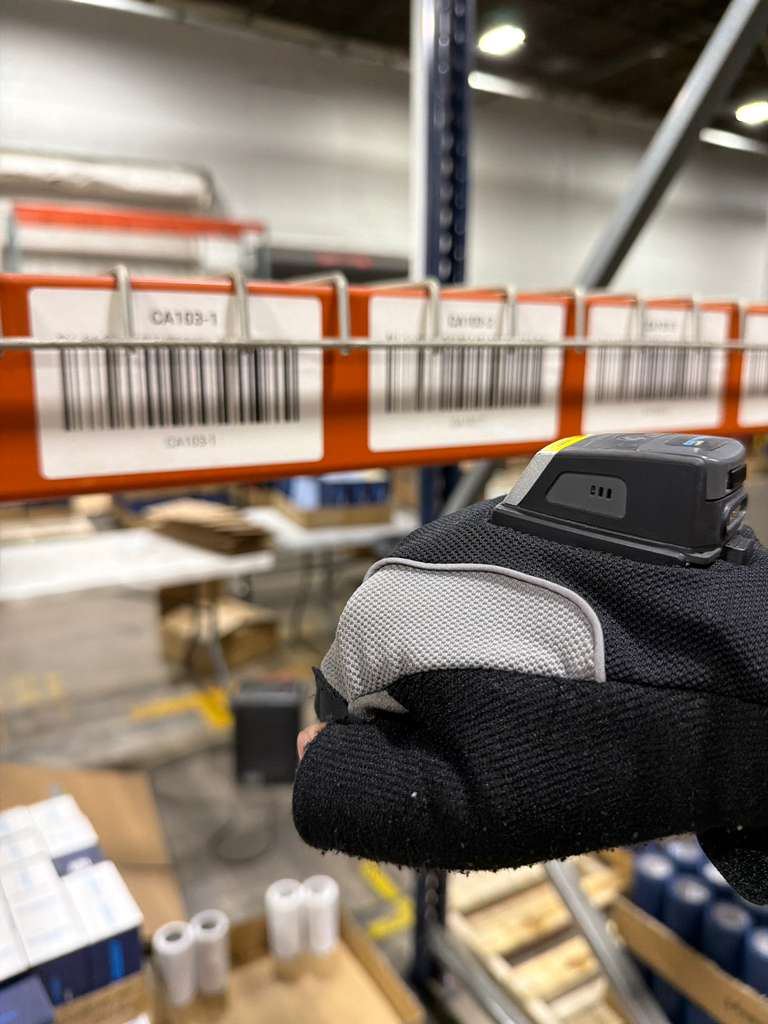
- Grab the required quantity shown on the iPad.
- Scan the barcode on each box as you grab it — the counter updates live (e.g. 1 Picked / 2 Required).
- Place scanned cans in your cart box.
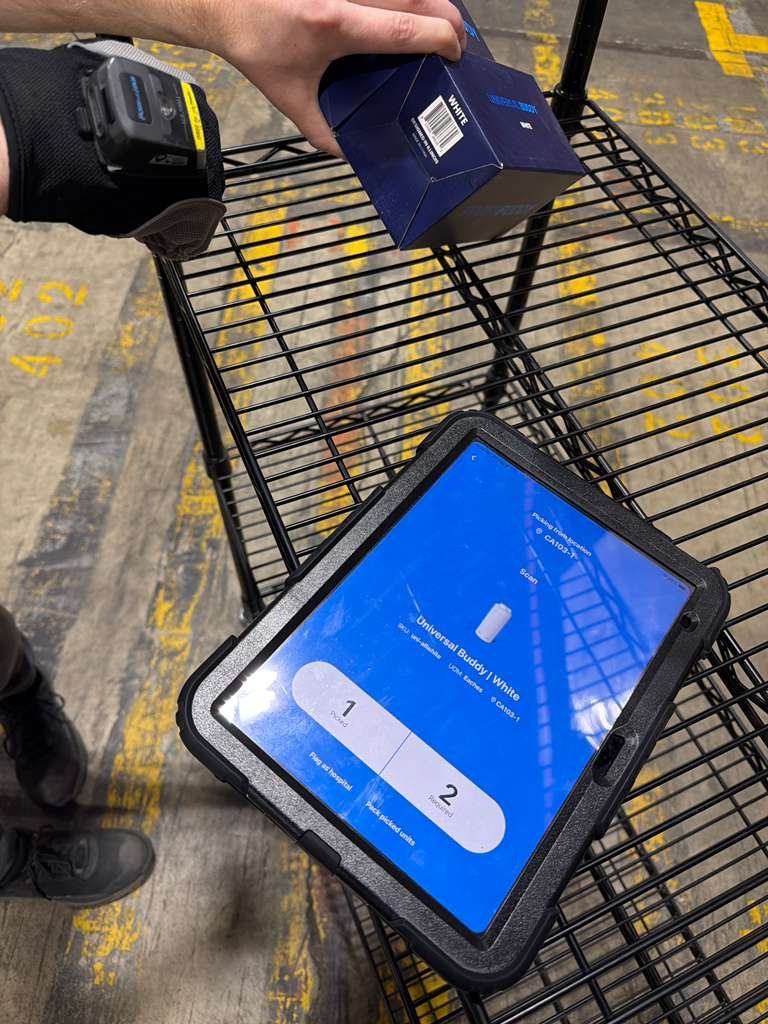
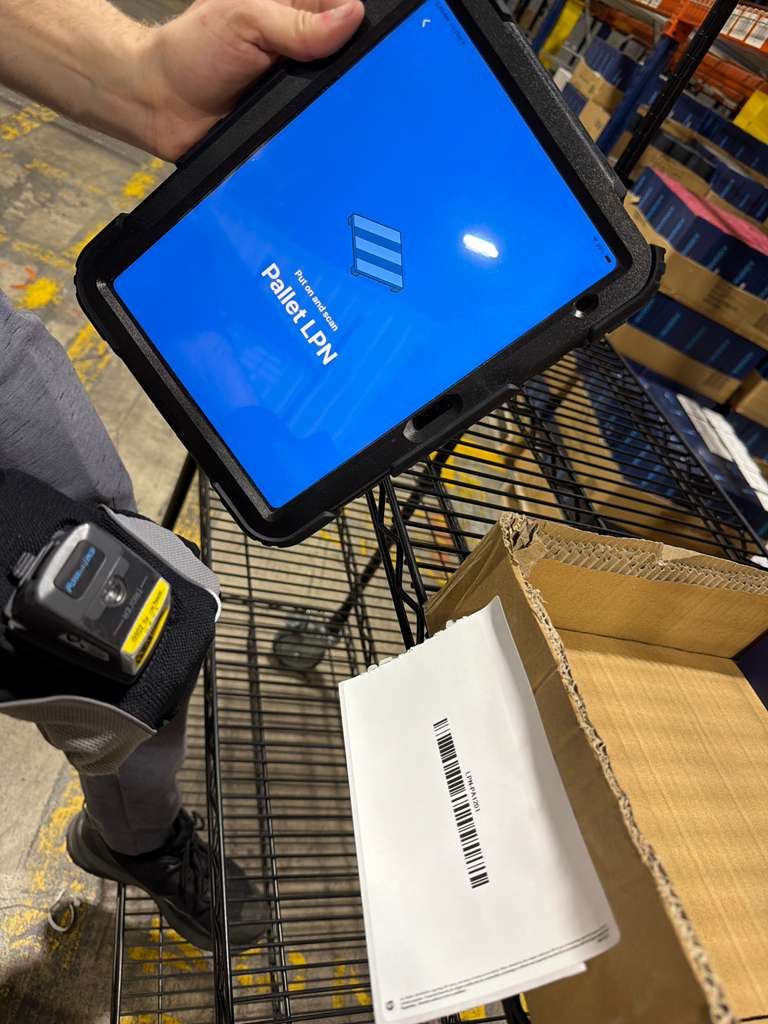
- After collecting the cans, a blue screen appears: "Put on and scan — Pallet LPN".
- Tap "Not required for this order".
- Next screen: "Pack, scan and place — Outer box LPN".
- Tap "Not required for this order" at the bottom.
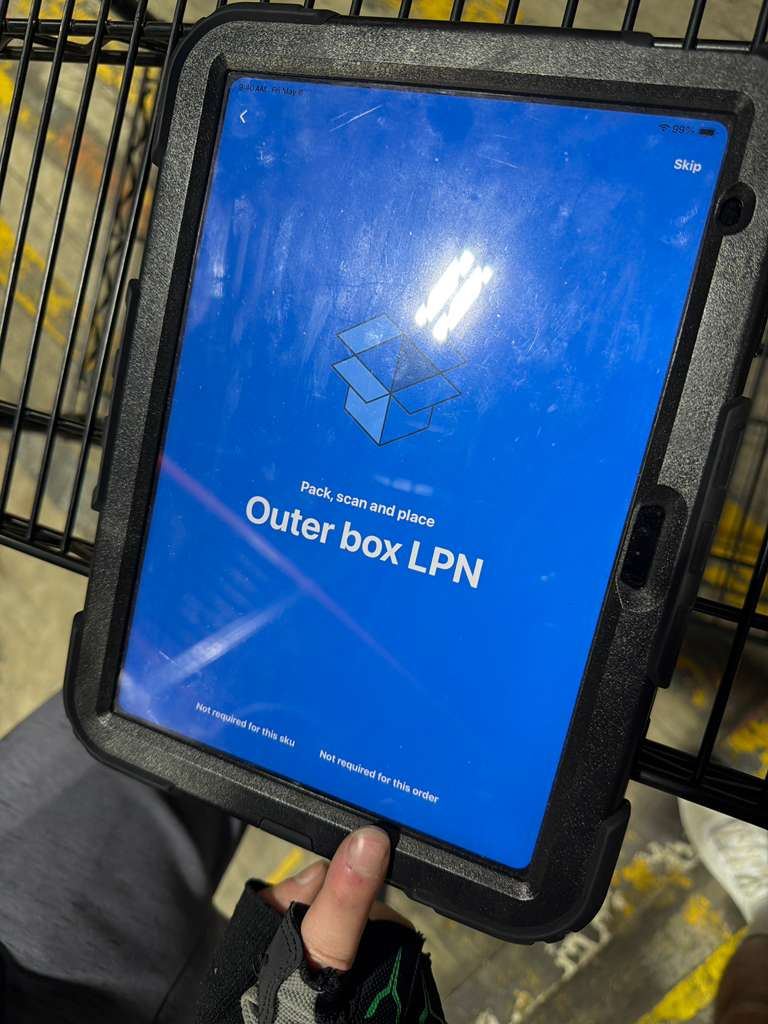
- If a "Set Pallet Dimensions" screen appears, tap "Not required for this order".
- This screen should not show again after pressing it once.
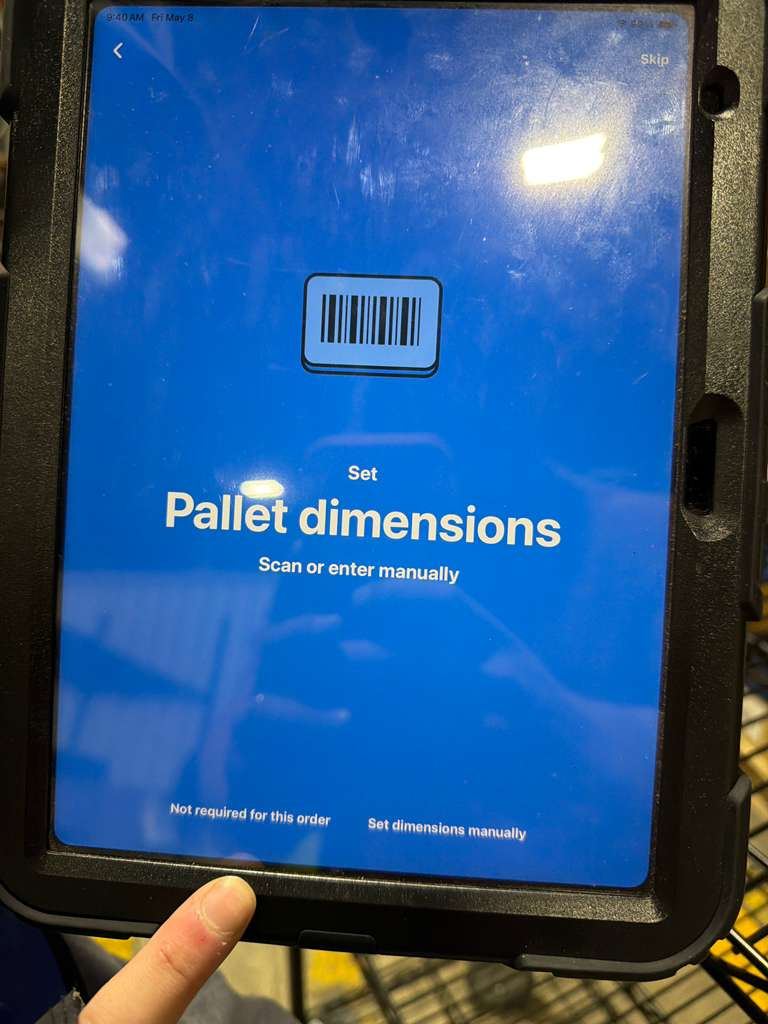
- The iPad returns to the batch list showing the remaining cans.
- Repeat Steps 9–17 for each remaining item until the full batch is complete.
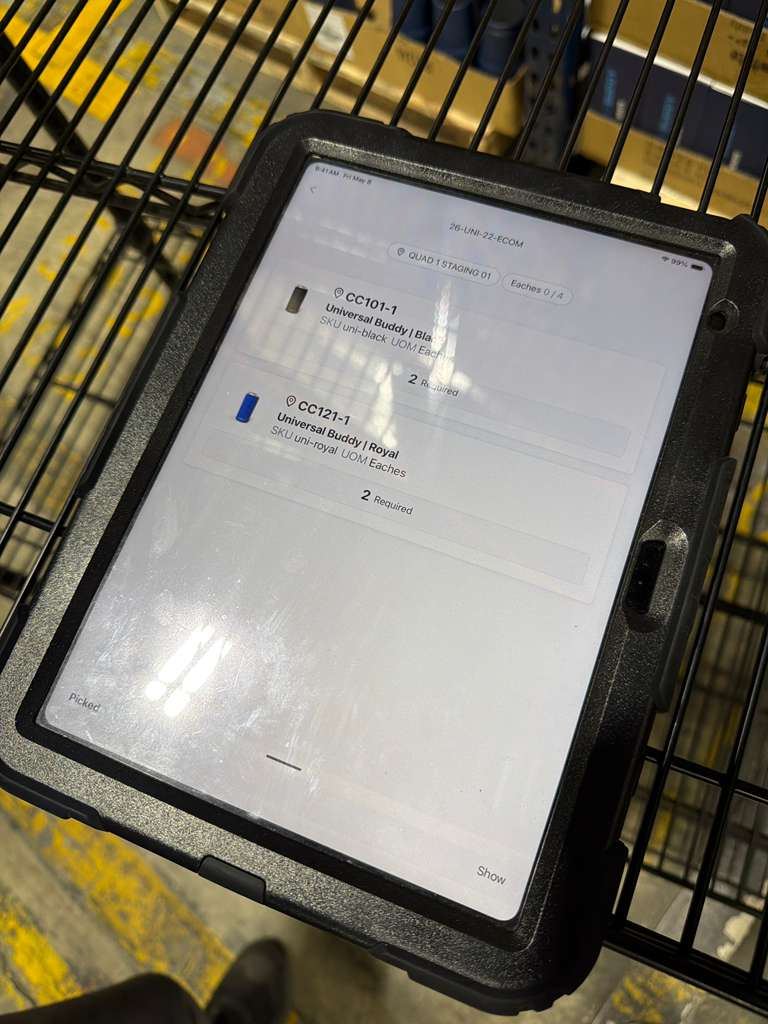
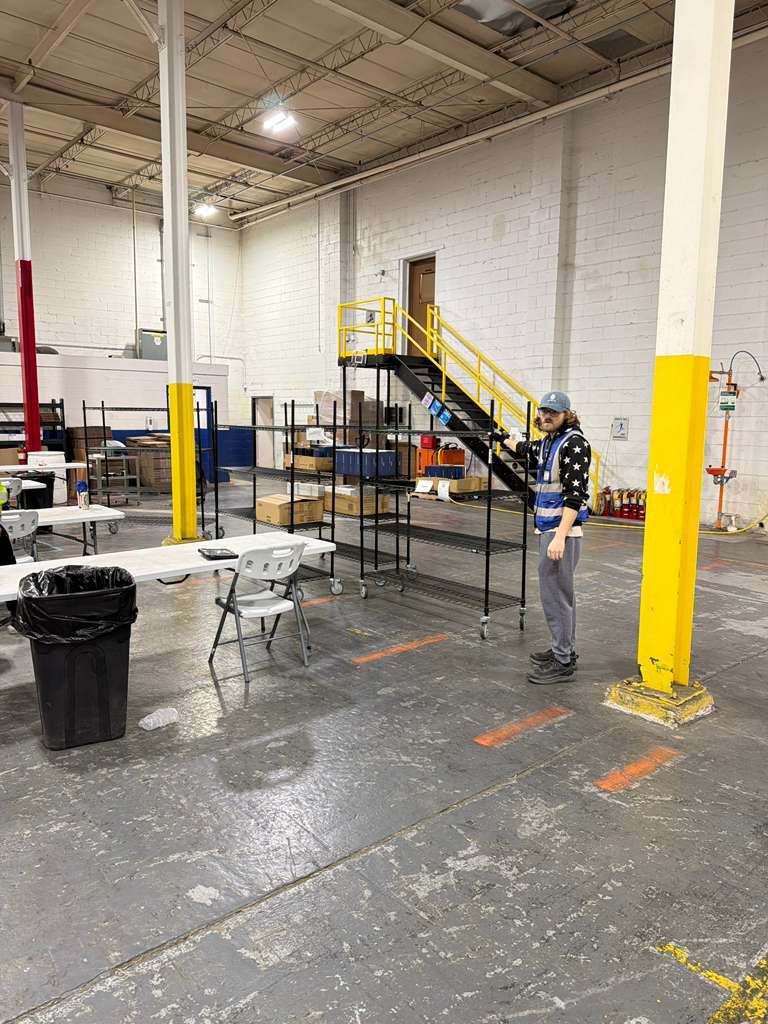
- Once all cans are picked and verified, wheel your cart to the staging area.
- Leave the cart there for the next stage of the process.
Picking — Problems & Exceptions
What to do when things do not go as planned.
- Double-check the location code on the iPad — confirm aisle and shelf level.
- Check adjacent locations — items are sometimes misplaced one slot over.
- If the shelf is empty: note the SKU and quantity needed. Do not skip it.
- Notify your supervisor and flag the shortage in ShipHero.
- Continue picking the rest of the batch — return to this item only if instructed.
- Pick everything available on the shelf.
- Note the SKU, how many were needed, and how many you actually picked.
- Do not scan more than what you physically have.
- Notify your supervisor — they will decide whether to hold the batch or ship short.
- Do not pick visibly damaged product — dented, cracked, scratched, or deformed.
- Set it aside — do not put it back on the shelf.
- Take a photo if possible and show your supervisor.
- Notify your supervisor to remove it from inventory.
- Treat it as a shortage and follow the Quantity Short steps above.
- Your progress is saved in ShipHero automatically — do not panic.
- Force-close the ShipHero app and reopen it.
- Log back in and navigate back to your batch.
- The app will show which items have already been scanned — continue from there.
- If the batch shows complete but you know it is not: notify your supervisor before moving the cart.
Unboxing
Select a product below to see its unboxing procedure.
Wiping
Pre-treatment spray selection and cleaning process.
- Look at the PRE-TREATMENT section at the bottom of the batch label.
- Find which box is checked — None, P2, or 606.
- If None is checked — skip the spray entirely, no pre-treatment needed.
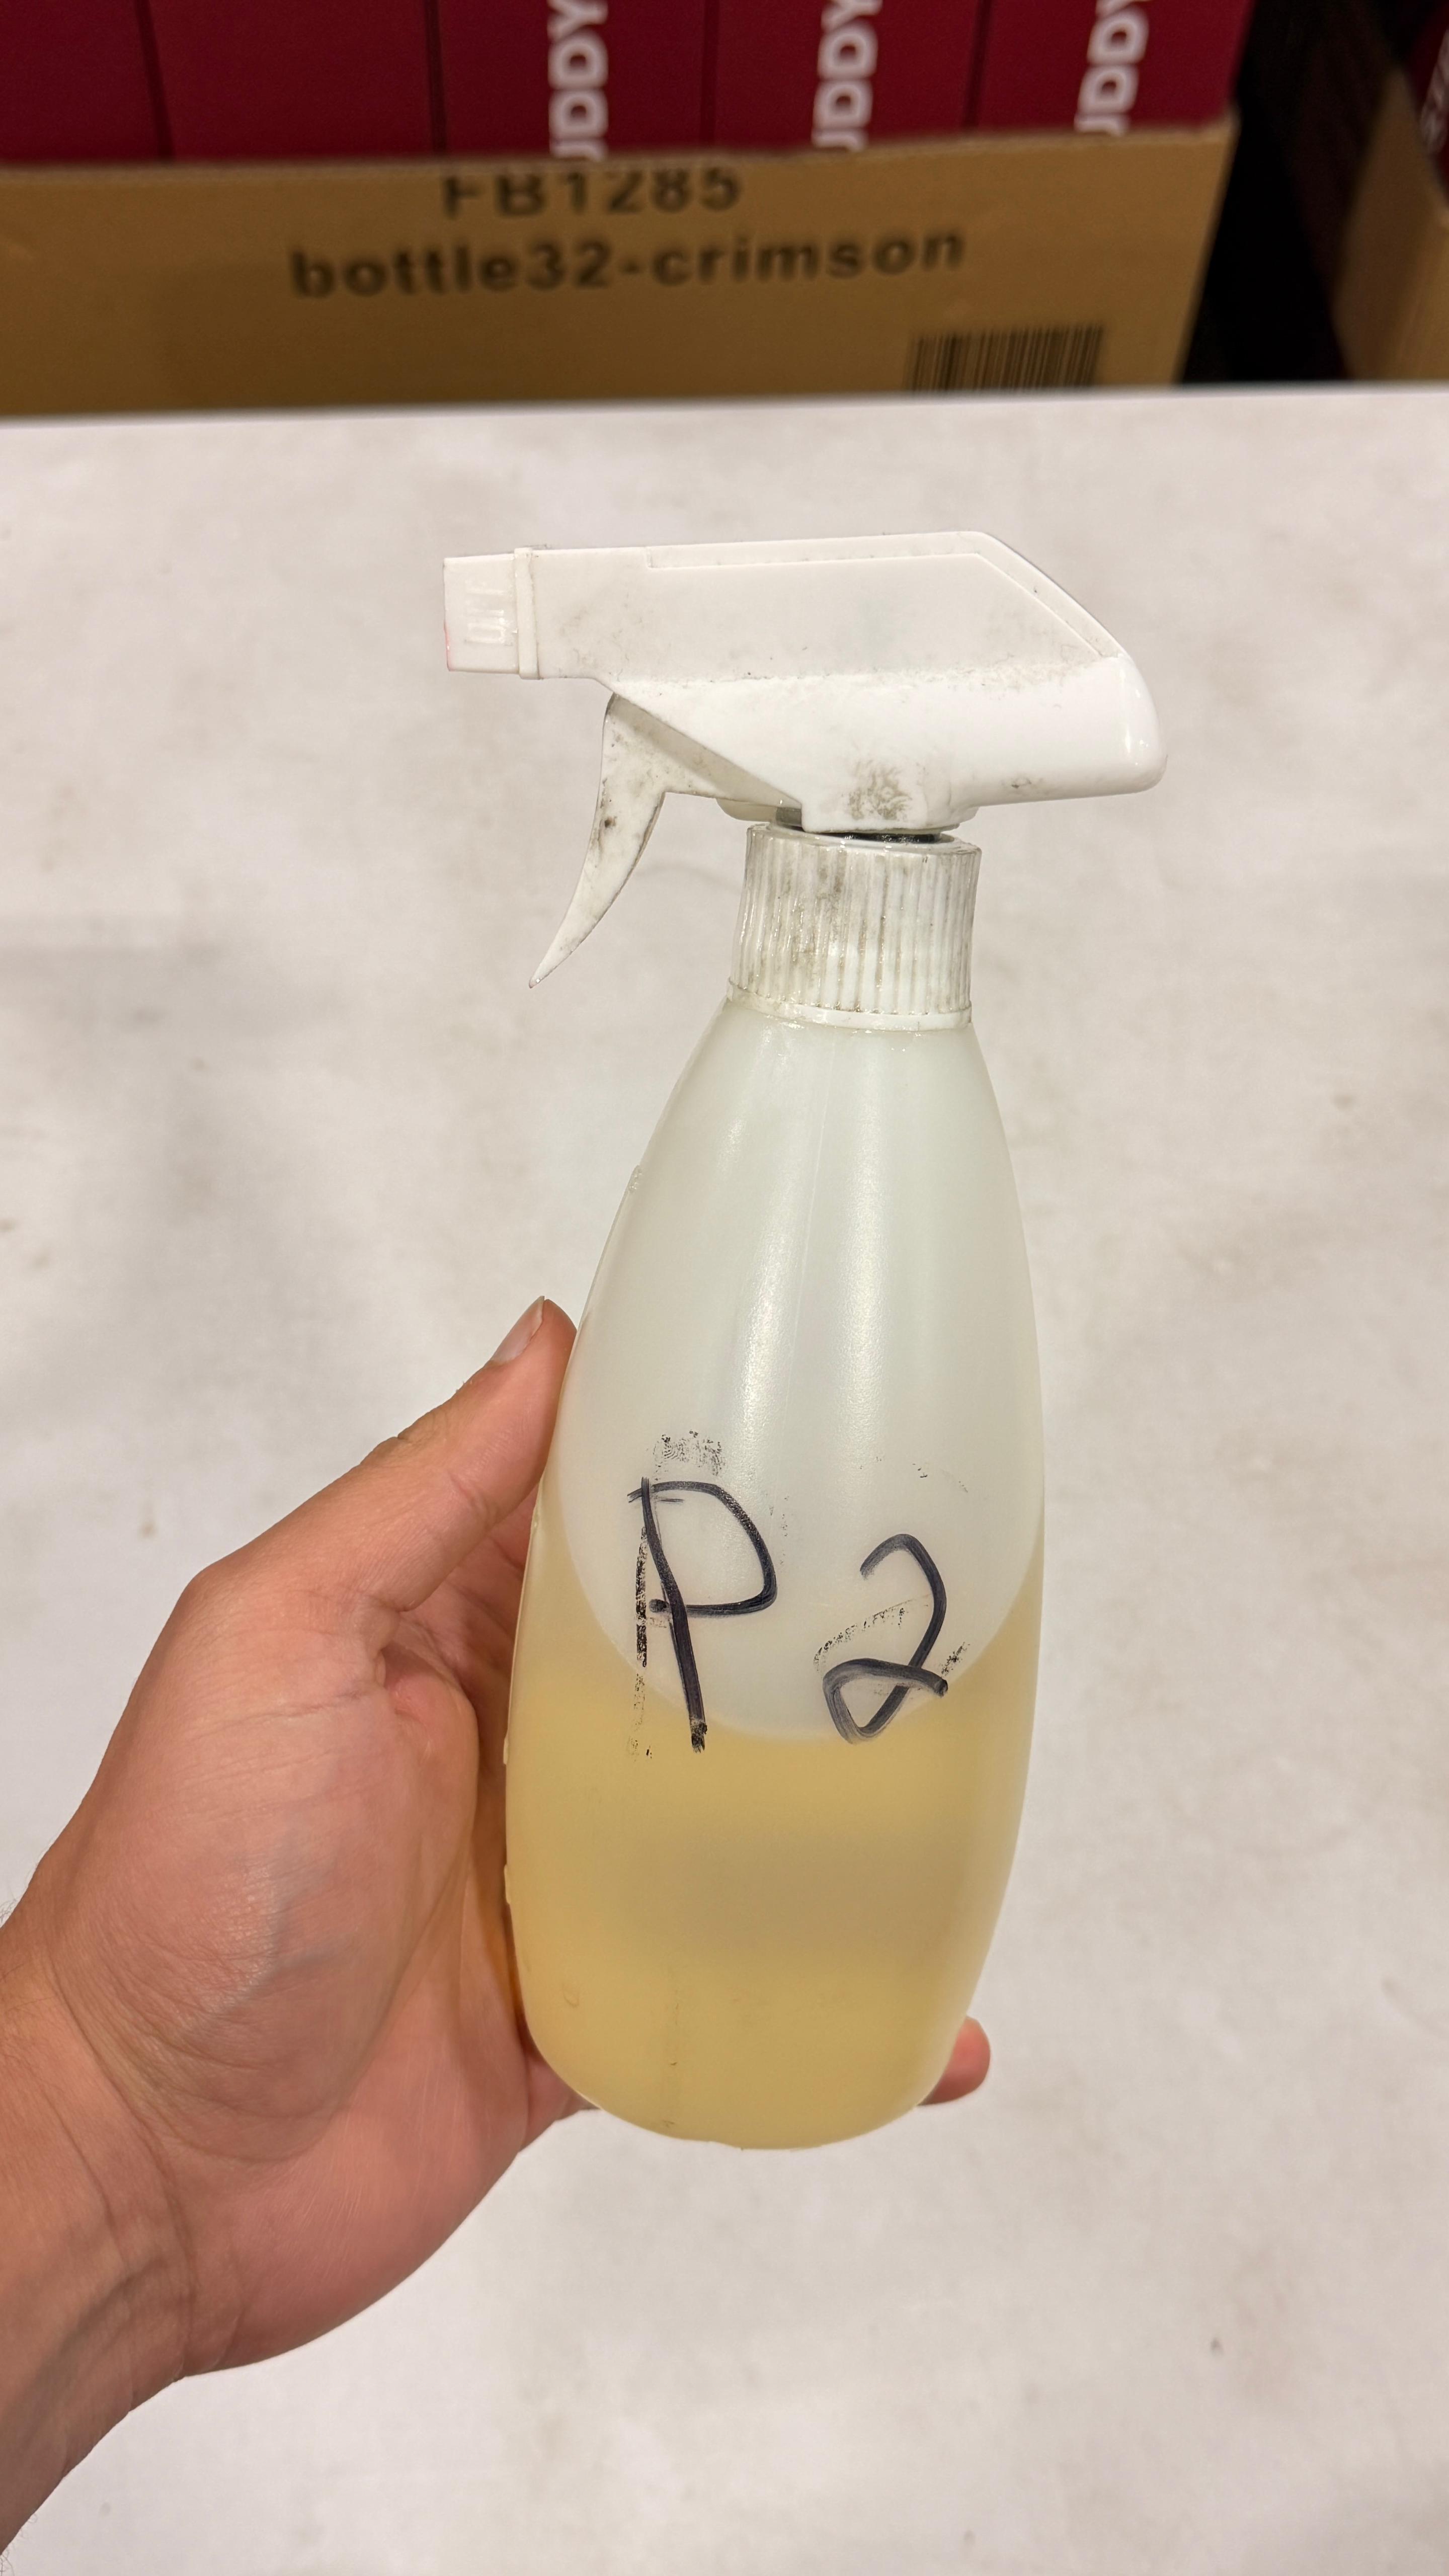
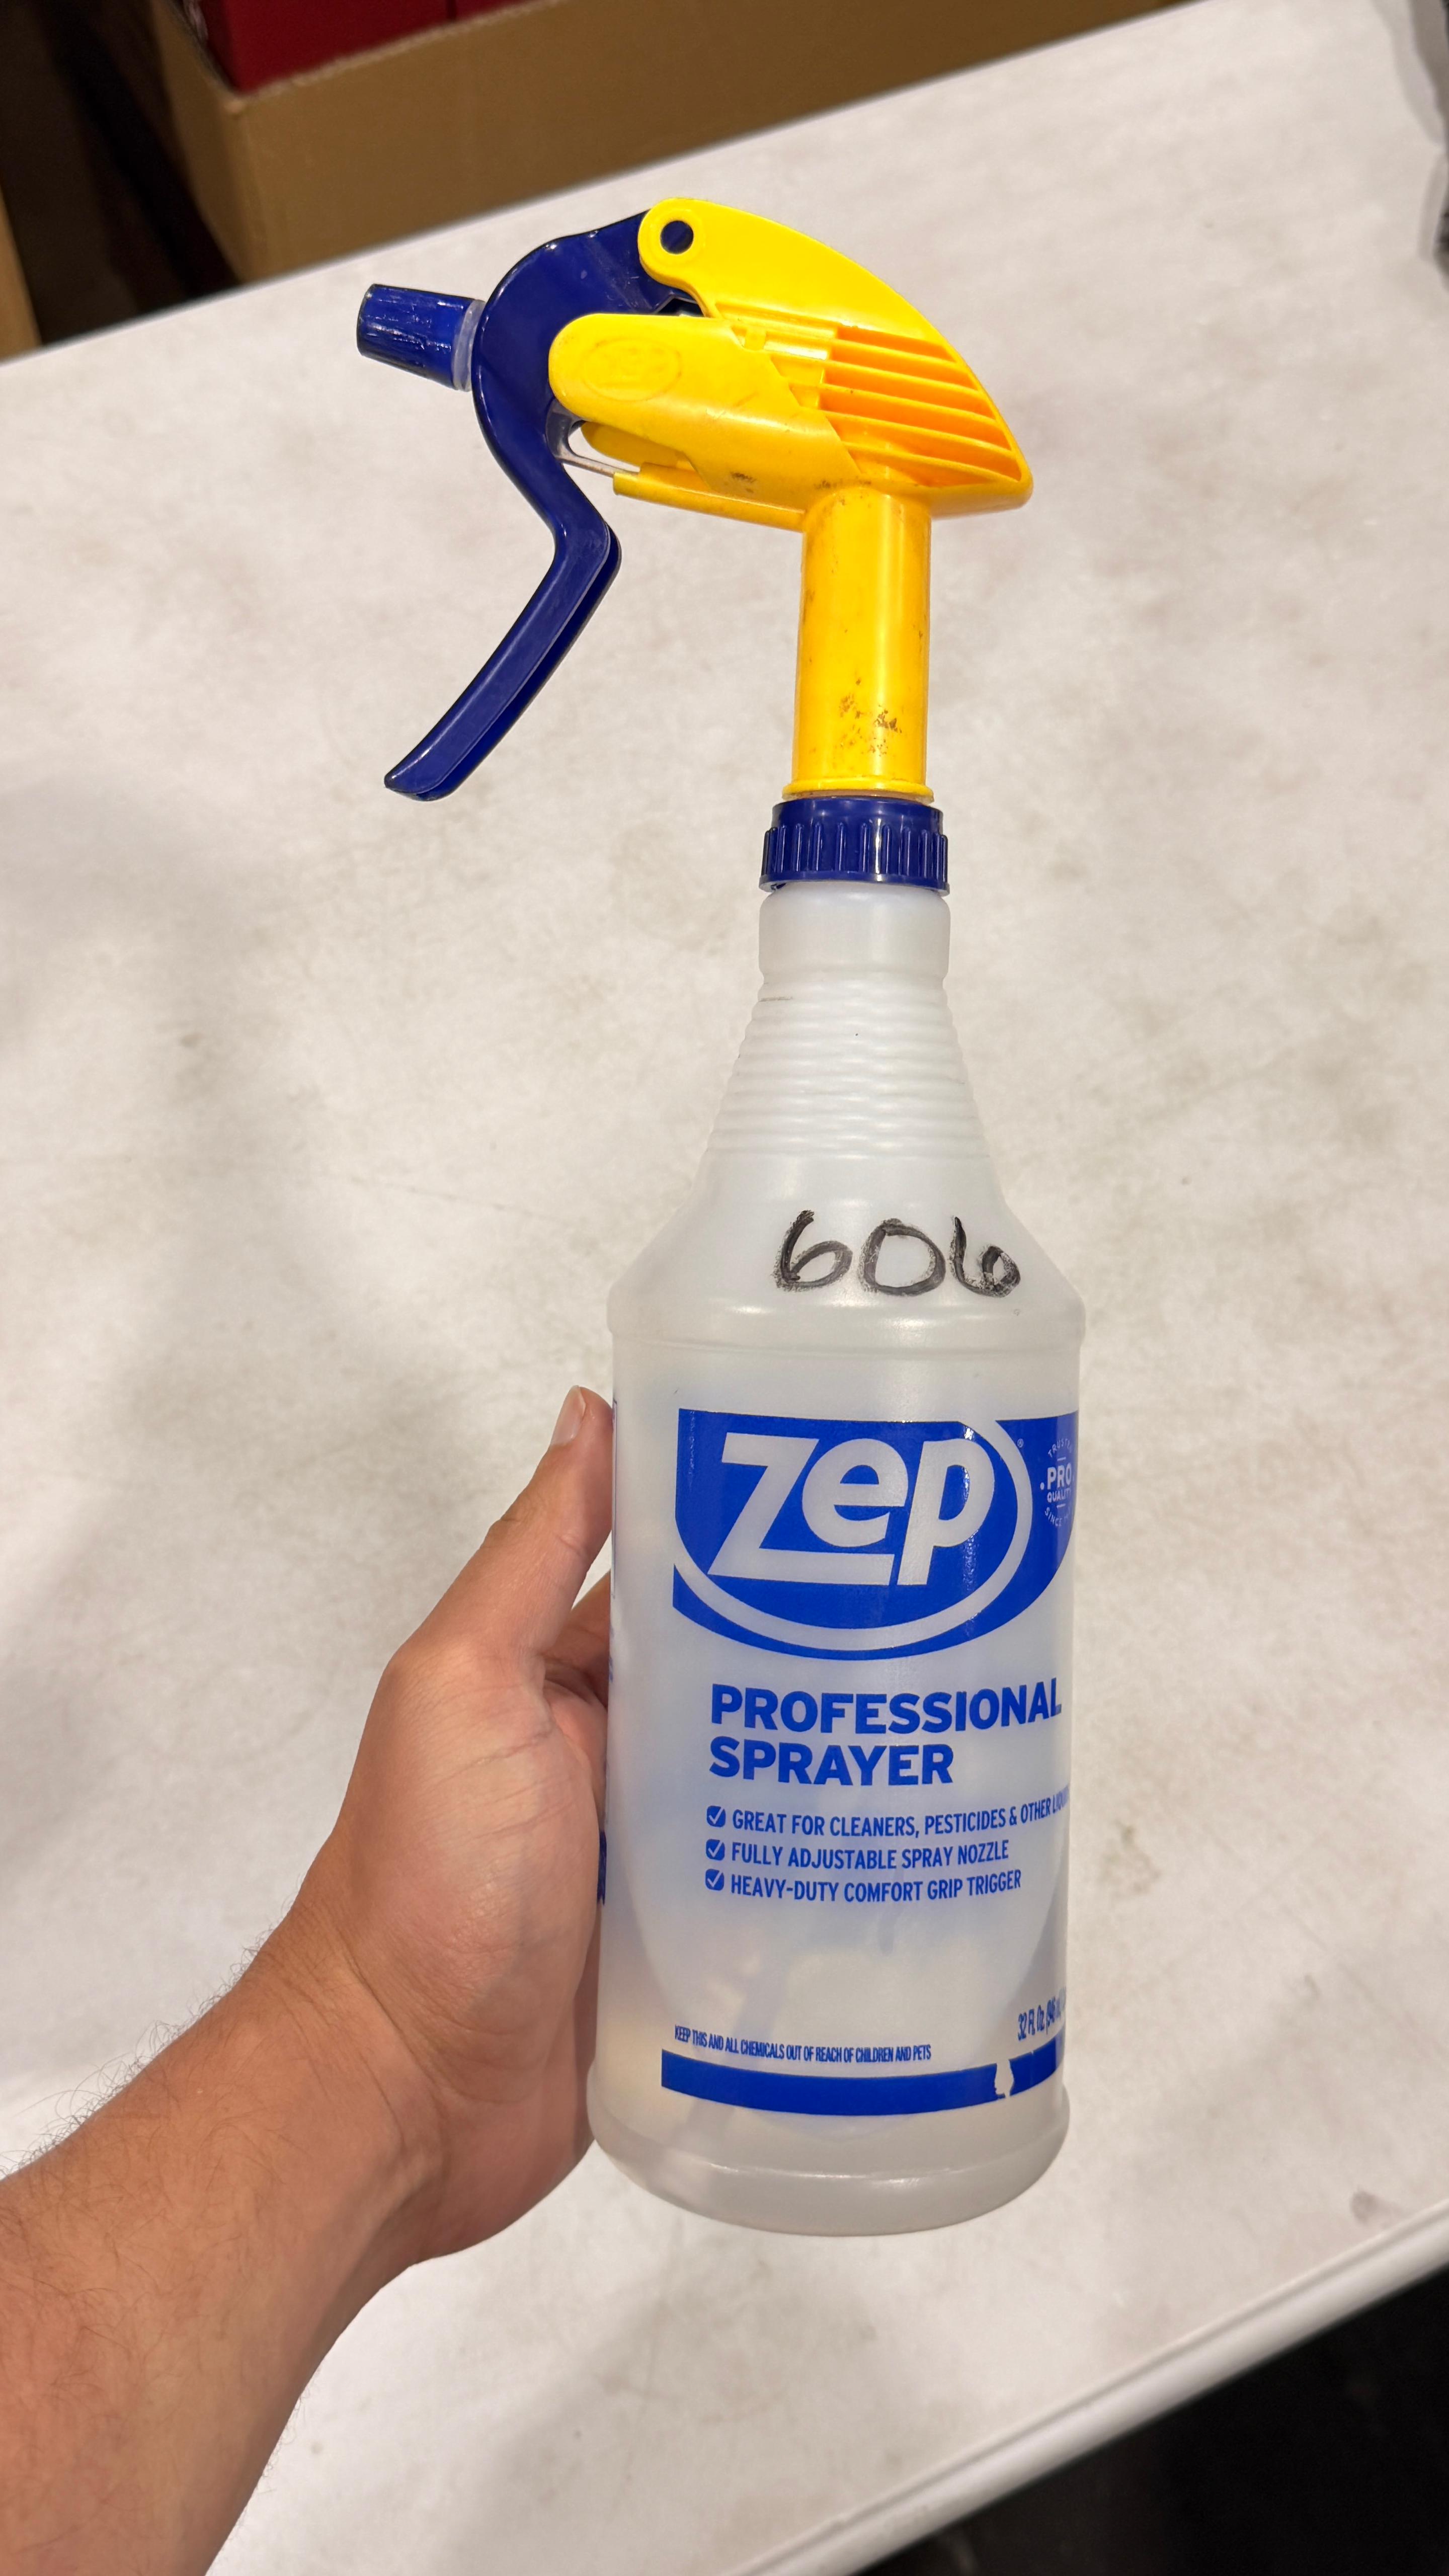
- If P2 is checked — grab the small white bottle with the yellowish liquid labeled P2.
- If 606 is checked — grab the Zep blue & yellow sprayer labeled 606.
- Never mix up the sprays — always double-check the label before spraying.
Put Away
Step-by-step process for adjusting inventory and putting extras back in their floor location.
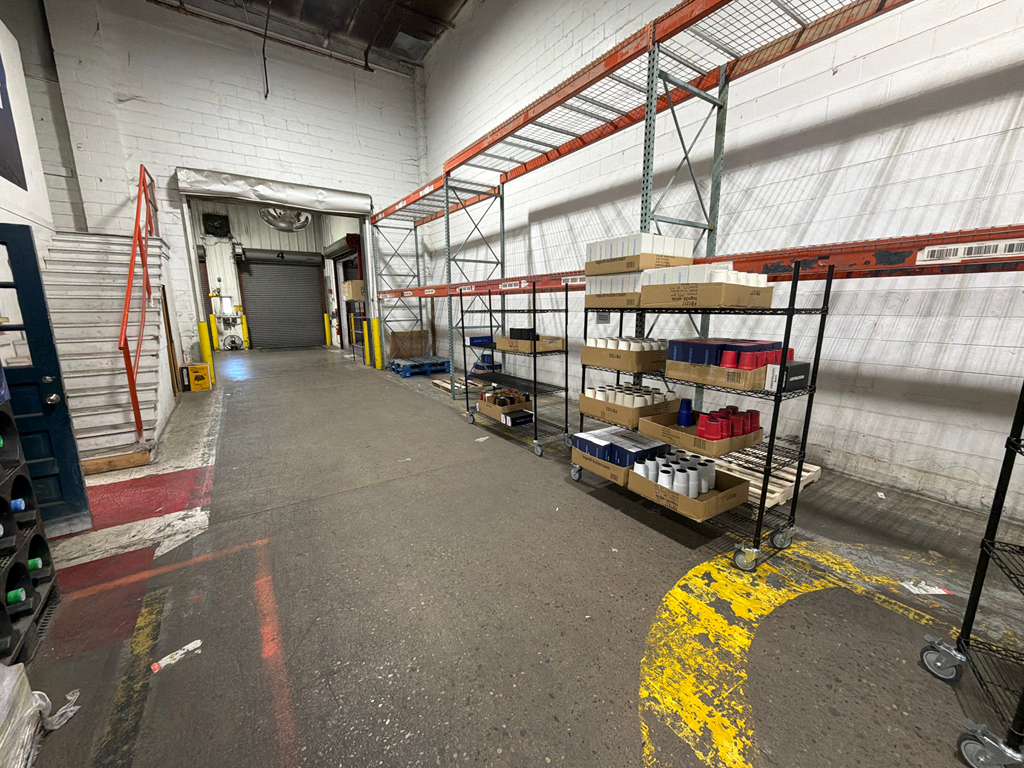
- Head to the printing back door area.
- Locate the S-carts — these are the carts used to transport extra cups back to their floor locations.
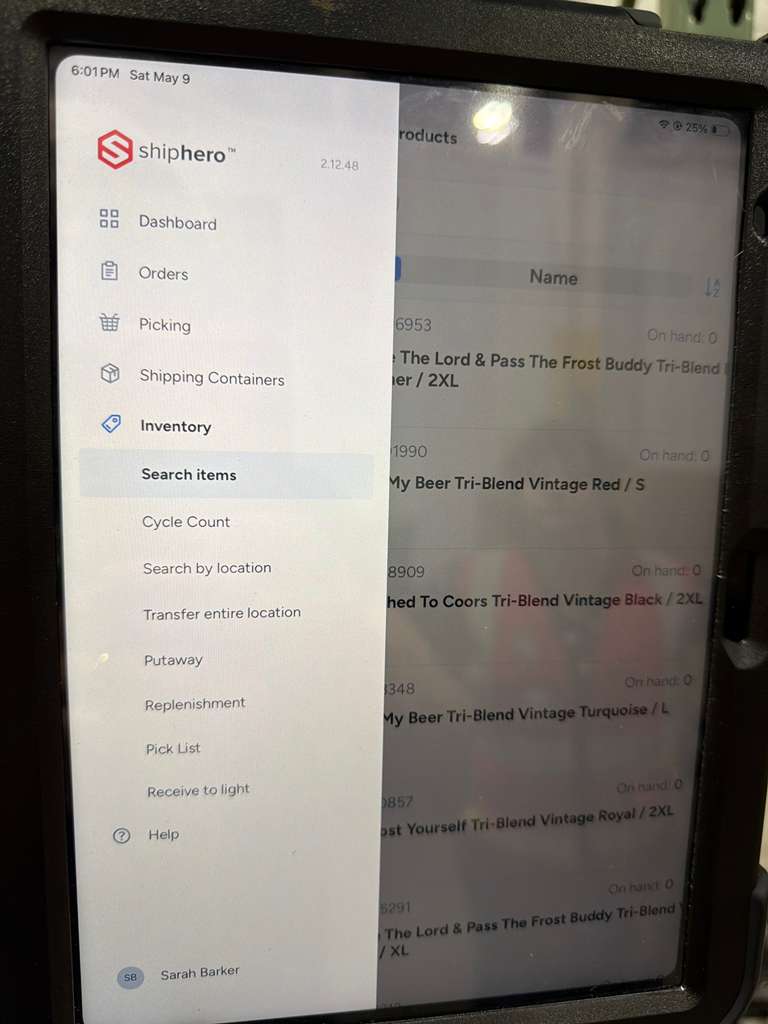
- Open the app and tap the 3 lines (≡) in the top-left to open the menu.
- Tap Inventory, then tap Search Item.
- The inventory search screen should now be open and ready to scan or search.
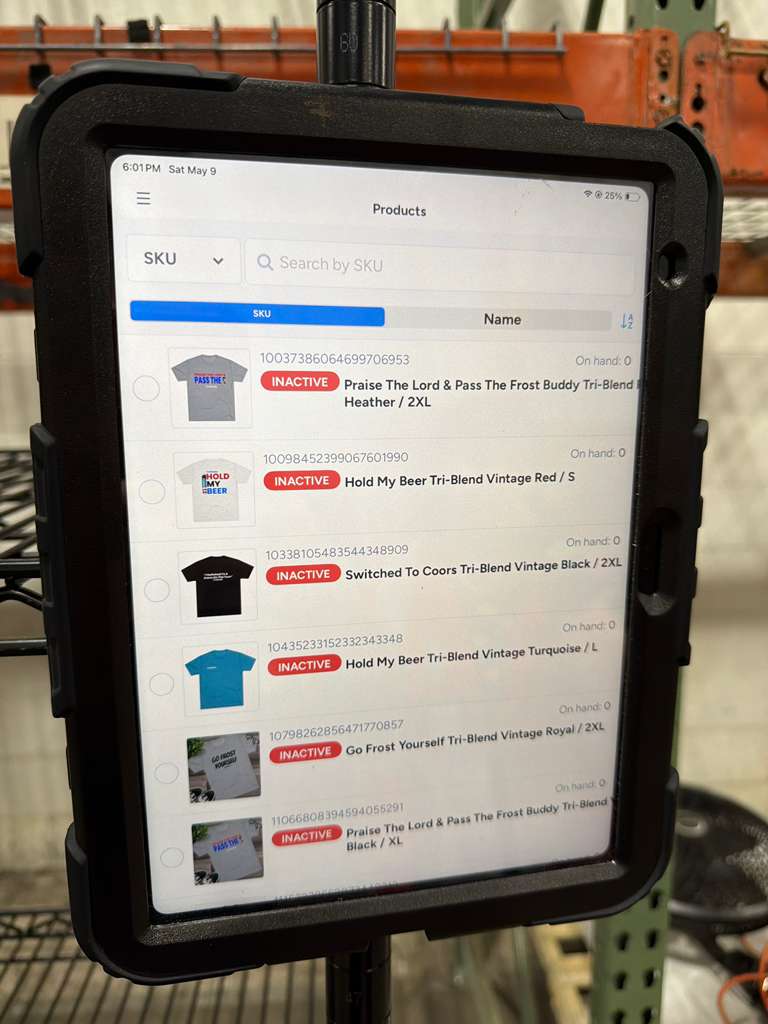
- Use the scanner to scan the barcode on the cup/item you're putting away.
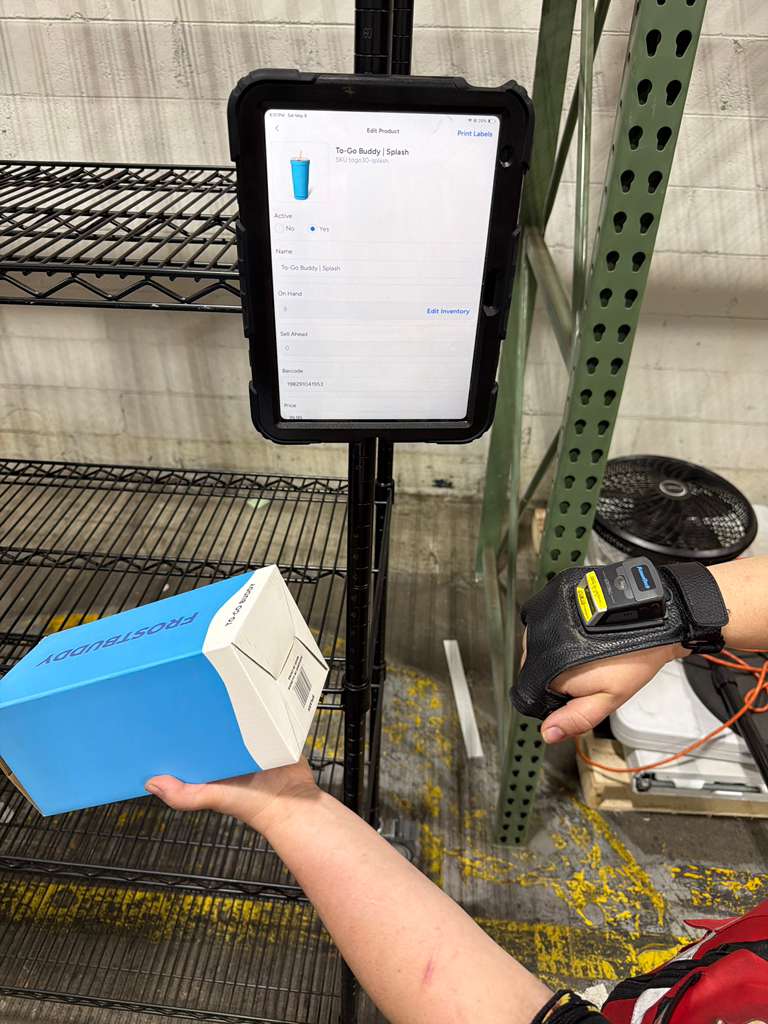
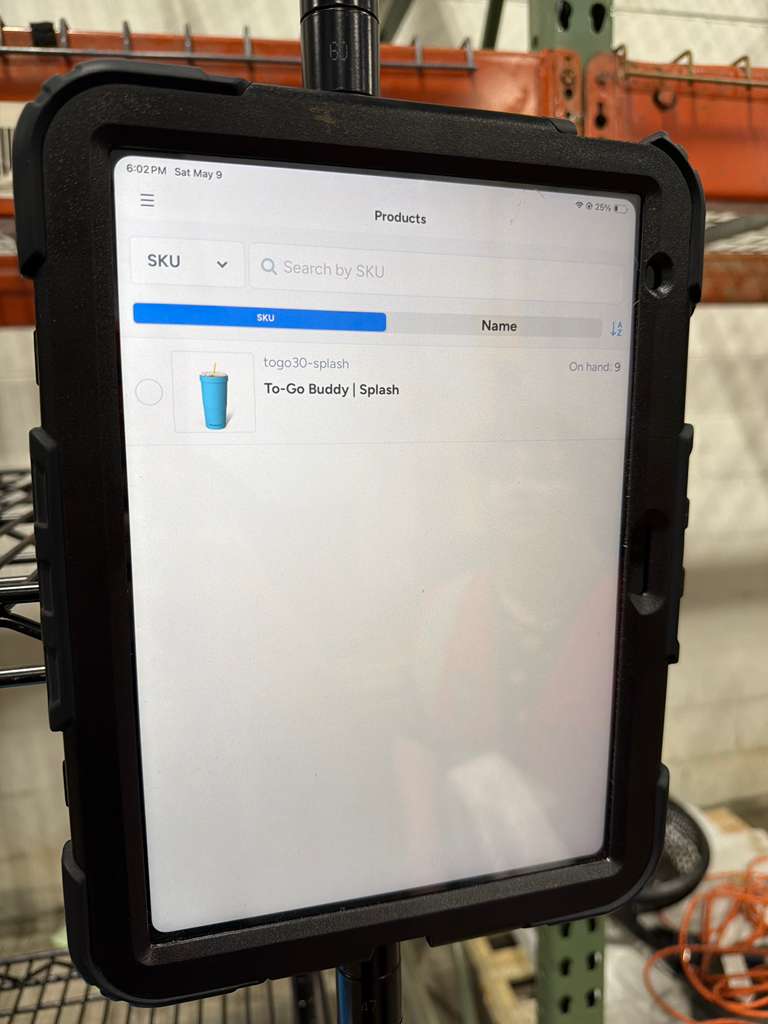
- The item will appear on screen — tap the correct one to select it.
- Make sure the name and SKU match what you're holding.
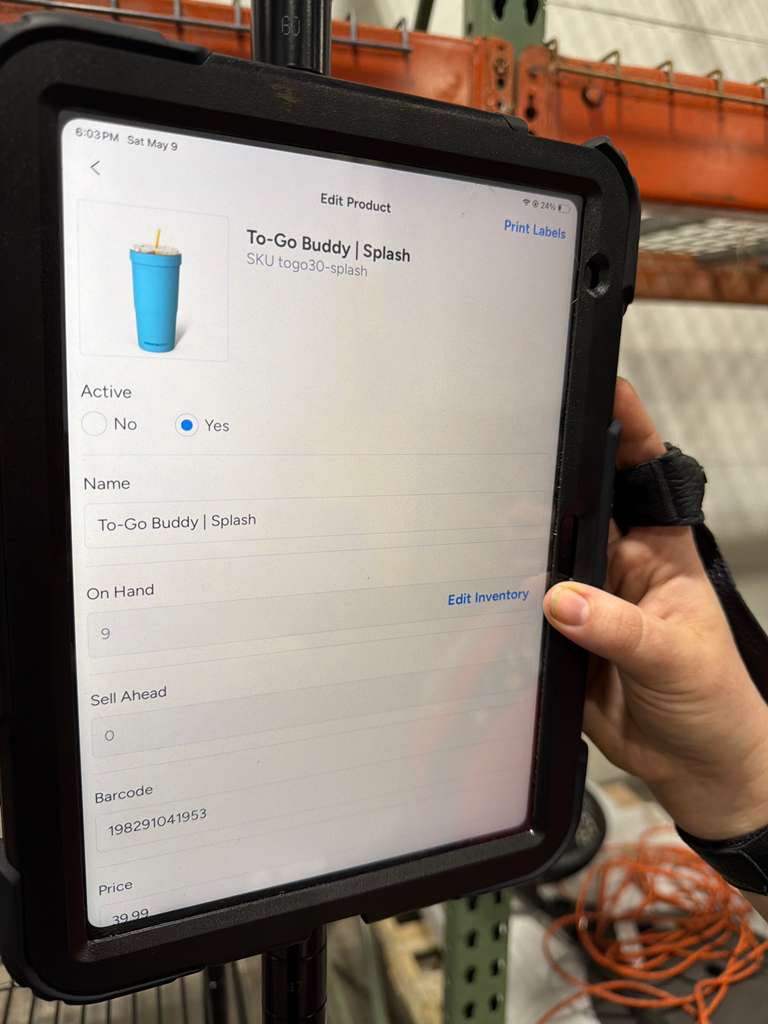
- Once the item is selected, tap Edit Inventory to open the adjustment screen.
- Look through the location list and find the floor location.
- Always look for the PS CODE — it starts with ps- (e.g. ps-xxx).
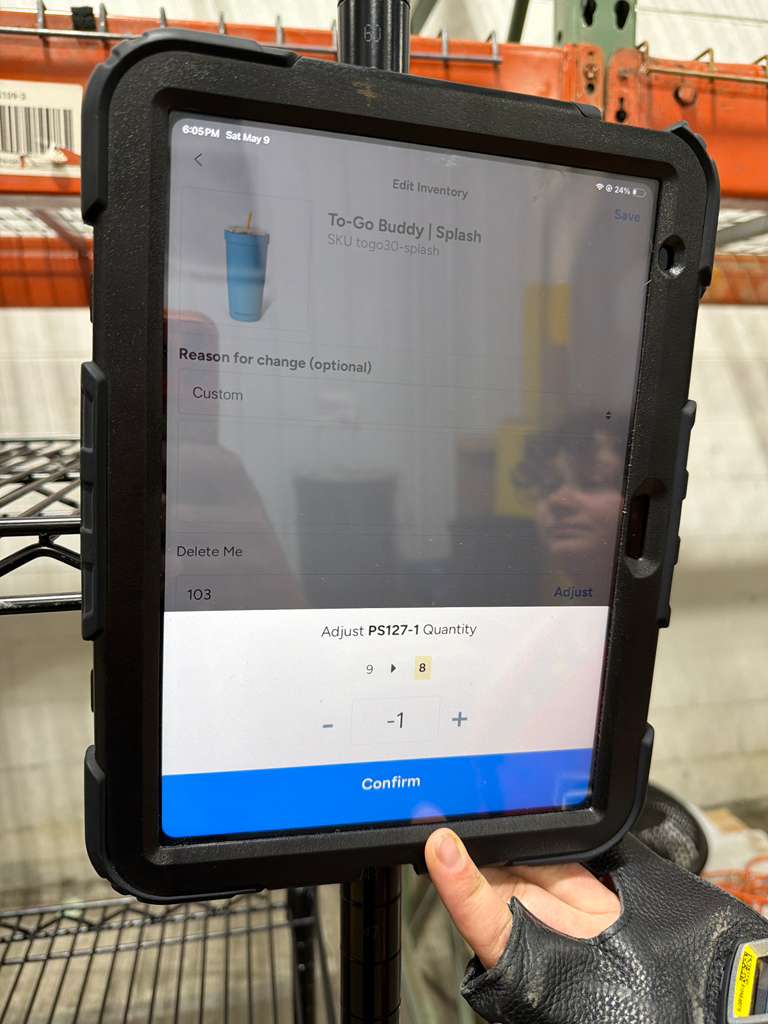
- Tap Adjust next to that location.
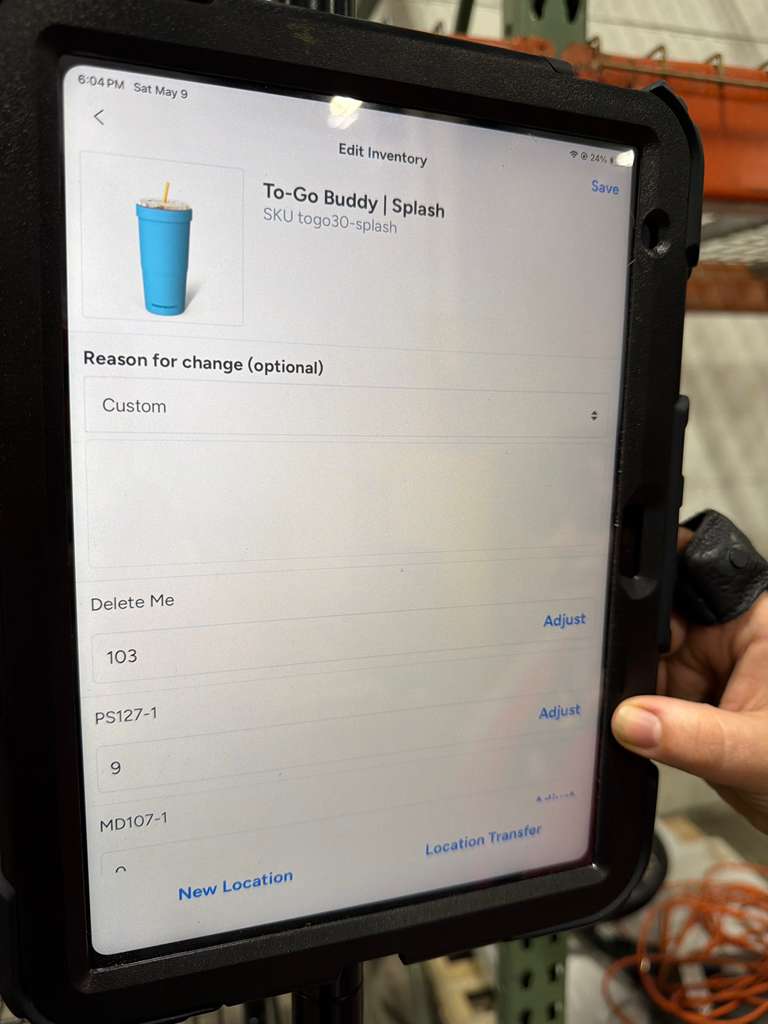
- Enter the number of extra cups you're putting away — add if returning stock, subtract if removing.
- Double-check the number, then press Confirm.
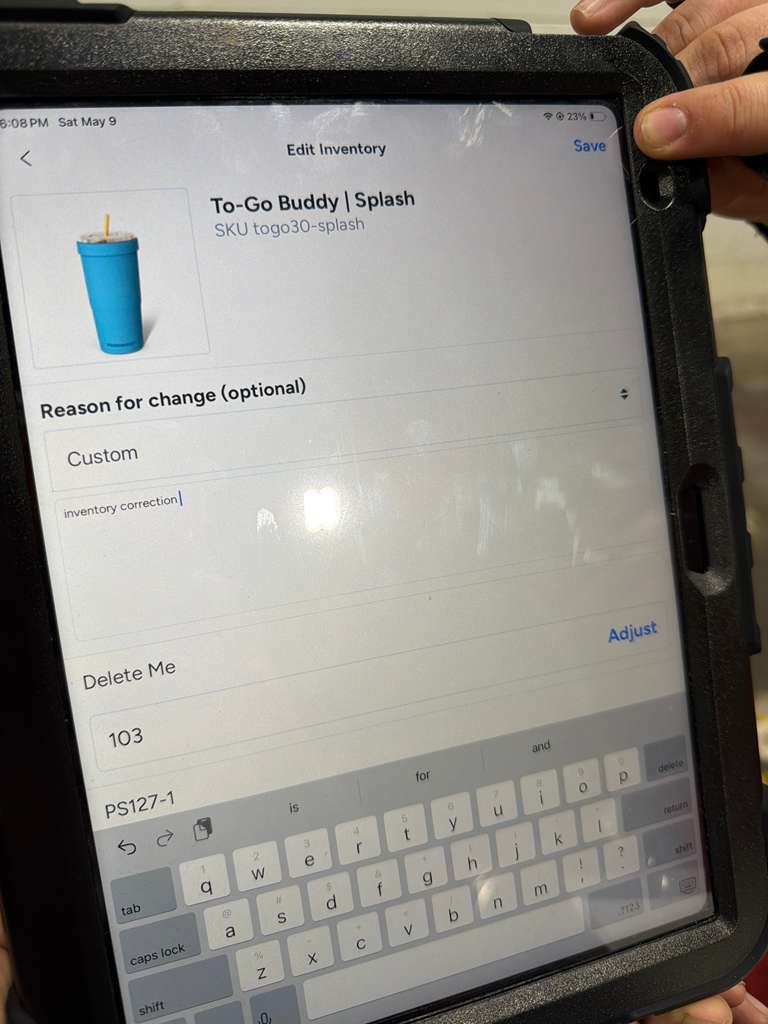
- In the note field, type: inventory correction
- Press SAVE to finalize the adjustment.
- Place the cups back in their box.
- Navigate back to the cup selection page to continue with the next item.
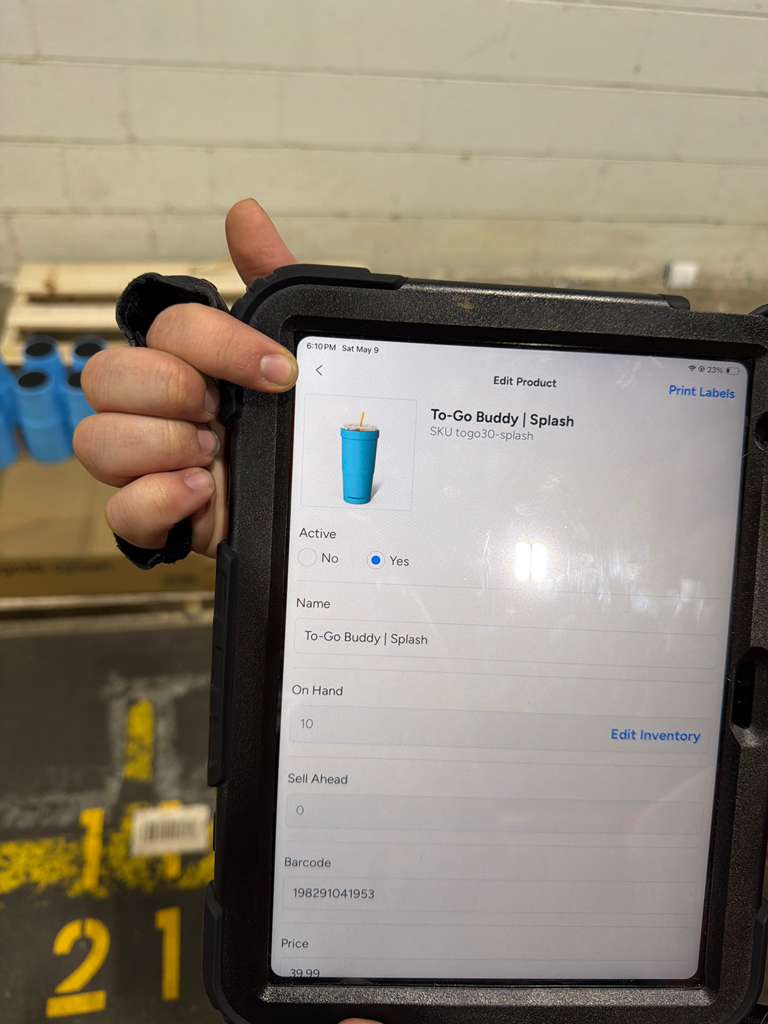
- Make sure you are on the cup selection or inventory screen first.
- Then scan the next cup to start the process again.
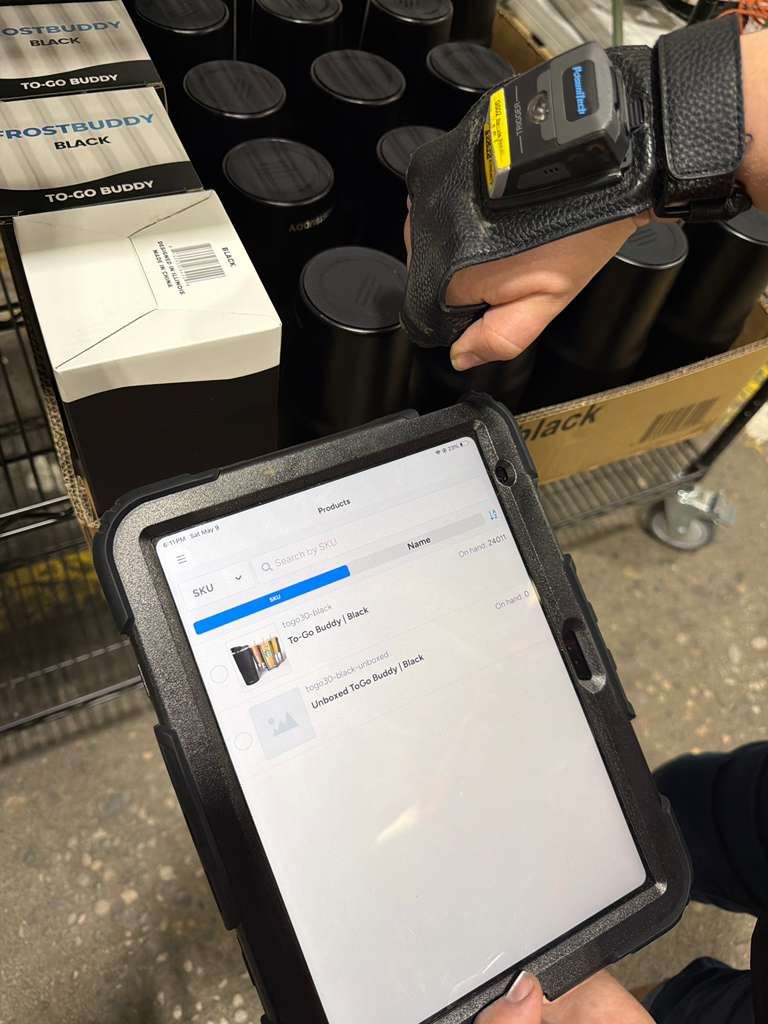
- Keep repeating Steps 4–11 for each cup type on the cart.
- Once the cart is empty and all inventory has been adjusted, the put-away is complete ✅
Machines
Tap your machine to see its How to Print, Troubleshooting, Shutdown and more.
🦁 BEAST
PeriQ360 printer — pick what you need below.
REV
PCS 6 Software printer — pick what you need below.
HDL
PCS 6 Software printer — pick what you need below.
QUAD
QUAD printers (Quad 1 & Quad 2) — pick what you need below.
🔦 LASER
Laser machine — pick what you need below.
DXF Detail Troubleshooting Guide
🔦 LASER — for detailed logos or tiny file details. Tap the Machines tab above to go back.
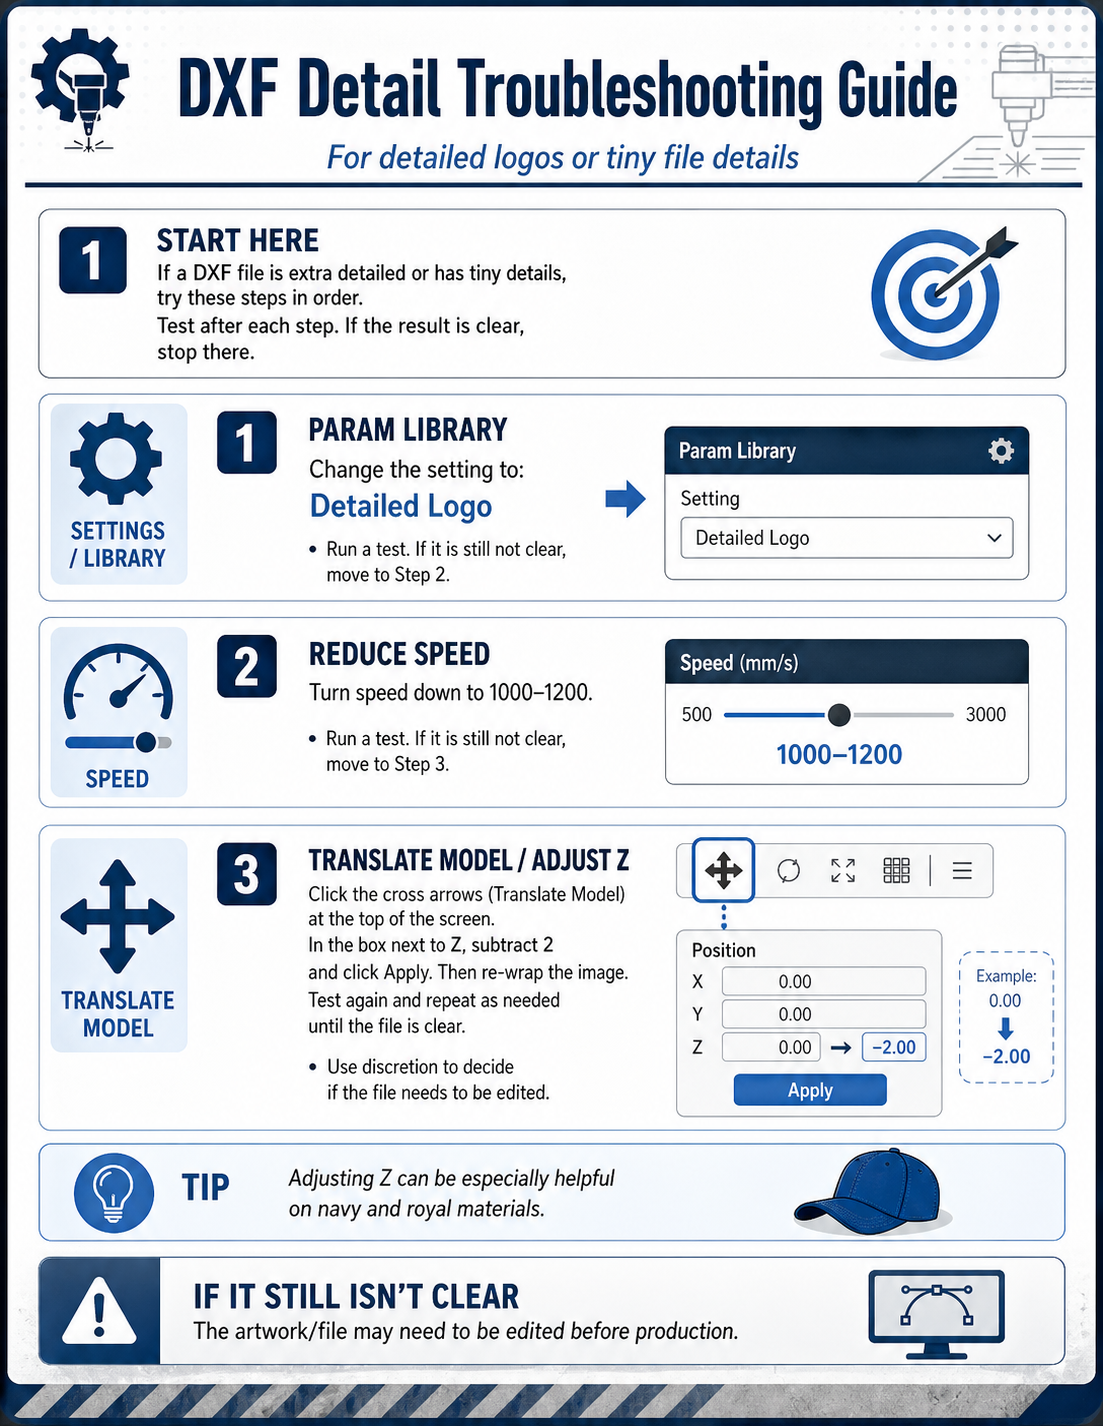
- Open the Param Library.
- Change the setting to Detailed Logo.
- Run a test. If it's still not clear, move to Step 2.
- Turn the speed down to 1000–1200 mm/s.
- Run a test. If it's still not clear, move to Step 3.
- Click the cross arrows (Translate Model) at the top of the screen.
- In the box next to Z, subtract 2 (example: 0.00 → −2.00) and click Apply.
- Re-wrap the image.
- Test again and repeat as needed until the file is clear.
- Use discretion to decide if the file needs to be edited instead.
How to Print
Full start-to-finish print workflow for each machine. Pick your printer below.
- Power on the REV machine and wait for it to fully initialize.
- Open PCS 6 software on the connected PC. Wait for the status bar at the top to show Ready.
- Check the ink temperature bar across the top — all channels should be at or near target temp. Black text = normal. Red text = 5°C over, heating is off — wait for it to stabilize.
- Check NP (Negative Pressure) is within the target range per your REV service manual.
- Check the Encoder icon — click it to confirm the stability difference is 10 or less.
- Load a bottle/cup onto the machine for the nozzle test.
- Go to Operation tab → click the gear icon next to Check Nozzle.
- Set the Y Offset (distance from print origin to ruler scale "0"), X Offset (rotational start position), and Diameter of the bottle.
- Click Check Nozzle. A test pattern prints — every nozzle fires a short line.
- Inspect the pattern. All lines solid = ready to print. Any missing lines = jammed nozzles, run Auto Clean before continuing.
The Bottle Profile stores all axis origins, speed, UV, and print settings for a product type. Always confirm the right one is active before loading a job.
- In the top-right of PCS, check the Default Bottle Profile dropdown — confirm it matches the product you're printing.
- If you need a different profile, click the dropdown and select the correct one. Or click the gear icon to open Edit Bottle Profile and create/copy one.
- With the profile selected, check the Setting tab on the right:
- X Axis — confirm Angle Offset and Y Offset are set for this product.
- Z Axis — confirm Print Position and Head-Media Distance (recommended 1.4mm).
- Print — confirm Print Order (e.g. [KCMY]), Drop Size, and Quality Level.
- UV Lamp — confirm Curing in Printing is checked for KCMY layers.
Speed Calibration
- Go to Calibration → 1 Step → Speed.
- Click Print. The bottle rotates while the carriage moves — no ink jets. PCS calculates the correct speed automatically.
- If auto-speed fails with "Y axis feedback error" → run Manual Speed Calibration: print the test, measure the gap between the solid and dotted line, enter it in Distance → Apply. Repeat until aligned.
Step Calibration
- Go to Calibration → 1 Step → Step.
- Click Print. Find the group (–10 to +10) where the two columns of short lines are best aligned.
- Enter that number in the Value field → Apply. Status changes to Calibrated.
Vertical Calibration
- Go to Calibration → 2 Vertical.
- Print the test chart. Find the best-aligned group per head (–8 to +8).
- Enter each group number → Apply → Yes. Numbers turn green when saved.
Horizontal Calibration
- Go to Calibration → 3 Horizontal. Set Print Order, Drop Size, and Over Print Value to match your job settings.
- Print the test chart. For each color channel, find the group where two white lines appear or dots overlap.
- Enter the group number per channel → Apply → Yes.
- Go to the Job List tab → click the [+] icon.
- Locate your .prt file (accepted: .prt · .tif · .vdf · .job).
- Set the number of copies.
- Click Open — the job appears in the Job List.
- Check the status icon to the right of the job:
- Calibrated + no red flags = ready to print.
- Uncalibrated in red = click it and run calibrations before printing.
- ? icon = color mismatch — go to Bottle Profile → Settings → Print → check Ignore Job Color Mismatch.
- Load the bottle/cup onto the REV spin tool module. Make sure it seats firmly.
- Go to Operation → Setting and confirm the Z Axis print position is set. Click the Z-move button to move the spin tool to print position.
- Confirm the Y Axis Offset is correct — the carriage should be positioned so the top-left nozzle is at your intended print origin.
- Select the job in the Job List and click the Print button (or press Ctrl+P).
- Watch the first print carefully. Check:
- Print starts at the right X-axis position on the bottle.
- Colors are overlapping correctly (no color fringing).
- No banding or missing lines.
- If any issue appears on the first print — Abort and refer to the Troubleshoot tab before continuing.
- ☐ Position: Image is centered on the product — not shifted left/right or up/down.
- ☐ All colors present: No missing color channels (check all areas of the design).
- ☐ No banding: Solid fills look even — no horizontal streaks or faded lines.
- ☐ Color accuracy: Compare to the proof or approved sample. If a Pantone is required, check with the Pantone swatchbook.
- ☐ Cure check: Lightly scratch the surface with a fingernail at 45° — ink should not flake or smear.
- ☐ Wrap / seam: Image meets cleanly at the wrap seam — no gap, overlap, or white stripe.
- Watch the print progress bar in the status pane and the remaining time readout.
- Periodically check for banding — if banding appears, abort, run Auto Clean, check nozzles, then resume.
- Check ink temperatures — if any channel turns red, heating has shut off. Investigate before continuing a long run.
- Check Encoder stability if prints start shifting mid-run.
- When the run finishes, the job status icon turns green.
- When all jobs are done, go to Operation → Printer Power → Maintain Head & Power Off.
- This automatically purges ink, wipes the heads, and caps them before shutting down — always use this instead of just turning off the machine.
- Save your PCS settings: go to Information tab → click the Save icon (or Ctrl+S).
- If the machine will be idle for 3+ days: purge white ink from the heads and replace with flushing fluid to prevent clogging.
- Power on the HDL machine. Wait for it to fully initialize.
- Open PCS 6 on the connected PC — wait for status bar to show Ready.
- Check the ink temperature bar — all channels should be near target temp (black text = normal, red = over by 5°C and heating is off).
- Check NP is in the correct range per your HDL service manual.
- Check the UV lamp temps — both left and right lamps shown in Peripheral Status bar.
- Click the Encoder icon and confirm the Difference is 10 or less.
- Load a test bottle/cup onto the HDL spin module.
- Go to Operation → gear icon next to Check Nozzle.
- Set Y Offset, X Offset, and Diameter for the loaded product.
- Click Check Nozzle — inspect the test chart for missing lines.
- All lines solid = good to go. Missing lines = run Auto Clean first, then re-check.
- Check the Default Bottle Profile dropdown in the top-right of PCS — make sure it matches your product.
- Review the Setting tab on the right side:
- Z Axis — Head-Media Distance set to 1.4mm (recommended). Click the Z-move button to send the module to print position.
- Y Axis Offset — distance from print origin to ruler scale "0".
- Print Order — confirm it matches your job's color channels. Primer (PP) is always first: e.g. [PP+WW+CK+MY]+[VV].
- UV Lamp — Curing in Printing checked for KCMY. Curing after Printing for Varnish only.
Speed Cal → Step Cal → Vertical Cal → Horizontal Cal
- Speed: Calibration → 1 Step → Speed → Print. Auto-calibrates. If it fails, run manual: print pattern, measure the gap between solid and dotted line, enter in Distance → Apply.
- Step: Calibration → 1 Step → Print. Find the best-aligned group (–10 to +10). Enter number in Value → Apply.
- Vertical: Calibration → 2 Vertical → Print. Find best-aligned group per head (–8 to +8). Enter → Apply → Yes.
- Horizontal: Calibration → 3 Horizontal. Set Print Order + Drop Size to match job. Print. Find best-aligned group per color channel. Enter → Apply → Yes.
- Job List tab → click [+] → find your .prt file.
- Set copies needed → click Open.
- Check job status icon — green/no flag = ready. Red Uncalibrated = calibrate first. ? icon = color mismatch, fix in Bottle Profile settings.
- Load product onto the HDL fixture. Confirm it's seated properly.
- Click Print on the job.
- Inspect the first unit:
- Print starts at the correct position on the product.
- Colors are properly overlapping — no color fringing or ghost lines.
- No horizontal banding or missing lines.
- UV curing looks solid — no tacky or uncured areas.
- If the first unit is good — continue the run. If not, abort and go to Troubleshoot.
- ☐ Position: Image is centered on the product — not shifted up/down or rotated.
- ☐ All colors present: No missing ink channels — check the full design including shadows and fine details.
- ☐ No banding: Even, consistent color in solid fills — no horizontal streaks.
- ☐ Color accuracy: Match to proof or approved sample. For Pantone jobs, verify with swatchbook.
- ☐ Cure check: Scratch test at 45° with a fingernail — no flaking, smearing, or tackiness.
- ☐ White underbase: If job uses white, confirm it covers the intended area fully before color layers.
- Watch for banding during the run — abort, Auto Clean, re-check nozzles if it appears.
- Monitor ink temps — red temp = heating shut off. Wait for stabilization before long runs.
- Check UV lamp status — dirty emitting windows will cause under-curing (wipe every 2 days with IPA).
- When done: Operation → Printer Power → Maintain Head & Power Off. This caps and purges before shutdown — never skip this step.
- Save PCS settings: Information tab → Save icon (Ctrl+S).
- Power on the Quad machine and connected PC.
- Open PCS 6 — wait for the status bar to show Ready.
- Check ink temperatures at the top — all should read near target. Red = 5°C over target and heating is off.
- Check the NP (Negative Pressure) indicator — confirm it's in range.
Voltage normal range: 17–18V (over 18V = high, use caution)
- Open Cylinder Set Up in PCS (or on the machine HMI).
- Choose mode: Auto Mode, Station A (default ✓), or Station B.
- Confirm the checkmark is shown on the selected station — this means the plunger is pushed in and the cup is locked.
- Load the cup/bottle onto the station. It should feel firm and not wobble.
- Go to Operation → Check Nozzle → gear icon.
- Set Y Offset, X Offset, and Diameter for the product loaded.
- Click Check Nozzle. Inspect the test pattern — all lines should be solid.
- Any missing lines = jammed nozzles. Run Auto Clean and re-check before printing.
- If Auto Clean doesn't fix it, do a manual clean:
- Click (C) to lower the head tray.
- Use damp microfiber + dry microfiber with alcohol. One head at a time, light touch.
- Raise tray, run Check Nozzle again.
- Go to Job List tab → [+].
- Check My Drive and Holding first. If the job isn't there, go to the Master SKU folder and find it.
- Select the job → set the number of copies → click Open.
- The job appears in the Job List. Check the status icon:
- No flag = ready to print.
- Red "Uncalibrated" = run calibrations first.
- "?" = color mismatch — go to bottle profile settings and check Ignore Job Color Mismatch.
- Speed: Calibration → 1 Step → Speed → Print. Auto-runs. If it fails, use manual speed cal.
- Step: Calibration → 1 Step → Print. Find best-aligned group → enter number → Apply.
- Vertical: Calibration → 2 Vertical → Print. Find best group per head → enter → Apply → Yes.
- Horizontal: Calibration → 3 Horizontal. Set Print Order + Drop Size → Print. Find best group per color channel → enter → Apply → Yes.
- Select the job in the Job List.
- Click the Print button.
- Watch the first print carefully:
- Print starts at the correct position.
- No banding or missing lines.
- Colors aligned — no ghosting or fringing.
- If the first unit looks good — continue the run.
- If banding appears mid-run: Abort → note count → Auto Clean → Check Nozzle → resume.
- ☐ Position: Image is centered on the cup — not shifted up/down or to one side.
- ☐ All colors present: No missing channels. Check the full design including fine lines and small text.
- ☐ No banding: Solid fills look even — no horizontal streaks or gaps.
- ☐ Alignment: Colors are overlapping correctly — no color fringing or ghosting between layers.
- ☐ Color accuracy: Match to proof or approved sample. Pantone jobs: verify with swatchbook.
- ☐ Cure check: Scratch test at 45° — ink should not flake, smear, or feel tacky.
- ☐ Wrap / seam: Image meets cleanly at the seam — no white stripe, gap, or double-image.
- When the run is complete, go to Operation → Printer Power → Maintain Head & Power Off.
- This purges, wipes, and caps the heads before shutdown. Always use this — never just power off.
- Save PCS settings: Information tab → Save (Ctrl+S).
- Scan the transfer cart QR with the Reboxer before product moves off the floor.
- Power on the BEAST (PeriQ360). The system should stay on at all times — turning it off removes pressure from the heads and can cause weeping/dripping.
- Wait for the HMI to fully initialize and show the main print screen.
- Verify ink Meniscus Pressures are at their correct levels for each channel.
- Check Head Tank levels — all should be filled before starting.
- Verify Bulk Tank levels — top up if running low.
- Load a test piece onto a fixture and place it in the print carriage.
- Run a Purge Print (Nozzle Check) from the HMI.
- Inspect the result — each color should have solid, continuous lines. Missing lines or uneven flow = jammed nozzles.
- If any heads need attention: Purge and Wipe from the HMI, then re-check before loading a production job.
- Select the correct fixture for the product size and type.
- Load the fixture onto the spindle — confirm it's secure and doesn't wobble.
- Load the product onto the fixture. Media should sit flat against the fixture surface with no gaps or overhangs.
- Lock the tailstock in place — tailstock in unclamped position should be no more than 1 inch from the media.
- Verify the correct Part Definition is selected on the HMI for this product.
- Open the .isi file in ISI Viewer to confirm all color channels are present before sending to the BEAST.
- In the HMI, navigate to the Job Queue and load the .isi file.
- Confirm the print settings in Print Settings:
- Head Offsets — all active colors should show light cyan boxes (turned on).
- Pin Lamp Intensities — set for each color (Clear: high · White: medium-high · Colors: standard).
- Rotational Speed and Print Gap — set appropriately for the media.
- Set the number of copies in the job queue.
- Run an alignment file first on a test piece — this confirms all colors are overlapping correctly and the wrap is centered.
- Check for a seam:
- Non-DIR: ensure the image goes all the way to the artboard edge. Check ONYX width = 8.2088 in (208.50352mm).
- DIR: enable DIR in settings. If there's a seam on the right side — take pixel width ÷ horizontal resolution → paste result into ONYX width → re-RIP.
- If alignment looks good, proceed to production print.
- Start the job from the HMI. Watch the first piece through the full print cycle.
- Check the first piece for:
- No missing colors or banding.
- Clean color overlap — no overspray or fringing.
- Ink fully cured — no tacky or wet areas.
- No seam or alignment issues.
- If the first piece is good — continue the run.
- During the run, periodically check for weeping heads (ink dripping), color fade, or banding. If any appear, pause and purge/wipe the affected head(s).
- ☐ Position: Design is centered and placed correctly on the product — not shifted up, down, or rotated.
- ☐ All colors present: No missing channels (primer, white, CMYK, clear). Check all design areas.
- ☐ No banding or dropouts: Even coverage with no horizontal streaks or missing sections.
- ☐ Alignment: Colors overlap correctly — no fringing between layers, no misaligned seam.
- ☐ Color accuracy: Compare against proof or approved sample. For Pantone jobs: use the swatchbook to confirm.
- ☐ Cure check: Scratch test at 45° with a fingernail — no smearing, flaking, or tacky areas.
- ☐ Seam / wrap: Seam is clean with no white stripe or overlap (confirm DIR setting is correct if seam was an issue).
- ☐ Clear / varnish: If the job uses clear, confirm it covers the design with no bubbling or void areas.
- When the run completes, remove all fixtures and product from the carriage.
- Do not power off the system. The BEAST should remain on — leave it in Maintenance Mode so it maintains Meniscus Pressure.
- If the machine will be idle overnight: cap the heads through the HMI. If idle for 3+ days: consult the shutdown procedure — heads may need flushing.
- Contact support@lsinc.com for any unresolved issues — include the sequence of events, actions taken, .isi files, and nozzle check photos.
Color, Calibration & Voltage
Pick your machine for ink codes, temps, calibration, and voltage.
Too high and ink cures before it can flow and cover properly — causes banding and striations.
- Set Clear pin lamp to the lowest safe level for the print speed being used.
- For uncured/fuzzy ink: increase pin intensity of the affected color gradually.
- For banding: reduce pin lamp intensity — don't increase it.
- Controls ink flow to the heads. Too high = weeping/dripping. Too low = starvation/missing color.
- If heads are weeping: increase Meniscus Pressure by 0.3 mBar at a time.
- If missing color after purge: decrease Meniscus Pressure by 0.3 mBar steps.
- Keep paired heads at the same pressure.
Temps shown in black = normal. Temps in red = 5°C over target — heating auto-shut off. Wait for it to stabilize.
Higher voltage forces ink out harder — sometimes helps with blur but is not always the fix. Try Auto Clean first.
Adjustment directions (Horizontal Cal)
Higher voltage forces ink out harder — not always the fix. Try Auto Clean first.
Step 1 — Find the file
- Open Google (Custom log in) → Google Drive.
- Search for the design. Example: national lampoon + Christmas.
- Drill in: Christmas → 2025 → Flat File. Find the correct .png. Example: shtfullsweater +40.
- Double-click the .png → Download.
Step 2 — ColorPRINT
- Open ColorPRINT.
- Click 40 oz full wrap (HDL only).
- Click the green folder (Add Job) → file will be at the top → Open.
- Job appears on screen → double-click it.
- Click Proof.
- Bottom right: click Apply, then Print — in that order.
Current job settings on Quad 1 & Quad 2 (from the printer software).
Higher voltage forces ink out harder — sometimes helps with blur, but not always the answer. Try a clean first.
- Abort job — get count of what's been printed.
- Job List → find the current job → click Calibration → Adjust Color.
Step 1 — Find the file
- Open Google (Custom log in) → Google Drive.
- Search for the design. Drill into the correct folder → Flat File → find the .png.
- Double-click → Download.
Step 2 — ColorPRINT
- Open ColorPRINT → add the job → Open.
- Double-click the job → click Proof.
- Bottom right: Apply, then Print — in that order.
Auto & Manual Cleans
When you see banding, stop printing and clean.
- From the HMI, navigate to the Purge & Wipe function.
- Select the affected color channel(s) — or purge All.
- After purging, the wiper blade runs automatically over the nozzle plates.
- Run a Purge Print (Nozzle Check) to confirm all heads are firing. Repeat if lines are still missing.
- Move the carriage to the maintenance position from the HMI.
- Use a Cleanroom wiper lightly dampened with IPA.
- Wipe across the nozzle plate with a light, single pass. Do not scrub.
- Follow with a dry Cleanroom wiper pass.
- Run a Nozzle Check before printing again.
- Abort job if mid-run.
- Go to Operation tab → click Auto Clean.
- The carriage moves to home, ink purges, and the wiper blade runs automatically.
- Run Check Nozzle to verify all lines are solid before resuming.
- Go to Operation → Purge Ink.
- Select the affected color channel(s), or click All.
- After purging, click Wipe to run the wiper blade.
- Run Check Nozzle to confirm improvement.
- Abort job — get count from Reboxer and subtract from total.
- Go to Operation tab → click Auto Clean.
- Auto clean purges ink and wipes nozzle surface automatically.
- Run Check Nozzle to verify — if lines are still missing, do Manual Purge below.
- Once clean: click Print to resume the job.
- Go to Operation → Purge Ink.
- Select the affected color channel(s), or click All.
- Click Wipe after purging to clean the nozzle surface.
- Run Check Nozzle to confirm all lines solid.
- Abort job — stop printing right away.
- Get count from Reboxer — subtract from total.
- Go to Operation → click Auto Clean.
- After auto clean: click Print on job to resume.
- Abort job.
- Back to main menu → click (C) — lowers the head tray for access.
- Get 2–3 microfiber cloths (silks) and alcohol. One damp, one dry.
- Clean one head at a time — light touch only.
- One pass damp → follow immediately with dry.
- Repeat until the head is clean, then move to the next.
- Raise the tray back up. Run Check Nozzle before printing.
Pantone Library
Pick the machine, search by team. Each machine has its own CMYK formula.
License Stickers
Pick a sport, then a license type.
Quick Reference
Cheat sheet — colors, temps, voltage, defaults.
- Rich Black — trapped 0.1–0.25pt 100K
- White — trapped 0.1–0.25pt
- Clear — bled 0.1–0.25pt
- Primer — bled same as Clear
- Non-DIR image width in ONYX: 8.2088 in (208.50352mm)
White · White · Black · Cyan · Magenta · Yellow · Varnish · Varnish
- Little Hearts / Darknights — VV = Varnish only at 80%.
- Head temp hits 92°C — print auto-pauses. Resumes at 85°C.
- Red temp display — 5°C over target, heating shut off. Wait to stabilize.
- Encoder difference >10 — instability affects quality. Contact support.
White · White · Black · Cyan · Magenta · Yellow · Varnish · Varnish
- Little Hearts / Darknights — VV = Varnish only at 80%.
- 40 oz Full Wrap — HDL only.
- ColorPRINT final step — Apply, then Print, in that order.
- Reboxer — scan transfer cart QR before product moves.
- UV emitting window — clean every 2 days with IPA.
White · White · Black · Cyan · Magenta · Yellow · Varnish · Varnish
- Little Hearts / Darknights — VV = Varnish only at 80%.
- ColorPRINT final step — Apply, then Print, in that order.
- Cylinder Setup — most-used function on Quad 1 & Lord Far Quad.
- Reboxer — scan transfer cart QR before product moves.
Product Labels
Step-by-step: how to create and print product labels.
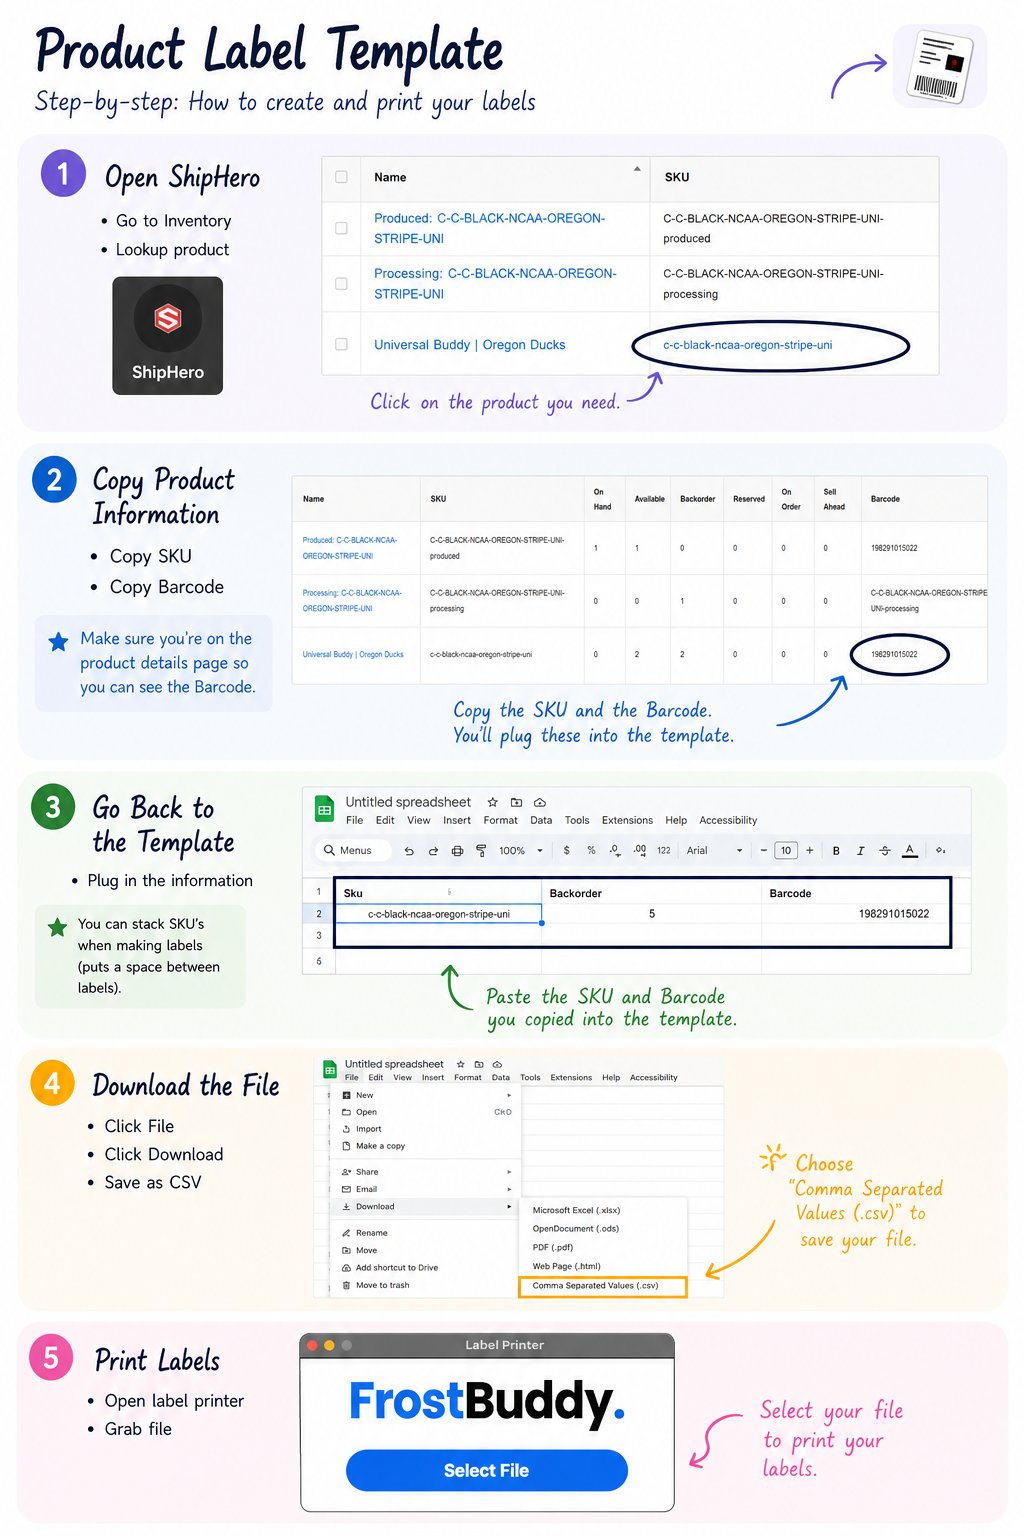
- Open ShipHero and go to Inventory.
- Search for and look up the product you need to label.
- Click on the product name to open the product details page.
- On the product details page, find and copy the SKU.
- Find and copy the Barcode number.
- Open the Google Sheets label template.
- Paste the SKU into the SKU column.
- Paste the Barcode into the Barcode column.
- Fill in the Backorder quantity if needed.
- In Google Sheets, click File.
- Click Download.
- Select Comma Separated Values (.csv).
- Open the FrostBuddy Label Printer app.
- Click Select File.
- Find and select the .csv file you just downloaded.
- Labels will print automatically.
Ripping Files
The manager puts the file into the correct folder. The operator picks it up from there — do not move or rename it.
C:\Users\Quadrev\Desktop\QUAD 1 UNI PORT FOLDER
C:\Users\custo\OneDrive\Desktop\Quad 2 Port Folders
- Open the file in the RIP software.
- Color match it.
- RIP it.
After the file is RIP'd, send it to the main printer.
Print the file and check if it looks right.
- ☐ Is the color right?
- ☐ Is the design in the right spot?
- ☐ Does the print look clean?
- ☐ Is it the correct file?
The ripping workflow for the BEAST hasn't been added yet. For now, ask your manager or a senior operator. This page will be filled in soon.
The ripping workflow for the REV hasn't been added yet. For now, ask your manager or a senior operator. This page will be filled in soon.
The ripping workflow for the HDL hasn't been added yet. For now, ask your manager or a senior operator. This page will be filled in soon.
Operator Training Guide
- Operate REV and HDL machines using PCS6 software.
- Perform routine maintenance procedures including printhead cleaning, purging, auto-cleaning, and Z-height adjustments.
- Understand and troubleshoot common print issues:
- Banding
- Overspray
- Discoloration
- Blurriness
- Perform basic calibration adjustments.
- Understand print order setup and product changeovers.
- Maintain consistent print quality and production targets.
- Queue and manage print jobs within POD Hero and related systems.
- Perform product quality control and salvage recoverable products when possible.
- Complete machine shutdown procedures at the end of the shift.
- Understand licensing requirements for applicable designs.
- Maintain proficiency in all Reboxer responsibilities.
Intermediate-level operator with advanced knowledge of Quad machine systems, calibration, and production troubleshooting.
- Perform all Level 1 Machine Operator and Reboxer responsibilities.
- Operate Quad machines using PCS6 software.
- Understand voltage systems and negative pressure systems.
- Perform advanced calibration and alignment adjustments.
- Troubleshoot and resolve higher-level print quality issues.
- Perform product changeovers and machine setup adjustments.
- Maintain production output while independently managing reboxing tasks when necessary.
- Exercise proper precautions to protect printheads and sensitive machine components.
- Complete machine shutdown procedures at the end of the shift.
Advanced operator responsible for operating highly specialized equipment including PeriQ systems while handling production processes.
- Perform all Level 1 and Level 2 Machine Operator responsibilities.
- Operate PeriQ systems using HMI software.
- Manage variable data printing and advanced print file operations.
- Understand key operational differences between PeriQ and IDS systems.
- Perform advanced printhead maintenance and cleaning procedures.
- Understand when to dry wipe, flush wipe, stop production, or continue printing during troubleshooting.
- Handle sensitive machine components using approved cleaning procedures.
- Load, organize, and manage production files.
- Troubleshoot print quality issues.
- Shut down machine at the end of the shift.
Machine Shutdown
End-of-day closure checklist for each printer. Tap each step as you complete it.
- Finish all jobs — confirm the job queue is empty and no jobs are queued or paused.
- Run a final Purge & Wipe — go to HMI → Purge & Wipe → All. This clears residual ink from all nozzles.
- Cap the heads — go to HMI → Head Maintain → Cap On. Capping protects nozzles from drying out overnight.
- Remove all fixtures and media — clear the print carriage completely.
- Check Head Tank levels — all tanks should be sufficiently filled for overnight. Top up any that are low.
- Verify Meniscus Pressure is stable — confirm the pumps are not running continuously. If they are, check for air leaks before leaving.
- Leave system powered ON — do not touch the power switch. The system stays on in Maintenance Mode overnight.
- 3+ day shutdown only: if the machine will be idle for 3 or more days, flush white ink from the heads with flushing fluid before leaving. Contact LSINC support if unsure.
- Finish all jobs — confirm the Job List is empty or all jobs are complete.
- Run Check Nozzle — print a final nozzle check and confirm all lines are solid. If not, run Auto Clean before shutdown.
- Save PCS settings — go to Information tab → click the Save icon (or Ctrl+S).
- Remove the bottle/cup from the spin tool module.
- Go to Operation → Printer Power → Maintain Head & Power Off — this automatically purges, wipes, and caps before shutdown. Wait for it to complete fully.
- Confirm the status shows powered off — PCS will close or go offline. Do not force-quit.
- 3+ day shutdown only: before the Maintain Head & Power Off step, purge white ink from the heads and replace with flushing fluid. On return, purge flush out and refill with ink (repeat 5+ times) before printing.
- Finish all jobs — confirm the Job List is empty or all jobs are complete.
- Run Check Nozzle — print a final nozzle check and confirm all lines are solid. Run Auto Clean if needed before proceeding.
- Save PCS settings — Information tab → Save icon (Ctrl+S).
- Remove the cup/bottle and unload the fixture from the spin module.
- Clean the UV emitting window — wipe with a Cleanroom wiper + IPA if it hasn't been done today. Don't over-wet.
- Go to Operation → Printer Power → Maintain Head & Power Off — wait for the full automated sequence to complete (purge → wipe → cap → shutdown).
- Confirm PCS goes offline — do not force-quit. Let the shutdown complete on its own.
- 3+ day shutdown only: purge white ink from the heads and replace with flushing fluid before the Maintain Head & Power Off step. On return, flush out and refill with ink before printing.
- Finish all jobs — confirm the Job List is empty and no jobs are pending or paused.
- Run Check Nozzle — print a final nozzle check. If any lines are missing, run Auto Clean or Manual Clean before shutdown.
- Get final count from Reboxer — scan the transfer cart QR code before product leaves the floor.
- Remove all cups/bottles from the cylinder stations. Make sure Station A and B are clear.
- Save PCS settings — Information tab → Save (Ctrl+S).
- Go to Operation → Printer Power → Maintain Head & Power Off — wait for the full automated purge → wipe → cap → shutdown sequence to finish.
- Confirm PCS goes offline — do not force-quit the software.
- 3+ day shutdown only: purge white ink from the heads with flushing fluid before the Maintain Head & Power Off step. On return, flush out completely and refill with ink (5+ purge cycles) before printing.
Troubleshooting
Pick your printer, then find your issue.
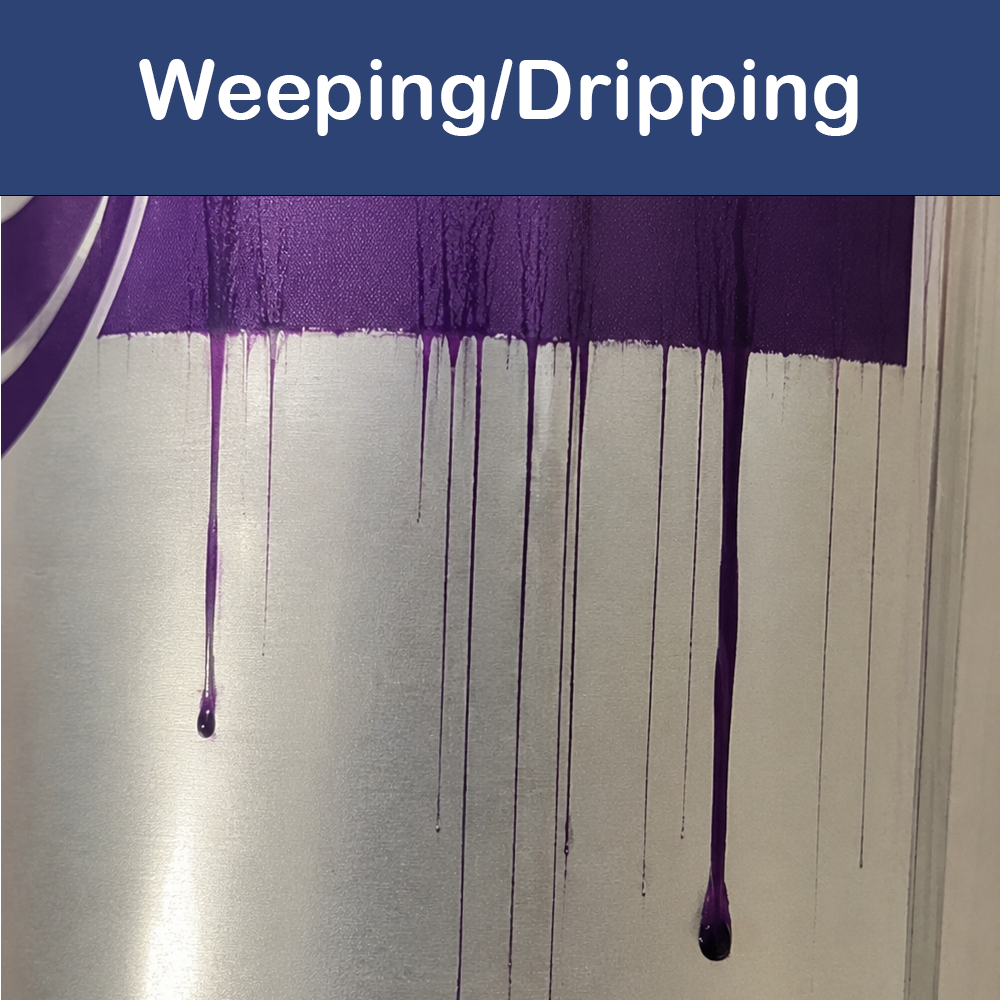
Ink dripping from heads while idle (white during Maintenance Mode is normal).
- Ensure the system is powered on and HMI is running. System should stay on at all times — turning it off removes pressure from heads.
- Check for air leaks. Meniscus Pumps will run constantly in one direction and pressure reads low. Use hemostats to isolate: clamp between head and pump. If pump stops → leak is between hemostat and head. If pump continues → leak is between hemostat and Meniscus Pump.
- Check the white air filter above the head tank. Unplug the air line between filter and head tank. If pressure drops suddenly → filter is fine. If pressure holds and pump stops → filter is blocked and needs replacement.
- Try increasing Meniscus Pressure by 0.3 mBar at a time. Verify pump rotates with each change. Keep shared heads at the same pressure: Black + Magenta together, Yellow + Cyan together.
- Reminder: to increase pressure, values must be made more negative.
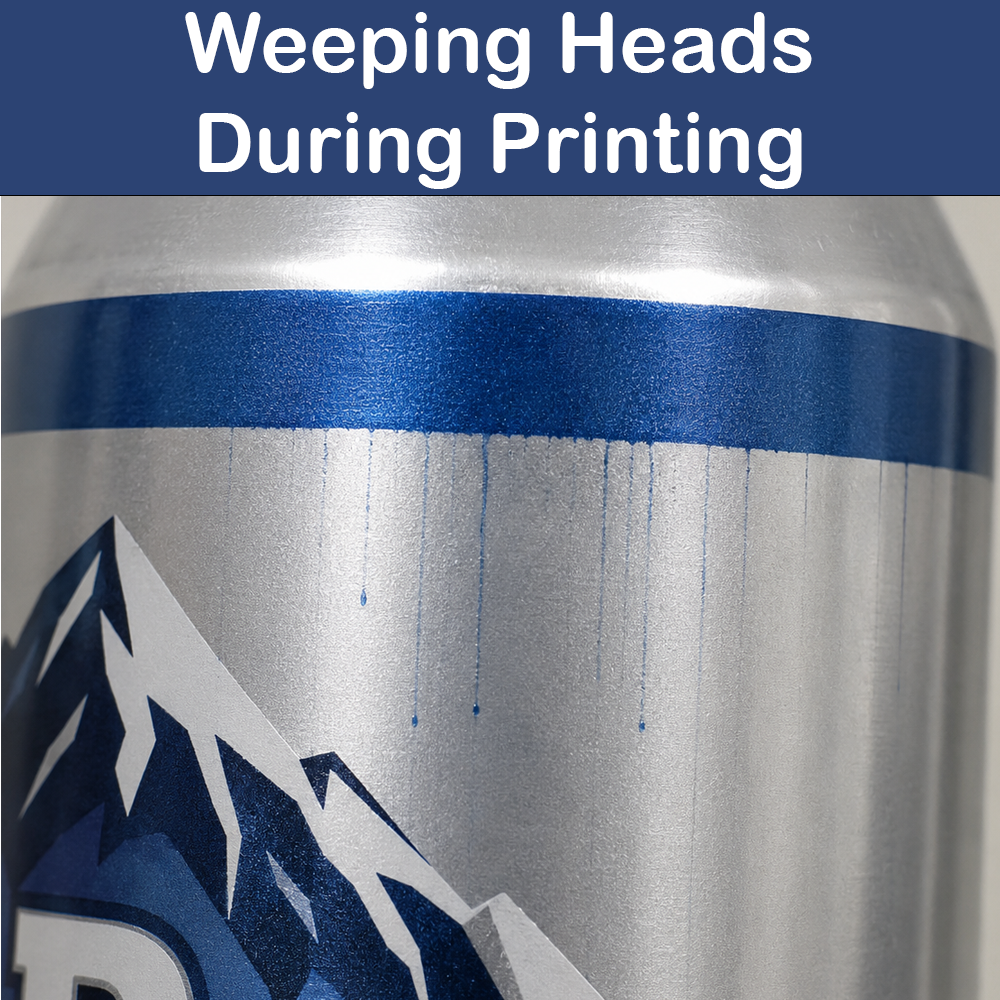
- Check Pressure Offsets in Print Settings — set to estimated offsets.
- Increase Meniscus Pressure in 0.3 mBar steps. Keep paired heads at same pressure (Black + Magenta, Yellow + Cyan).
- Reminder: more negative = higher pressure.

- Open the .isi file in ISI Viewer — confirm color is present. If not → issue is in art setup or RIP.
- In Head Offsets tab of Print Settings, ensure the color is turned on (all boxes should show light cyan).
- Purge and wipe printheads — starvation is common after sitting idle. If purging fixes it, check if ink is sucked back; if so, lower Meniscus Pressure by 0.3 mBar.
- Check for ink build-up on printhead. Wipe off or scrape cured ink with plastic scraper. Run nozzle check, then decide: flush, replace, or use Nozzle Replacement.
- Try slowing print speed or changing Meniscus Pressure. For White/Clear: try unchecking "No Mask".
- Check Head Drive Boards for red lights. If present: reinitiate Print Engine by restarting HMI or toggling "Primer: Enable" in Print Settings.
- Verify Ribbon Cables are fully seated in Head Drive Board.
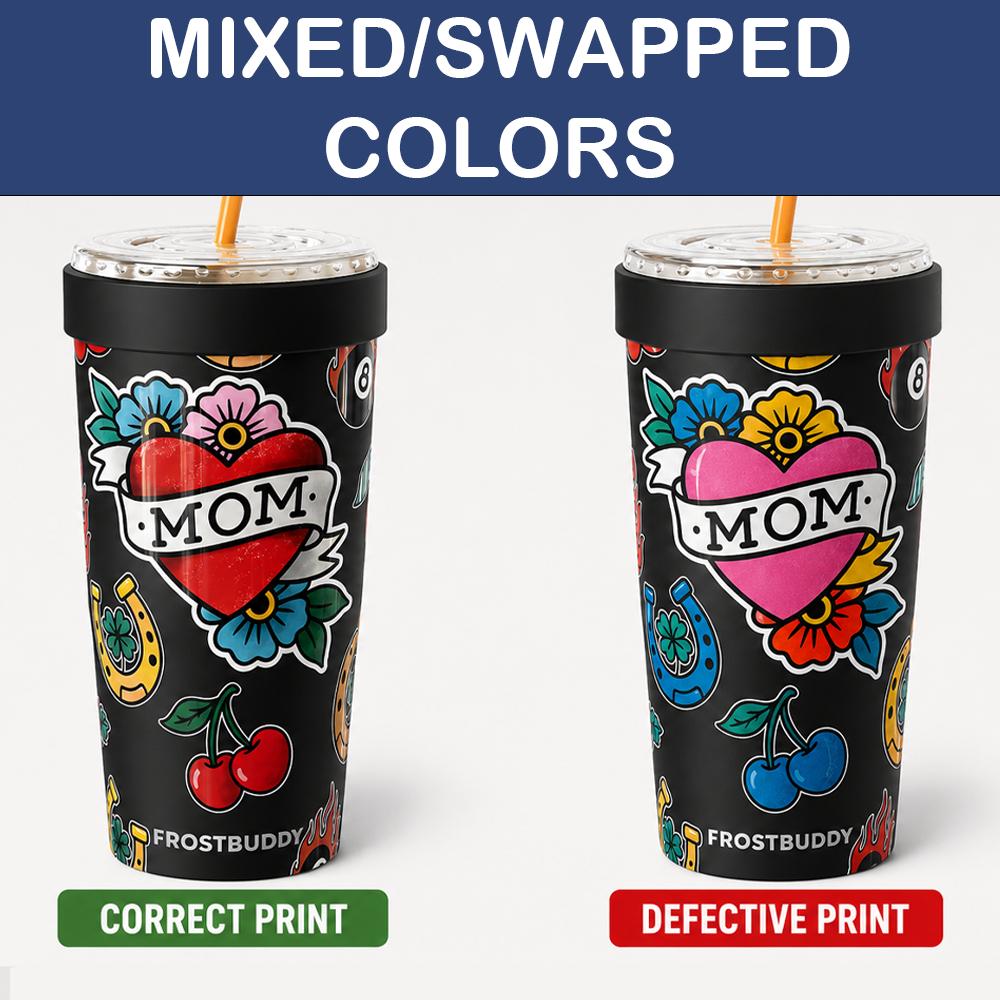
- Run multiple Purge Prints. If slow to clear, increase Meniscus Pressures on both infected inks.
- If colors still mix after several purges: close cutoff valves → unhook ink line from cutoff valve → long purge to empty Head Tank → close cutoff valve → let Head Tank refill. Repeat 1–2 times → reconnect ink line.
- If colors are swapped (not mixed): check Ribbon Cables are installed correctly and not swapped.
- If mixing continues across days: adjust Meniscus Pressures of both inks. See Weeping Printheads section.

- Ensure the Cutoff Valve above printhead is fully open.
- Purge and wipe printhead. If it fixes it → see Missing Colors section for follow-up.
- Check for ink cured onto the printhead. Scrape off, run nozzle check, decide: flush, replace, or use Nozzle Replacement.
- Slow print speed, adjust Meniscus Pressure, or (for White/Clear) uncheck "No Mask".
- Run Nozzle Check to verify jetting. Change Pressure Offsets in Print Settings if needed.
- Decrease Meniscus Pressure.
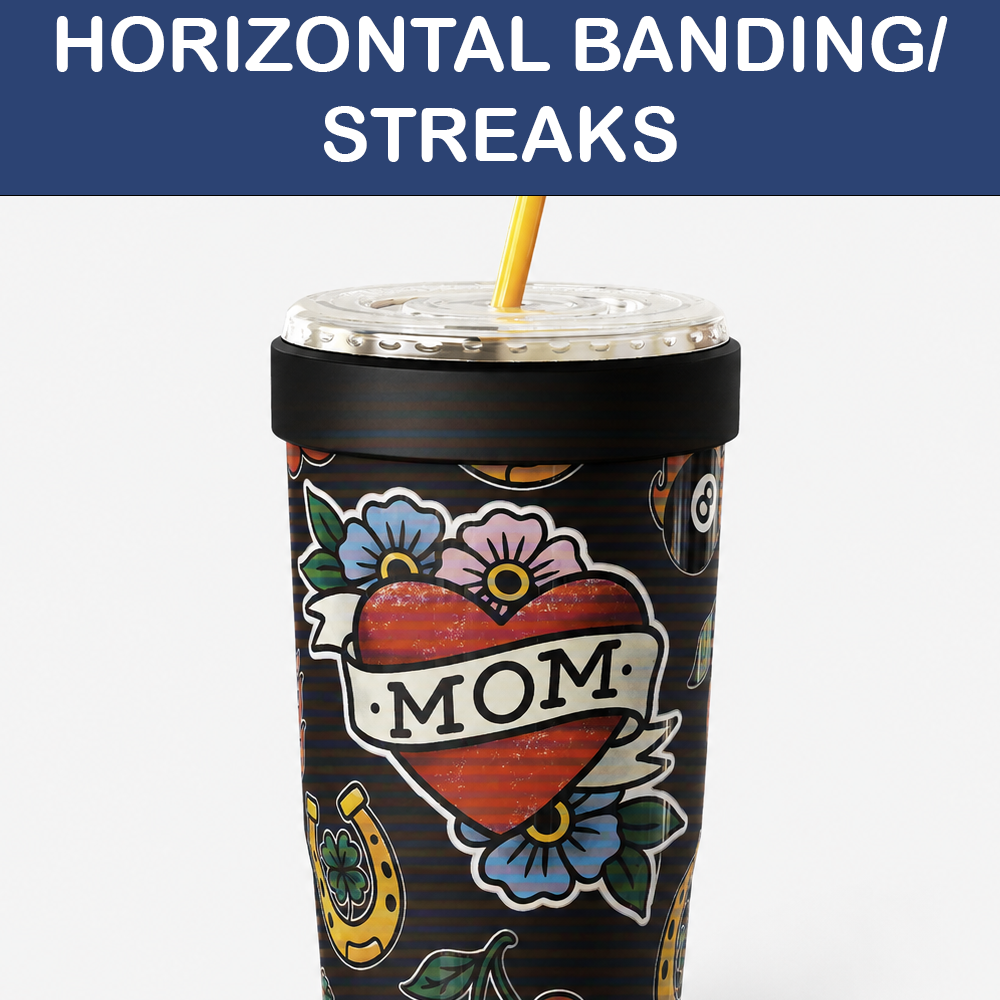
Identify the banding color using a purge print. For Clear-specific banding see below.
- Check for ink beads forming on printhead. If present: increase Meniscus Pressure 0.3 mBar at a time. Keep paired heads same pressure.
- Ensure no flush residue in ink lines — purge and wipe a few more times.
- Check Head Tanks are refilling. If not → see Head Tank Not Filling below.
- Run Nozzle Check. Decide: flush, replace, or Nozzle Replacement.
- Reduce Pin Lamp Intensities — too high and ink cures in place before flowing to cover properly.
- Verify nothing is rubbing against printheads from fixtures — cut excess material or increase print gap.
- Check Head Temps & Voltages: Clear 50–52°, White 47–50°, Primer ~29°, Colors 43–48°. Voltage should be ~20V.
- Replace printhead if all else fails.
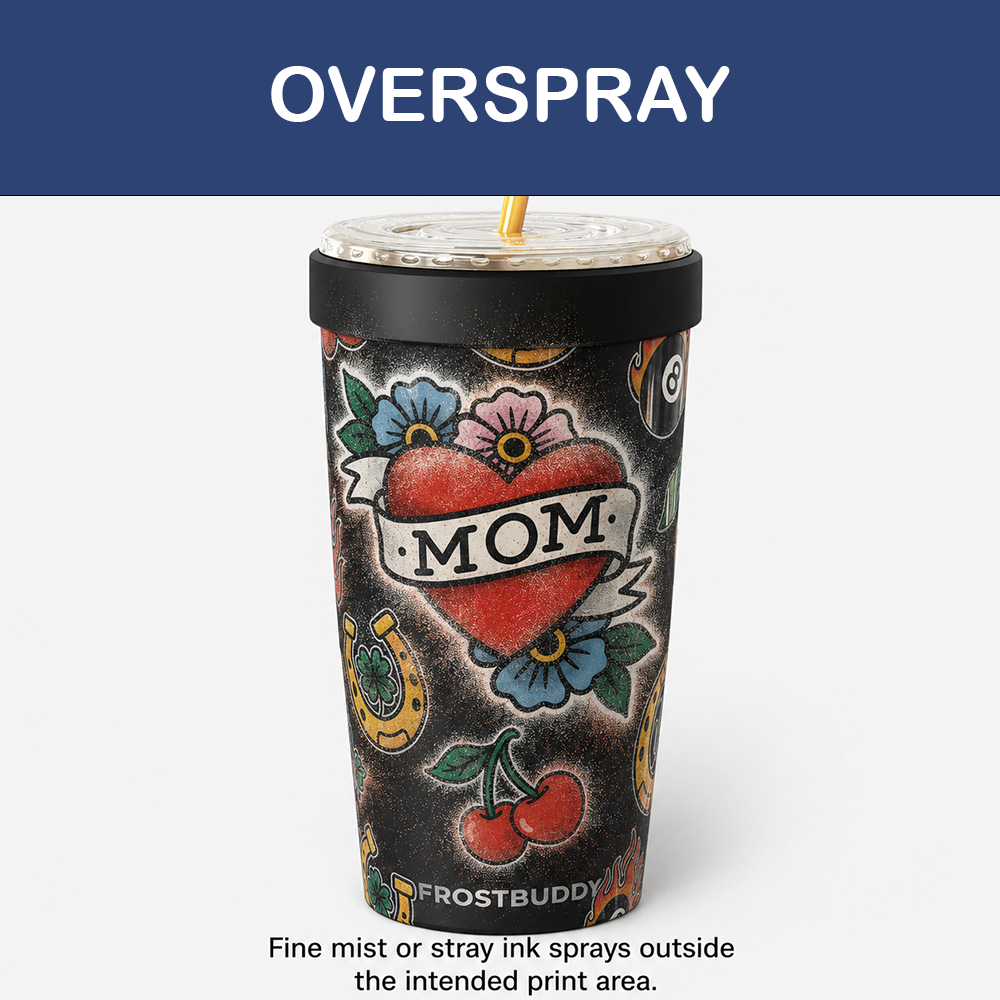
- Purge and wipe printhead.
- Ensure media is seated properly on fixtures.
- Reduce print gap as low as possible.
- Lower rotational speed.
- Increase print mode (controls how much ink drops at once).
- Slightly reduce ink percentages in art file.
- Verify Head Temps: Clear 50–52°, White 47–50°, Primer 29–32°, Colors ~45°. Voltage ~20V.
- Run Nozzle Check — flush or use Nozzle Replacement if needed.
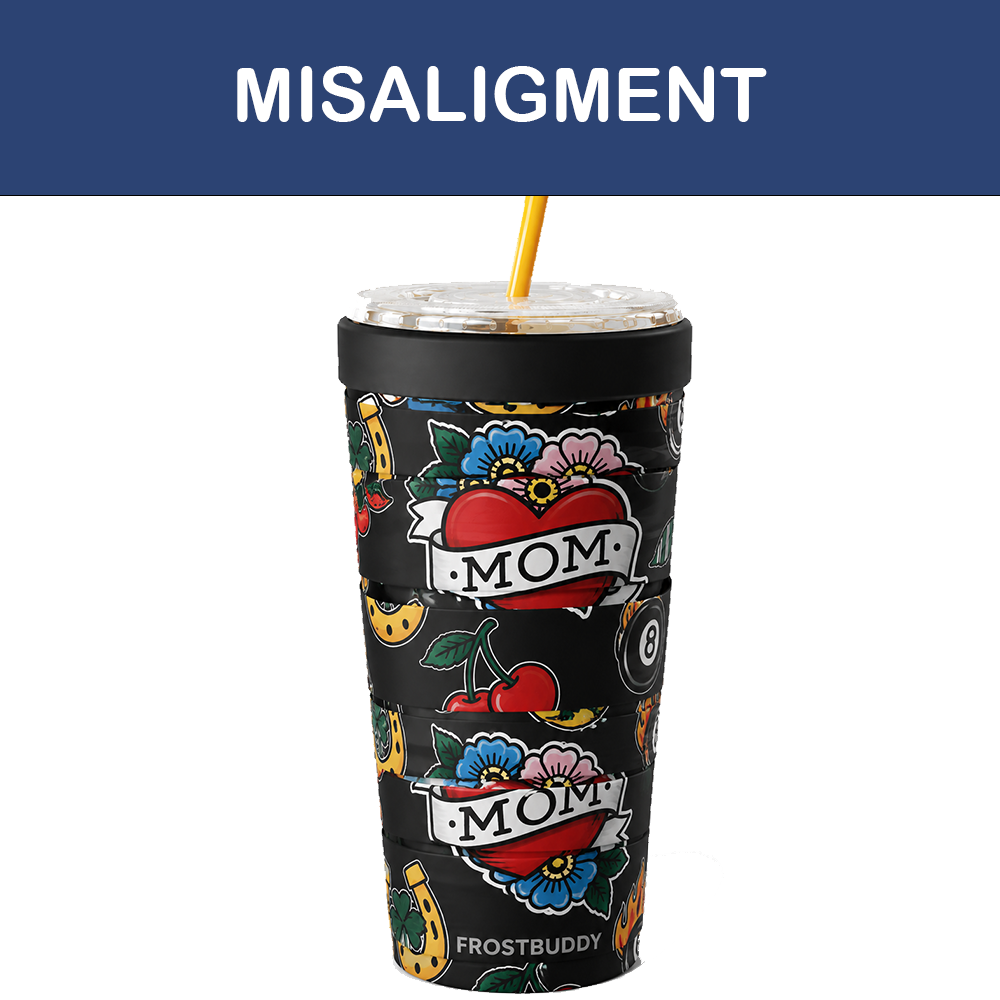
- Ensure fixtures are tight on spindles.
- Ensure media is seated properly on fixtures.
- Re-align using an alignment file.
- Art setup checks: Rich Black trapped with 0.1–0.25pt 100K → White trapped 0.1–0.25pt → Clear bled 0.1–0.25pt → Primer bled same as Clear.
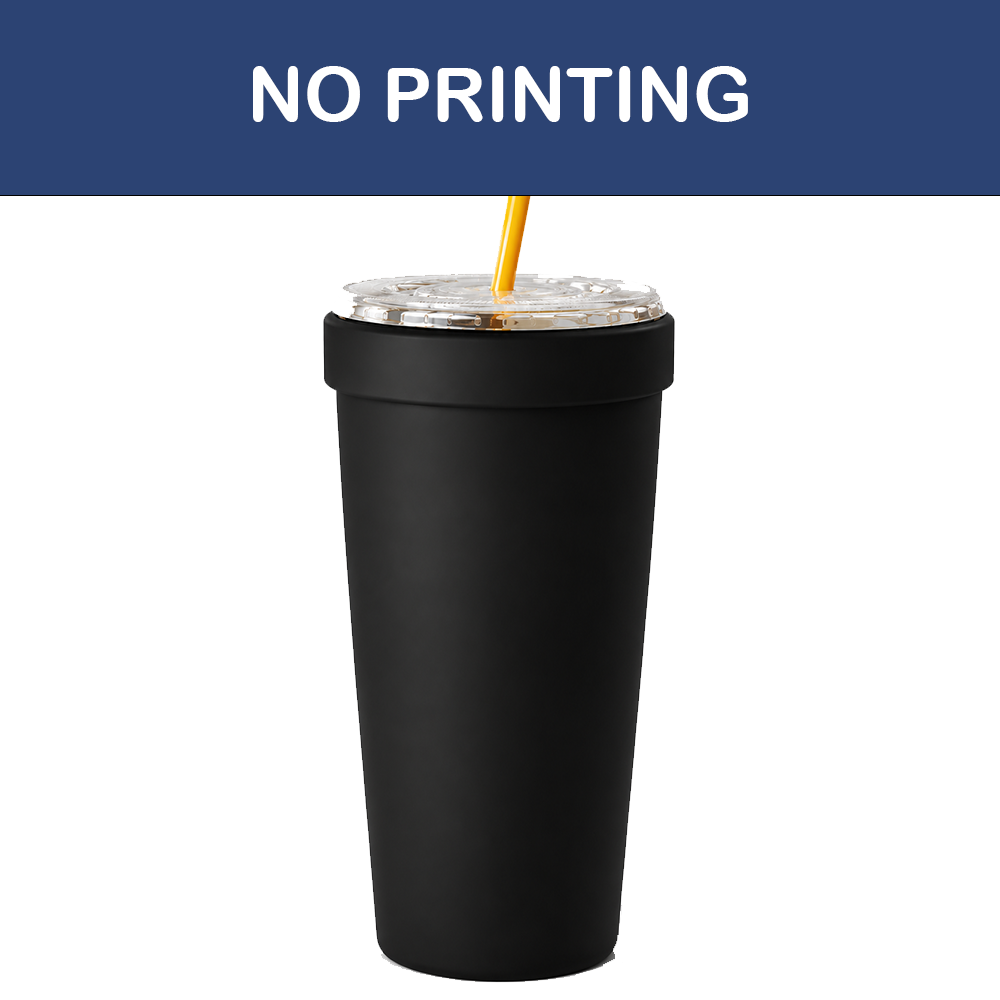
- Clear cache and rerun.
- Check Bulk Tank level.
- Verify Head Tank is full.
- Verify tailstock is set properly.
- Purge and wipe printheads.
- Restart the HMI.
- Ensure Ribbon Cables are fully seated.
- Decrease Meniscus Pressure by 0.3 mBar steps. Less negative = lower pressure.
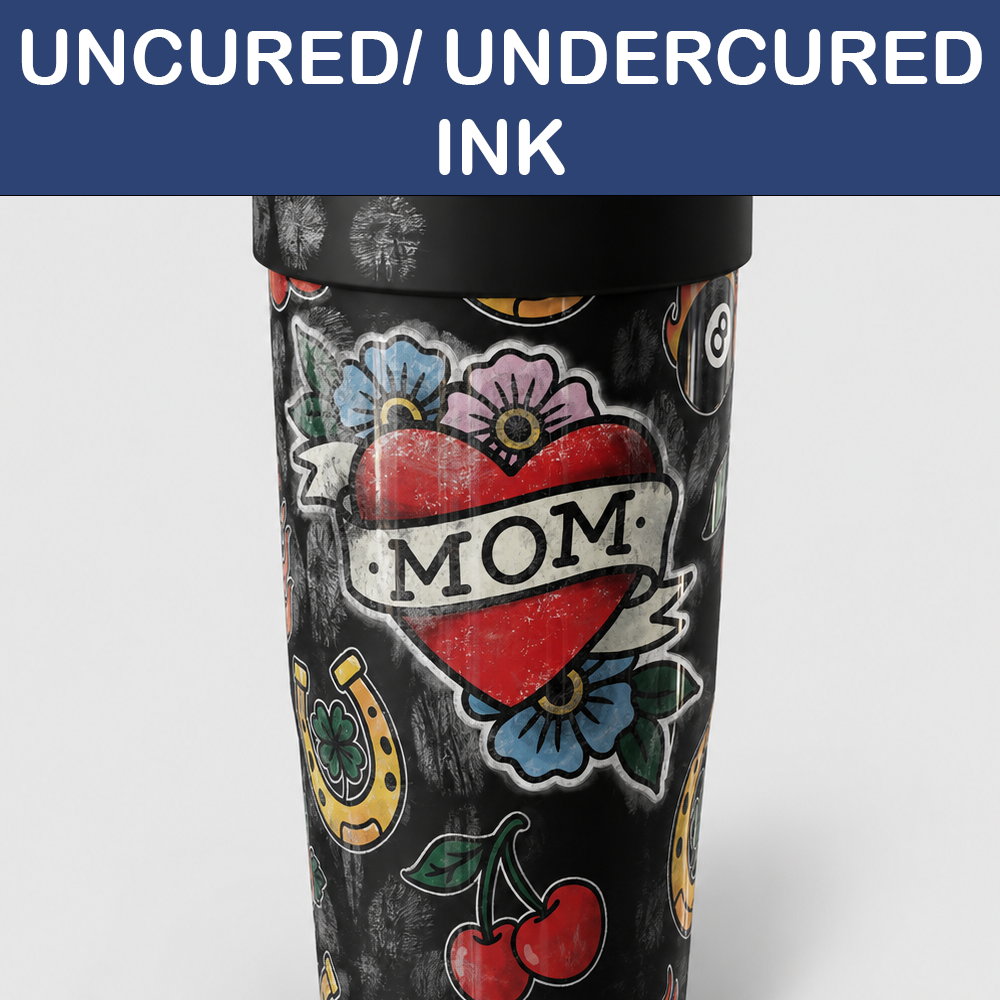
- Increase pin intensity of fuzzy colors to a safe level.
- Slow down print speed by increments of 0.5 revs/sec until resolved.
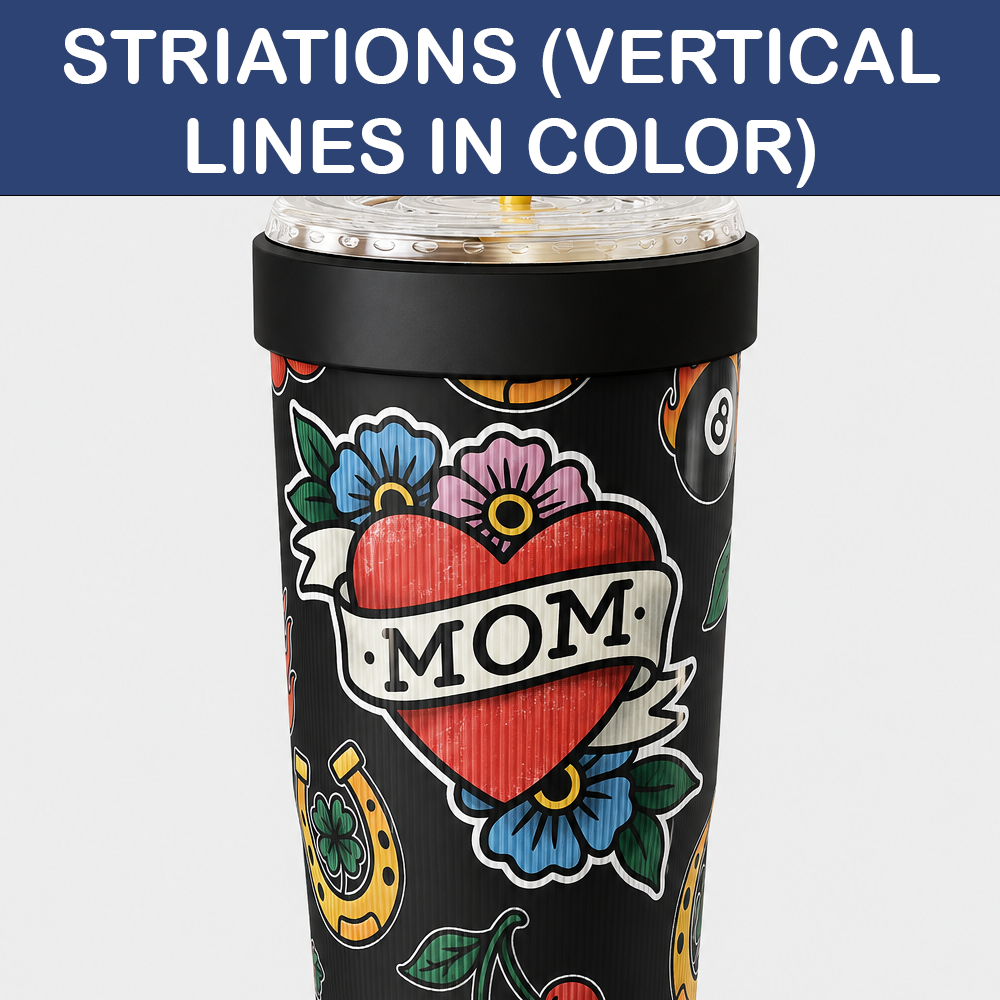
- Run Nozzle Check — flush, replace, or use Nozzle Replacement.
- Reduce Pin Lamp Intensities to lowest safe level (ink curing in-place causes striations).
- If available, use Diameter Independent Resolution (DIR).
- For 100K Black: use Rich Black trapped with 0.1–0.25pt 100K Black.
- Use a higher resolution.
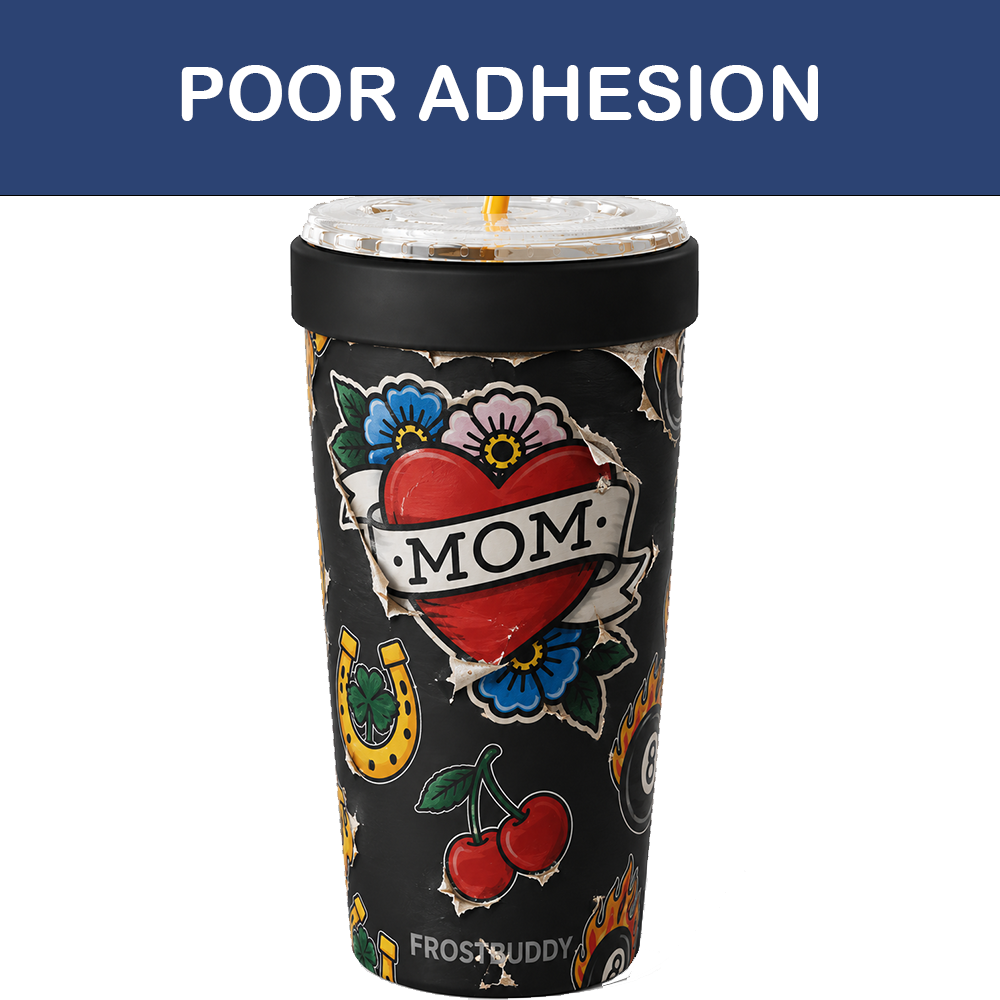
- Ensure media is clean before printing.
- Allow 24 hours before testing adhesion.
- Measure surface tension — Dyne Pen should read 45–60 Dyne.
- Clean Cure Lamp covers.
- If using Jettable Primer: verify it's printing on all inked areas (not trapped), turned on, and properly aligned.
- Increase Pin Lamp settings.
- Verify pre-treatment.
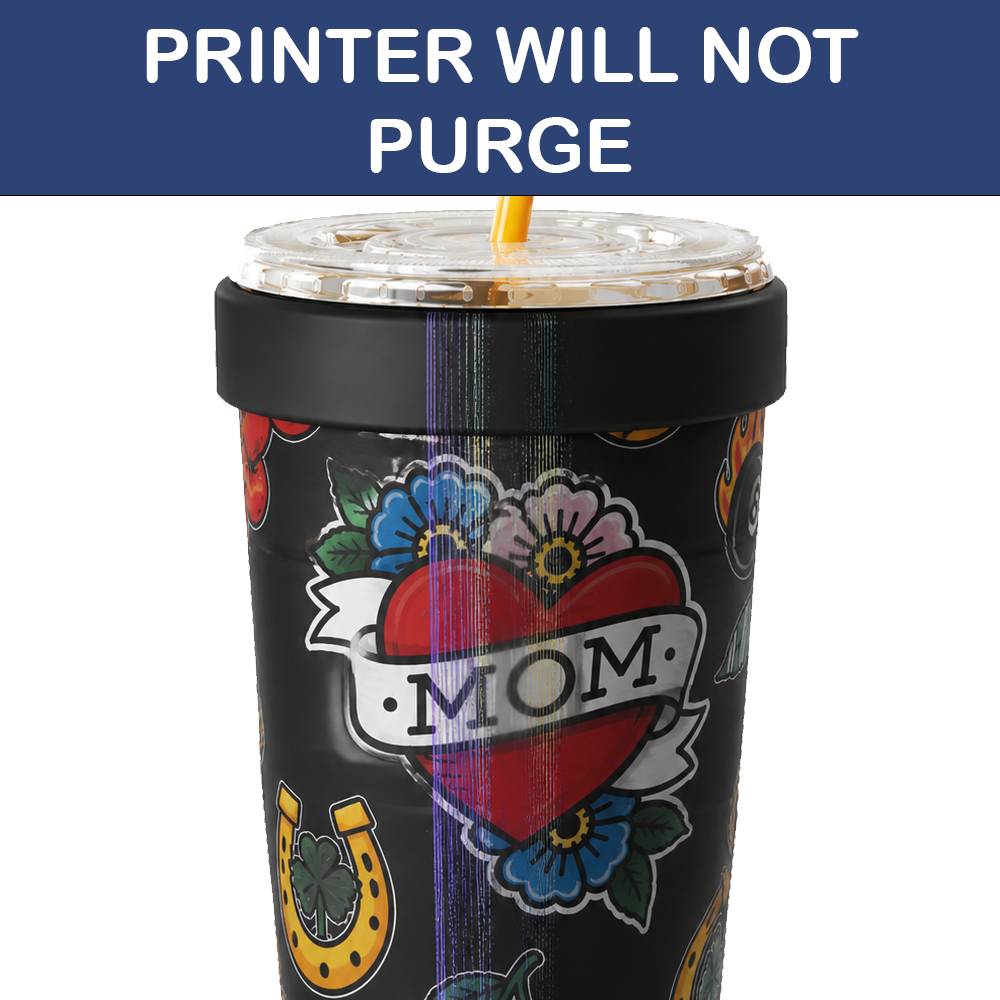
- Ensure cutoff valve between Head Tank and printhead is open.
- Ensure ink is not cured to the printhead.
- Verify Head Tank is full.
- Verify pump is generating pressure.
- Check electrical connection on top of purge valve.
- Replace Hygroscopic Filter on top of Head Tank.
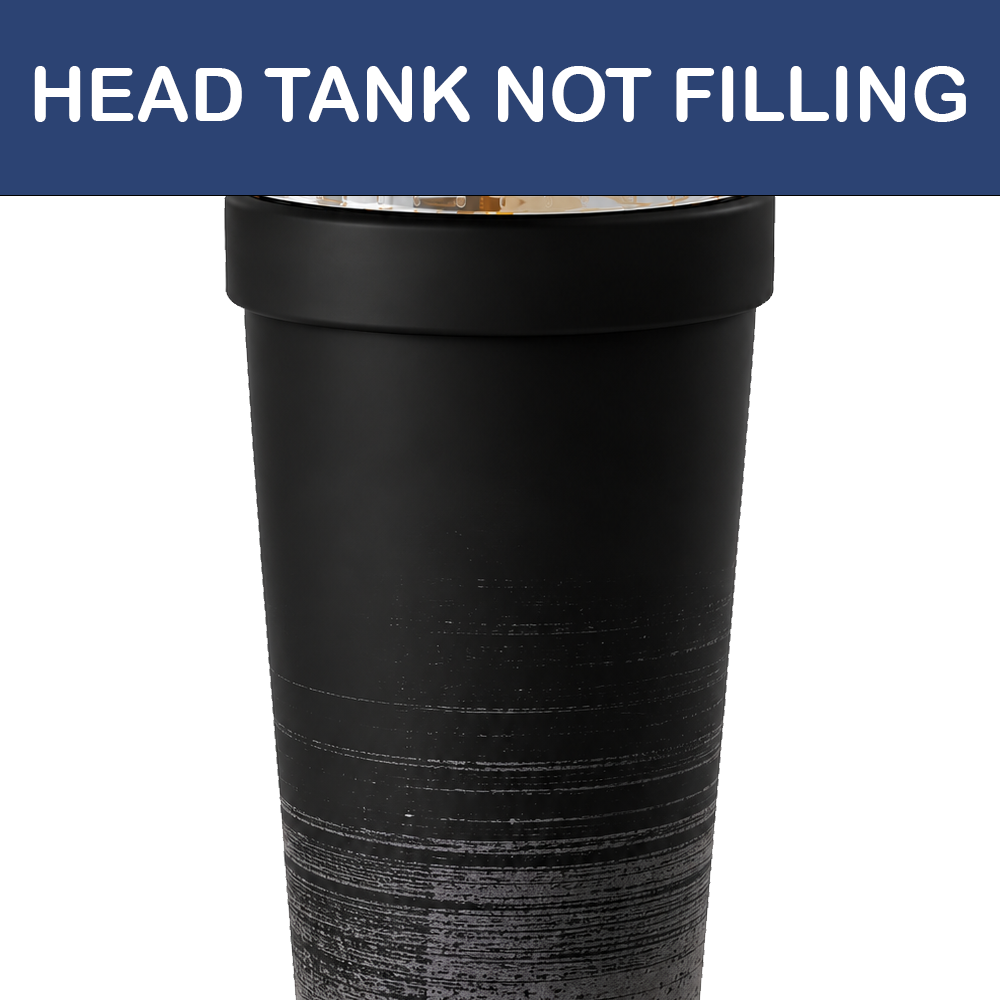
- Check Bulk Tank is filled.
- Restart HMI.
- Verify Fill Pumps are connected — check electrical and fluid connections between Bulk Tank and Fill Pump.
- Replace Bulk Tank Filter.
- Replace Head Tank Filter.
- Replace Fill Pump.
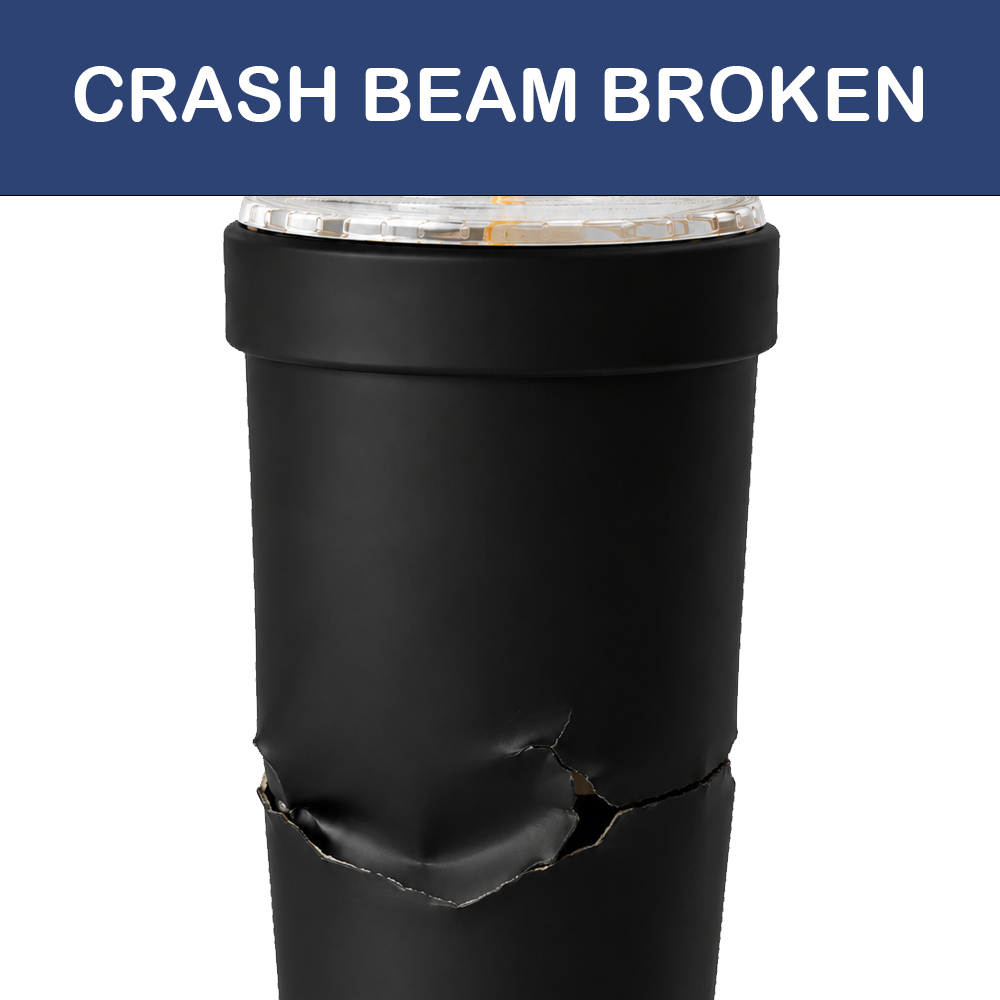
- Note where on the media the Crash Beam broke.
- Press "Return".
- Verify correct fixture is loaded and correct media is selected.
- Check media is fit correctly on fixture.
- Verify Part Definition is correct.
- If using vellum: ensure it's fully taped down.
- Raise Print Gap.
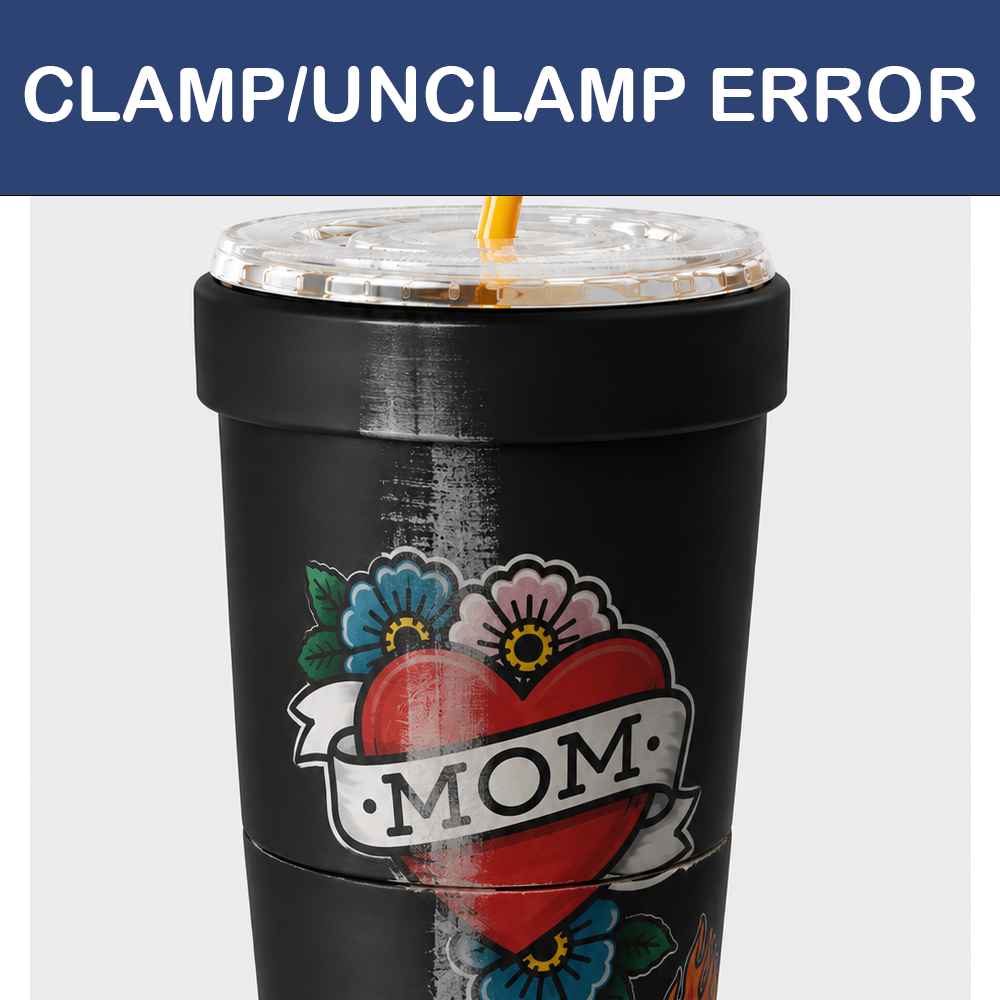
- Press "Return".
- Ensure media is present in the print carriage.
- Ensure Tailstock is locked in place.
- Tailstock in unclamped position should be no more than 1 inch away from the media.
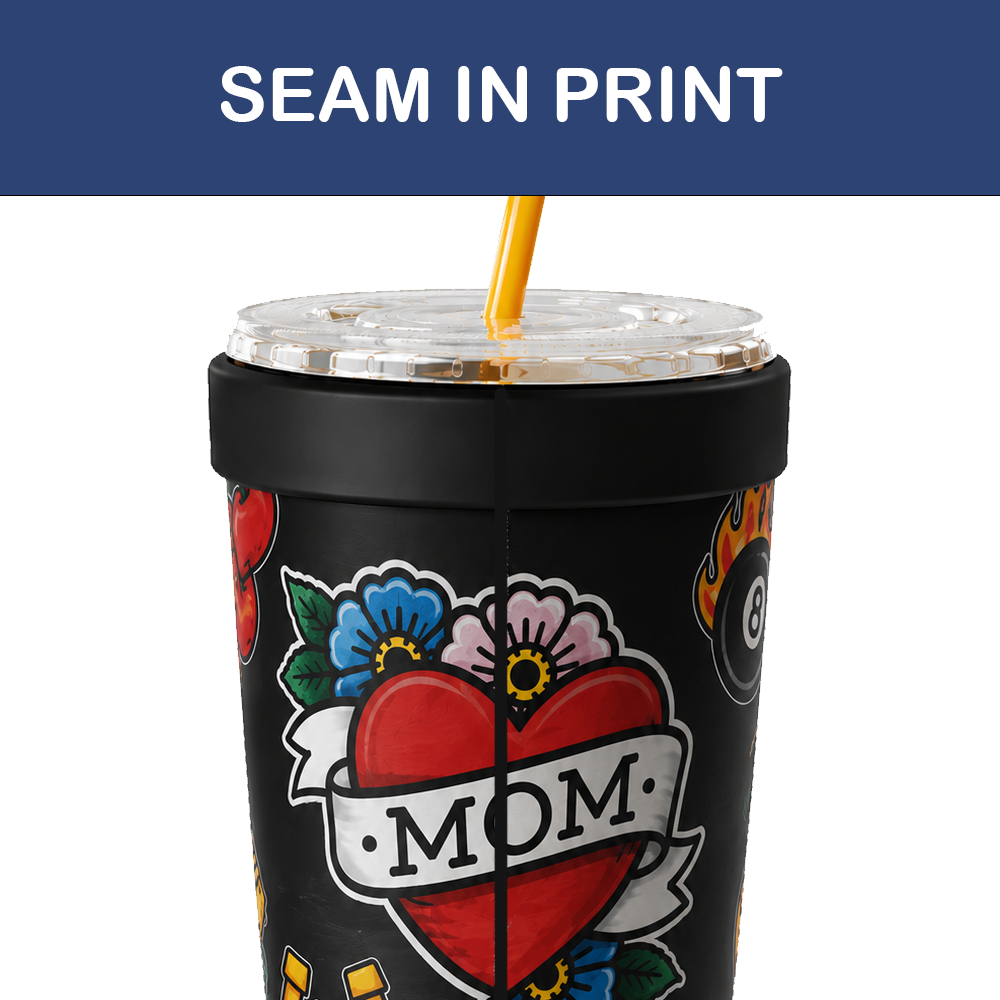
Non-DIR: Ensure Art and White layers go all the way to the edge of the artboard. If not using DIR, verify image size in ONYX is set to 8.2088 in (208.50352 mm).
DIR: Ensure DIR is enabled. Check .isi file for seam on right side only. If seam present: take pixel width ÷ horizontal resolution → paste result into ONYX width field → re-RIP and print.
Email support@lsinc.com with:
- The series of events that led to the issue.
- Any relevant prior issues with the system.
- Actions already taken to fix it.
- If relevant: .isi files, .xml files, photo of printed output, current nozzle checks.
- If motion-related: screenshots of HMI + photo of system. Do NOT turn off system if it could cause damage.
Step 1 — Run a Nozzle Check first
- Go to Operation tab → click Check Nozzle.
- A test pattern prints. If all nozzles are firing, every line will be solid — no gaps. If lines are missing, nozzles are jammed.
Step 2 — Auto Clean (preferred)
- Go to Operation tab → click Auto Clean.
- The carriage moves to home, ink purges, then the wiper blade runs automatically. No manual steps needed.
- After it finishes, run another Check Nozzle. Repeat if lines are still missing.
Step 3 — Manual Purge (if Auto Clean didn't fix it)
- Go to Operation → expand Purge Ink.
- Select the specific color channel(s) with missing nozzles, or click All to purge everything.
- After purging, click Wipe to run the wiper blade across the nozzle plates.
- Re-run Check Nozzle to confirm all lines are solid before printing again.
Check the status icon to the right of the job in PCS:
"?" — Job not allowed to print (color mismatch)
- Most common cause: color channels in the job file don't match the Print Order set in PCS. Error shows in orange dotted-line at bottom of screen.
- Go to the job's Bottle Profile → Settings → Print.
- Check Ignore Job Color Mismatch.
- Set Missing Channels of Job to Copy (duplicates data to extra heads) or Blank (leaves missing channels empty).
"Uncalibrated" in red
- Click the red Uncalibrated button to the right of the job.
- Perform calibration in order: Speed → Vertical → Horizontal.
- Status clears once all calibrations are saved and applied.
Source file missing (✕ icon)
- The .prt / .tif file has been moved or deleted from its saved location.
- Delete the job from PCS. Re-add it via [+] and locate the file again.
Step Calibration (Y-direction banding or uneven spacing)
- Go to Calibration tab → 1 Step.
- Click Print. A test pattern of 21 groups (–10 to +10) prints. Each group has two columns of short lines.
- Find the group where the two columns are best aligned (lines overlap cleanly).
- If no group is well-aligned: measure the gap distance "H" in group 0 → enter it in the Offset field → Apply → reprint → find the now-aligned group.
- Enter that group number in the Value field → Apply. PPI updates automatically.
Speed Calibration (Y-axis feedback error / carriage speed)
- Go to Calibration → 1 Step → Speed.
- Click the Print icon. The bottle rotates while the carriage moves — heads do not jet ink.
- If auto-calibration fails with the error "Step calibration failure. Y axis feedback error" → switch to Manual Speed Calibration.
- Manual: Print the test pattern → measure the distance between the solid and dotted line → enter in the Distance field → Apply. Repeat until lines align.
Vertical Calibration (heads misaligned vertically)
- Go to Calibration → 2 Vertical.
- Print the test chart — 17 groups (–8 to +8), two columns per group.
- Find the group where the two columns are best aligned. Enter that number in the field → Apply → confirm Yes. Number turns green when saved.
Horizontal Calibration (colors not overlapping)
- Go to Calibration → 3 Horizontal.
- Set Print Order, Drop Size, and Over Print Value to match the current job settings.
- Print the test chart. Find the group with two white lines or where the dot columns overlap for each color channel.
- Enter the best-aligned group number per channel → Apply → Yes.
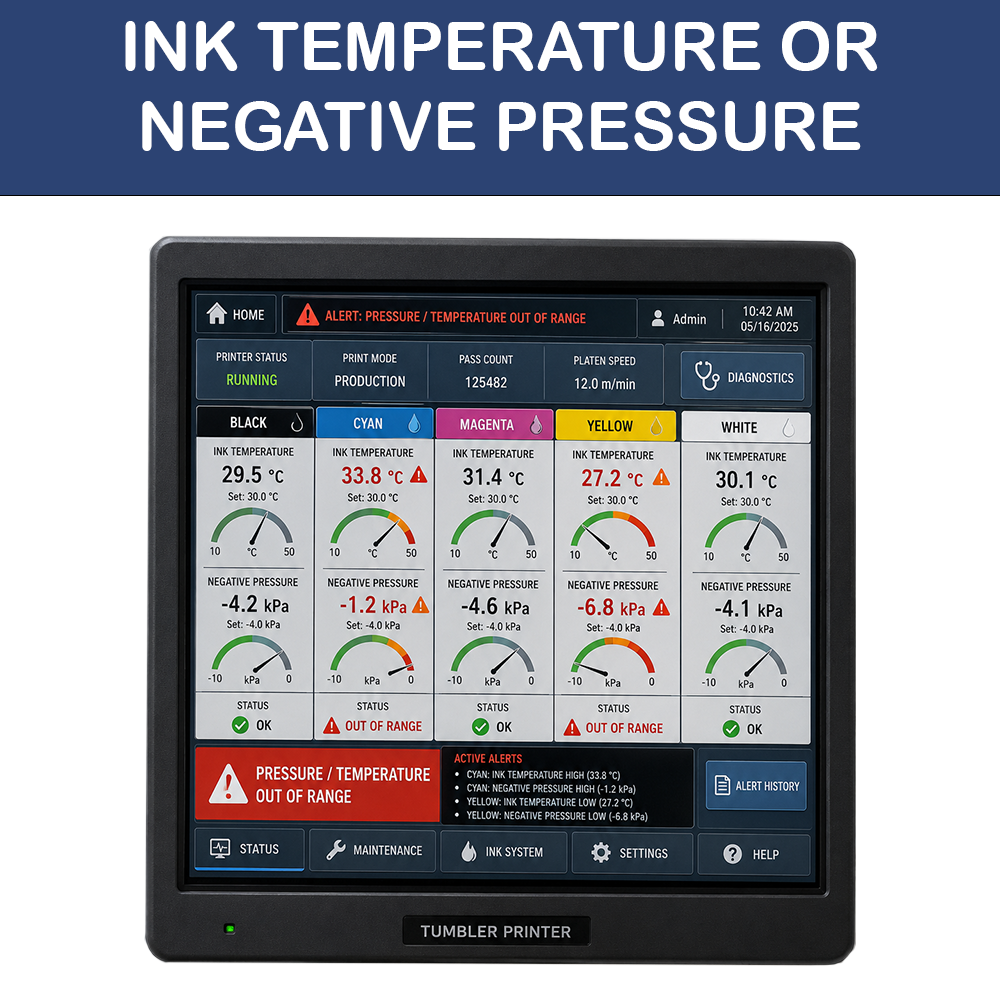
Sub-ink-tank temperature out of range
- Look at the temperature bar at the top of PCS (shows each ink channel's current temp).
- Black text = normal. Red text = 5°C over target — sub-ink-tank heating has auto-shut off.
- To set: click the dotted line under the ink channel you want to adjust.
- Check Switch → enter target temperature → click blank area to save.
- To apply the same temp to all channels, check Apply to All.
Print head temperature too high — printing paused
- Printing auto-pauses if any head reaches 92°C.
- Wait for the head to cool down to 85°C — printing can resume automatically at that point.
- To view or adjust the threshold: click the temp icon in the Peripheral Status bar → drag the 85°C and 92°C sliders.
Negative pressure (NP) out of range
- Look at the NP indicator at the top of PCS. Reference the Service Manual for the target NP value for your REV model.
- To adjust: click the dotted line below the NP readout.
- Set the value in the popup → click blank area to save.
- Go to Print Head tab.
- Click the pencil icon to enter Edit mode (icon changes to a checkmark).
- Check the print head you want to adjust.
- Ricoh Gen 5/6 heads: Click Apply Normal Voltage → save with checkmark.
- Ricoh Gen 4 heads: Find the nominal voltage on the label on the physical data cable. Enter Voltage A for even nozzle lines and Voltage B for odd nozzle lines. Save with checkmark.
- Click the Encoder icon in the Peripheral Status bar to open the encoder graph.
- The graph shows encoder pulse count per bottle rotation. The difference between Max Value and Min Value should be 10 or less.
- If the difference is 10–20: encoder is slightly unstable — monitor closely.
- If the difference is 20–30 or higher: encoder is too unstable and will affect print quality. Contact Amica technical support — do not attempt to fix mechanically.
PCS shows errors in three different ways. Here's how to handle each:
- Orange dotted-line message below the job (e.g. "Colors of the job don't match the current print order") — click the dotted line to expand and see the suggested fix.
- Error in the Peripheral Status pane (shown below the ink temp bar) — click the Help button next to it for the solution.
- Popup window error — read the instruction inside the popup. Most tell you exactly what to correct (e.g. "Media Width + Media Offset must be ≤ Platen Width").
If the problem still isn't resolved
- Go to the Information tab → click the Feedback icon.
- Set a save location (no spaces in the path), describe the problem briefly, and set the log window to cover the time when the issue happened (e.g. Recent 30 min).
- Save the log file and email it to Amica technical support.
- Head temp hit 92°C — wait for it to cool to 85°C. Printing resumes automatically.
- Motion error in Peripheral Status — note the error code, click Help, follow the fix. Press Return/Resume if prompted.
- Paused manually (II icon) — click the Print button on the job to resume. Note: the Pause button is unavailable during bottle/cup printing on some models.
- UV lamp temperature alarm — check UV lamp temps in the Peripheral Status bar. Overheating lamps will stop the job. Allow lamps to cool before resuming.
Step 1 — Auto Clean first
- Go to Operation tab in PCS → click Auto Clean.
- Auto clean purges ink and wipes the nozzle surface automatically.
- After auto clean completes, run a Check Nozzle test pattern.
- If nozzles look good — resume printing.
- If banding is still present — proceed to manual clean below.
Step 2 — Manual Head Clean (if Auto Clean didn't fix it)
- Switch the printer mode to Manual.
- Open the middle door of the printer.
- From the Movement menu on the LCD, tap the arrow buttons to move the carriage above the UV lamp.
- Fold a new Cleanroom wiper and spray flushing fluid on it.
- Wipe the edges and undersurface of the head plate with the wiper.
- Wipe the head nozzles with a fresh wiper — wipe in ONE direction only, never back-and-forth.
- Clean the wiping blades with a new wiper soaked in flushing fluid.
- Move carriage back to origin → close door → switch mode back to Auto.
- Run Check Nozzle again before resuming printing.
Auto Clean first
- Go to Operation tab → click Auto Clean.
- Auto clean purges ink and wipes the nozzle surface automatically.
- Run Check Nozzle again to verify improvement.
Manual Purge (if Auto Clean not enough)
- Go to Operation tab → click Purge Ink.
- Select the affected color channel (K, C, M, Y, W, or All).
- After purging, click Wipe to clean the nozzle surface.
- Run Check Nozzle to verify.
Spray (preventive / after idle)
- If the HDL has been sitting idle, use Spray on the Operation tab before printing — jets ink for 100ms to prevent nozzle dry-out.
- Only works when status is Ready or Pause.
Power-On
- Turn on the computer running PCS and ColorPRINT Bottle software.
- Start PCS and ColorPRINT Bottle.
- Switch the manual 3-way valve to position INK.
- Press the ON button — printer initializes. LCD will show Ready when done.
- Check for any warning messages on the LCD or in PCS. Click Help next to any warnings for the fix.
- Wipe dust and ink off the head plate, head nozzles, and wiping blades with a Cleanroom wiper and flushing fluid.
- Perform an Auto Clean via LCD or PCS.
- Print a Check Nozzle test chart — confirm all nozzles are firing.
Power-Off
- Switch 3-way valve to position INK.
- Perform an Auto Clean.
- Print a Check Nozzle test chart — save it with date, time, and your name.
- Wipe the head plate, nozzles, and wiping blades.
- Power off using Maintain Head & Power Off (PCS: Operation tab → Printer Power → Maintain Head & Power off). This purges ink, wipes nozzles, and caps the heads before shutting down.
- Switch the 3-way valve to position OFF.
Speed Calibration
- Go to Calibration tab → 1 Step.
- Click Print under Speed. PCS may run this automatically when settings change for the first time.
- After printing, click View Results. The red line on top of the pattern should be flat — no sharp jumps.
- If there's drastic fluctuation, do Manual Speed Calibration: measure the distance between the solid and dotted line, enter it in the Offset field → Apply.
Vertical Calibration (heads not aligned vertically)
- Go to Calibration → 2 Vertical tab.
- Click Print to print the vertical test pattern.
- Each head prints 21 groups (–10 to +10). Find the group where the two columns of short lines are best aligned.
- Enter that group number into the calibration field → click Apply → confirm Yes.
Horizontal Calibration (colors not overlapping)
- Go to Calibration → 3 Horizontal tab.
- Set Print Order, Print Speed, Drop Size to match your job settings.
- Print the test chart. Find the group with two white lines or where dots overlap for each color channel.
- Enter the best-aligned group number per channel → Apply → Yes.
- Go to Print Head tab.
- Click the pencil icon to enter Edit mode (icon changes to a checkmark).
- Select the print head you want to adjust.
- If Apply Nominal Voltage is available for that head, click it directly.
- Otherwise: find the nominal voltage printed on the physical print head label on the machine.
- Enter Voltage A for even-numbered nozzle lines; Voltage B for odd-numbered nozzle lines.
- Click the checkmark to save.
Check and set sub-ink-tank temp
- Look at the temperature bar across the top of the PCS screen (shows each ink channel's current temp).
- Temperatures shown in black = normal. Temperatures shown in red = 5°C over target — heating has auto-shut off.
- To adjust: click the dotted line under the ink color you want to set.
- Check the Switch checkbox → enter target temperature → click blank area to save.
- If all tanks need the same temp, check Apply to All.
Print head heating temperature
- Go to Print Head tab → enter Edit mode.
- Select the head → enter target temperature.
- Toggle the switch ON to enable heating (Ricoh heads only) → save with checkmark.
- Contact Amica technical support for the correct target temperature for your specific head model.
Check the status icon on the right of the job in PCS:
Job shows "?" (not allowed to print)
- Most common cause: color channel mismatch between job file and print order.
- Check the job's color mode vs the current Print Order setting in PCS.
- To override: go to the job's bottle profile → Settings → Print → check Ignore Job Color Mismatch.
- Then set Missing Channels of Job to Copy (duplicate existing channel data) or Blank (leave missing channels empty).
Job shows "Uncalibrated" in red
- Click the Uncalibrated button to the right of the job.
- Run calibration in order: Speed → Vertical → Horizontal.
- After calibrating, the status clears and the job can print.
Source file missing (X icon)
- The .prt file has been moved or deleted from its original folder.
- Delete the job from PCS. Re-add it by clicking [+] and locating the file.
- Look at the NP indicator at the top of the PCS screen.
- Check the Service Manual for the target NP value for your specific HDL model.
- To adjust: click the dotted line below the NP readout.
- Set the value in the popup → click blank area to save.
- Click the Encoder icon in the PCS peripheral status bar to open the stability chart.
- Check the Difference between Maximum and Minimum values on the chart.
- Difference should be within 10. If higher → encoder is unstable, print quality is affected.
- Check encoder cable connections on the machine.
- Clean the linear encoder scale (weekly task): open the rear door → wipe with Cleanroom wiper + industrial alcohol in one direction only — do not scratch it.
- If problem persists after cable check and cleaning, contact technical support — do not continue printing.
Clean the UV emitting window (every 2 days)
- Switch printer to Manual mode.
- Open the middle door → unload the cup fixture.
- Slide the UV light shield to reveal the emitting window.
- Use a Cleanroom wiper pre-moistened with IPA to remove dust, debris, or cured ink. Don't over-wet the wiper — IPA dripping into the spin tool module can cause damage.
- If ink is hardened on the glass, carefully use a razor blade to remove it first, then wipe with IPA.
- Restore the UV shield and cup fixture → close door → switch back to Auto.
UV light leakage warning in PCS
- Go to PCS → Peripheral Status → click the monitor icon.
- Check the UV light sensor table: Normal = OK · Slight Leaking = investigate · Fatal Leaking = stop immediately.
- For any leakage status: find the source of the UV light leak and perform an Auto Clean.
UV lamp settings in PCS
- Go to the job's bottle profile → Settings → UV Lamp section.
- Select the print order first — the UV settings will show per ink layer.
- For standard KCMY layers: check Curing in Printing.
- For Varnish layers: check Curing after Printing only — do not cure during printing or the varnish will be uneven.
- Set Curing Speed after Printing — this is the rotation speed ratio during post-cure (e.g. 10% = 1/10th of print speed).
- Print Speed — bottle profile → Settings → Print → select Low, Middle, or High.
- Low speed = better quality
- High speed = faster output
- Drop Size — affects ink drop volume per nozzle. Change in Settings → Print → Drop Size.
- Quality Level — Standard vs Super High. Higher = slower but better output.
- White Skipping — if there are large blank areas in the job, enable White Skipping so the head jumps over blank space instead of crawling through it.
- Over Print Value — increases number of ink layers applied. Set under Settings → Print (click the dropdown arrow to reveal hidden options).
- Click the [+] icon in Job List tab to open the file browser.
- Locate your .prt file (accepted types: .prt · .tif · .vdf · .pmt · .job).
- Set the number of copies needed.
- Click Open — the job appears in the PCS Job List.
- If the job shows Uncalibrated in red, click it and run calibrations before printing.
- Click the Print button to start.
Daily
- Follow power-on and power-off procedures
- Clean head plate, print head nozzles, and wiping blades (flushing fluid + Cleanroom wiper)
- Print and save a Check Nozzle test chart (write date, time, name)
Every 2 Days
- Clean UV emitting window (IPA)
- Clean UV light sensor
Weekly
- Clean wiping tray and capping tray (flushing fluid)
- Clean baffle, media height sensors, mug handle sensor (industrial alcohol)
- Clean linear encoder scale (industrial alcohol — one direction only!)
- Clean carriage beam, linear guides, fixture shafts (industrial alcohol + apply thin layer of calcium grease AFC GRS to guides)
- Clean printer doors and covers
- Check filter regulator — drain water if present
- Replace ink mist collector filter sponge (USOT400498)
Biweekly
- Lubricate guide sliders (calcium grease AFC GRS — grease gun, press ONCE per nipple)
- Lubricate lead screw (lithium grease #2)
Monthly
- Replace UV lamp filter sponge (ECLE400121)
Quarterly
- Replace wiping blades (MCAS417005)
- Replace quick connectors on waste tank
- Replace disk filter (ECIK000019)
- Replace PWC sponge sheet (USOT400499)
Semi-Annually
- Replace ink pump (ECIK000024-A) and F-Circle pump (ECIK000196)
- Replace needle filter (ECIK000254)
- Replace manual 3-way valve, one-way valve in flush channel, quick connectors
- Replace ink mist fan (ECFN000106)
Annually
- Replace capper (MCMP002419), air disk filter, air pump
- Replace waste tank assembly (MBIA000274)
- One-way valve in ink channel + ink tube assembly — contact technical support
Orange box error (Motion Error etc.)
- Click the Help button inside the orange error box for the suggested fix.
- Follow the on-screen steps to resolve.
Dotted-line error message
- Click directly on the dotted-line error text — it expands to show the solution.
Yellow box error ("Input value is invalid")
- A setting is out of its valid range. Read the yellow box — it shows the allowed range (e.g. 0.0–310.0).
- Correct the value in that field and re-save.
Need to send a log to Amica support
- Go to Information tab → click the Feedback icon.
- Set a save directory (no spaces in the path) and describe the problem in the Problem Description box.
- Set the time window to cover when the issue occurred (Recent 10 min is best if done immediately after the error).
- Send the saved .zip file to Amica technical support.
Step 1 — Abort & get count
- Abort job — stop printing right away.
- Note how many units have been printed so far (check Reboxer count and subtract from total).
Step 2 — Try Auto Clean first
- Go to Operation tab → click Auto Clean.
- After auto clean completes, run a Check Nozzle test pattern.
- If nozzles look good — resume printing.
- If banding is still present — proceed to Manual Clean below.
Step 3 — Manual Clean (if Auto Clean didn't fix it)
- On the Quad main menu click (C) — lowers the head tray for access.
- Get 2–3 microfiber cloths (silks) and alcohol. One damp, one dry.
- Clean one head at a time — light touch only.
- One pass with the damp cloth → follow immediately with the dry cloth.
- Repeat until the head is clean, then move to the next.
- Raise the tray back up. Run Check Nozzle again before printing.
Auto Clean first
- Go to Operation tab → click Auto Clean.
- Auto clean purges ink and wipes the nozzle surface automatically.
- Run Check Nozzle again to verify improvement.
Manual Purge (if Auto Clean not enough)
- Go to Operation tab → click Purge Ink.
- Select the affected color channel (K, C, M, Y, W, or All).
- After purging, click Wipe to clean the nozzle surface.
- Run Check Nozzle to verify.
Spray (preventive)
- If printer has been sitting idle, use Spray on the Operation tab before printing — jets ink for 100ms to prevent nozzle dry-out.
- Only works when status is Ready or Pause.
Quick color adjustment
- Abort job — get count of what's been printed.
- Open the Job List → find the current job.
- Click Calibration → Adjust Color.
- Use the arrow keys to shift color position:
- ← (left) = positive number
- → (right) = negative number
- ↑ (up) = positive number
- ↓ (down) = negative number
Vertical Calibration (heads not aligned vertically)
- Go to Calibration → 2 Vertical tab.
- Click Print to print the vertical test pattern.
- Each head prints 21 groups (–10 to +10). Find the group where the two columns of short lines are best aligned.
- Enter that group number into the calibration field → click Apply → confirm Yes.
Horizontal Calibration (colors not overlapping)
- Go to Calibration → 3 Horizontal tab.
- Set Print Order, Print Speed, Drop Size to match your job settings.
- Print the test chart. Find the group with two white lines or where dots overlap perfectly for each color channel.
- Enter the best-aligned group number per channel → Apply → Yes.
- Go to Print Head tab.
- Click the pencil icon to enter Edit mode.
- Select the print head you want to adjust.
- Find the nominal voltage printed on the physical print head itself.
- Enter Voltage A for even-numbered nozzle lines; Voltage B for odd-numbered nozzle lines.
- Click the checkmark to save.
Check and set sub-ink-tank temp
- Look at the temperature bar across the top of the PCS screen (shows W2 W1 Y M C K etc).
- Temperatures shown in black = normal. Temperatures shown in red = 5°C over target — heating has auto shut off.
- To adjust: click the dotted line under the ink color you want to set.
- Check the Switch checkbox → enter target temperature → click blank area to save.
- If all tanks need the same temp, check Apply to All.
Print head heating temperature
- Go to Print Head tab → enter Edit mode.
- Select the head → enter target temperature.
- Toggle the switch ON to enable heating → save with checkmark.
Check the status icon on the right of the job in PCS:
Job shows "?" (not allowed to print)
- Most common cause: color mismatch between job file and print order.
- Check the job's color mode vs the current Print Order setting.
- If you need to override: go to the job's bottle profile → Settings → Print → check Ignore Job Color Mismatch.
- Then set Missing Channels of Job to either Copy or Blank depending on your need.
Job shows "Uncalibrated" in red
- Click the Uncalibrated button to the right of the job.
- Run calibration in order: Speed → Vertical → Horizontal.
- After calibrating, status will clear and job can print.
Source file missing (X icon)
- The .prt file has been moved or deleted from its original folder.
- Delete the job from PCS. Re-add it by clicking [+] and locating the file in My Drive or Holding.
- Print Speed — go to the job's bottle profile → Settings → Print → select Low, Middle, or High.
- Low speed = better quality
- High speed = faster output
- Drop Size — affects ink drop volume per nozzle. Change in Settings → Print → Drop Size.
- Quality Level — Standard vs Super High. Higher = slower but better output.
- White Skipping — if there are large blank areas in the job, enable White Skipping (Settings → Print) so the head jumps over blank space instead of crawling through it.
- Look at the NP indicator at the top of the PCS screen.
- Check the Service Manual for your printer's target NP value.
- To adjust: click the dotted line below the NP readout.
- Set the value in the popup → click blank area to save.
- Click the Encoder icon in the PCS status bar to open the stability chart.
- Check the Difference between Maximum and Minimum values.
- Difference should be within 10. If higher → encoder is unstable.
- Check the encoder cable connections on the machine.
- If problem persists, contact technical support — do not keep printing as quality will be affected.
Orange box error (Motion Error etc.)
- Click the Help button in the orange error box for the suggested fix.
- Follow the on-screen steps to resolve.
Dotted-line error message
- Click directly on the dotted-line error text — it will expand to show the solution.
Yellow box error ("Input value is invalid")
- A setting is out of range. Read the yellow box — it will show the valid range (e.g. 0.0–310.0).
- Correct the value in that field and re-save.
Need to send a log to support
- Go to Information tab → click the Feedback icon.
- Set a save directory (no spaces in path) and describe the problem.
- Set the time window to cover when the issue occurred (Recent 10 min is best if done immediately).
- Send the saved .zip file to Amica technical support.
- Click the [+] icon in Job List to open the file browser.
- Check My Drive and Holding first for the job file.
- If not found there, go to the Master SKU folder and locate it.
- Set the number of copies needed.
- Click Open — the job appears in PCS → start printing.
- Open Cylinder Set Up in PCS.
- Choose mode: Auto Mode, Station A (default ✓), or Station B.
- Confirm the checkmark is shown on the selected station — this means the plunger is pushed in and the cup is secured.
- If the cup feels loose or falls out, verify the checkmark is present and the correct station is selected.
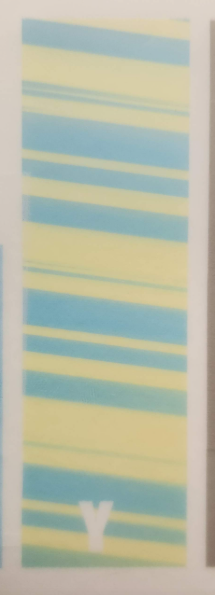
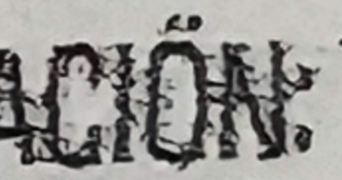
Emergency Procedures
Stay calm. Know what to do before something happens.
- Alert everyone in the room — shout "FIRE, EVACUATE."
- Pull the nearest fire alarm if safe to do so.
- Do NOT attempt to fight the fire unless it is very small and you are trained.
- If using an extinguisher: CO₂ only — aim at the base of the flame.
- Evacuate immediately via the nearest exit. Do not use elevators.
- Call 911 from outside the building.
- Do not re-enter until fire department clears the building.
- Notify your supervisor once you are safe.
- Alert anyone nearby and clear the area.
- Put on nitrile gloves and eye protection before cleaning up.
- Small spill: absorb with paper towels, dispose in a sealed trash bag.
- Large spill: use the spill kit — ask supervisor for location. Ventilate the area.
- Do NOT pour chemicals down the drain.
- Wash the affected surface with clean water after cleanup.
- Report the spill to your supervisor and document it.
- Do NOT rub your eyes.
- Go immediately to the eyewash station — ask supervisor for location.
- Flush eyes with clean water for a minimum of 15 minutes continuously.
- Remove contact lenses if present — after initial flushing.
- Seek medical attention immediately, even if symptoms seem minor.
- Inform your supervisor right away.
- Remove contaminated clothing immediately.
- Wash skin with soap and water for at least 5 minutes.
- For UV-curable ink: do not expose the area to UV light until fully washed off — ink can cure on skin.
- If irritation persists, seek medical attention.
- Notify your supervisor.
- Stop work immediately and assess the situation.
- For serious injuries or unconsciousness — call 911 immediately.
- First aid kit location: — Ask your supervisor —
- Do not move an injured person unless they are in immediate danger.
- Notify your supervisor of any injury, no matter how minor.
- All injuries must be documented — your supervisor will file a report.
- Emergency stop: use the red E-STOP button on the machine or cut power at the machine switch.
- Emergency shutoff for the entire room: — Ask your supervisor for location —
- If power goes out mid-print: do not restart until power is stable. Check nozzles before printing again.
- Notify your supervisor before restarting any machine after an emergency stop.
Contacts & Escalation
Who to call, when to call them, and how to escalate.
| Role | Name | Contact | When to Call |
|---|---|---|---|
| Manager | Allan | — Add number — | Machine down, quality issue, emergency |
| Supervisor | — Add name — | — Add number — | Day-to-day issues, batch questions |
| IT / PCS Support | — Add name — | — Add contact — | PCS software crash, computer issue |
| Machine | Vendor | Support Contact | Serial # |
|---|---|---|---|
| BEAST (PeriQ360) | LSINC | support@lsinc.com | — Add serial # — |
| REV | — Add vendor — | — Add contact — | — Add serial # — |
| HDL | — Add vendor — | — Add contact — | — Add serial # — |
| QUAD | — Add vendor — | — Add contact — | — Add serial # — |
| Situation | Action |
|---|---|
| Machine issue — troubleshoot step did not work | Stop the machine. Call supervisor. |
| Print quality wrong vs. approved sample | Stop the run. Do not print more. Call supervisor. |
| Batch item missing / out of stock on shelf | Flag in ShipHero. Notify supervisor. |
| Received damaged or wrong shipment | Do not process. Set aside. Notify supervisor immediately. |
| Chemical spill or exposure | Follow emergency procedure. Notify supervisor. |
| Any injury, no matter how minor | Report to supervisor immediately for documentation. |
| PCS software crash | Try restart once. Crashes again — call IT/supervisor. |
Shift Handoff
Leave the room ready for the next person. Every time.
- All machines shut down per correct procedure (see Shutdown tab)
- All ink caps seated and heads capped
- Work area clean — no spills, used rags disposed of properly
- Spray bottles (P2 / Zep 606) capped and stored correctly
- All in-progress batches labeled and staged clearly
- ShipHero updated — any incomplete batches flagged
- Tools and equipment returned to correct locations
- Any damage, errors, or issues documented for next shift
- Machine issues: Anything that acted up, produced bad prints, or needed a workaround
- In-progress batches: Batch ID, what was completed, what is left, any special notes
- Inventory flags: Any empty shelves or short items found during picking
- Supplies low: Ink, IPA, cleaning cloths, labels — anything running low
- Maintenance due: Any machine due for a clean or head check
Every batch follows this path. Know where yours is at all times.
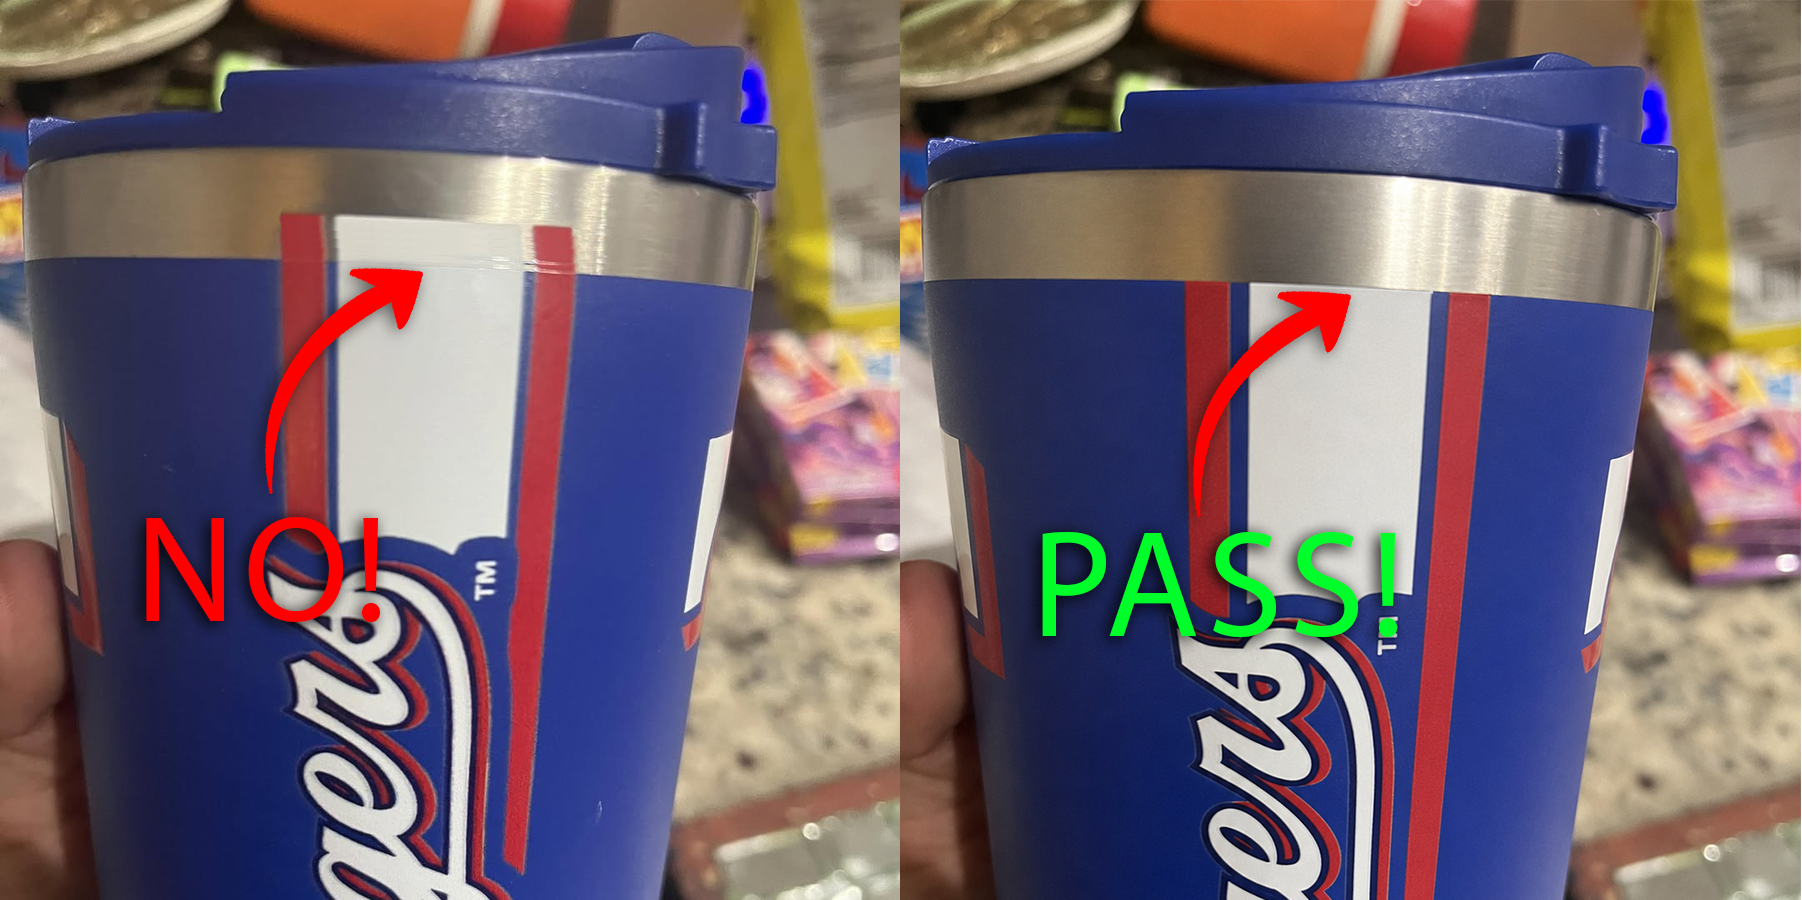
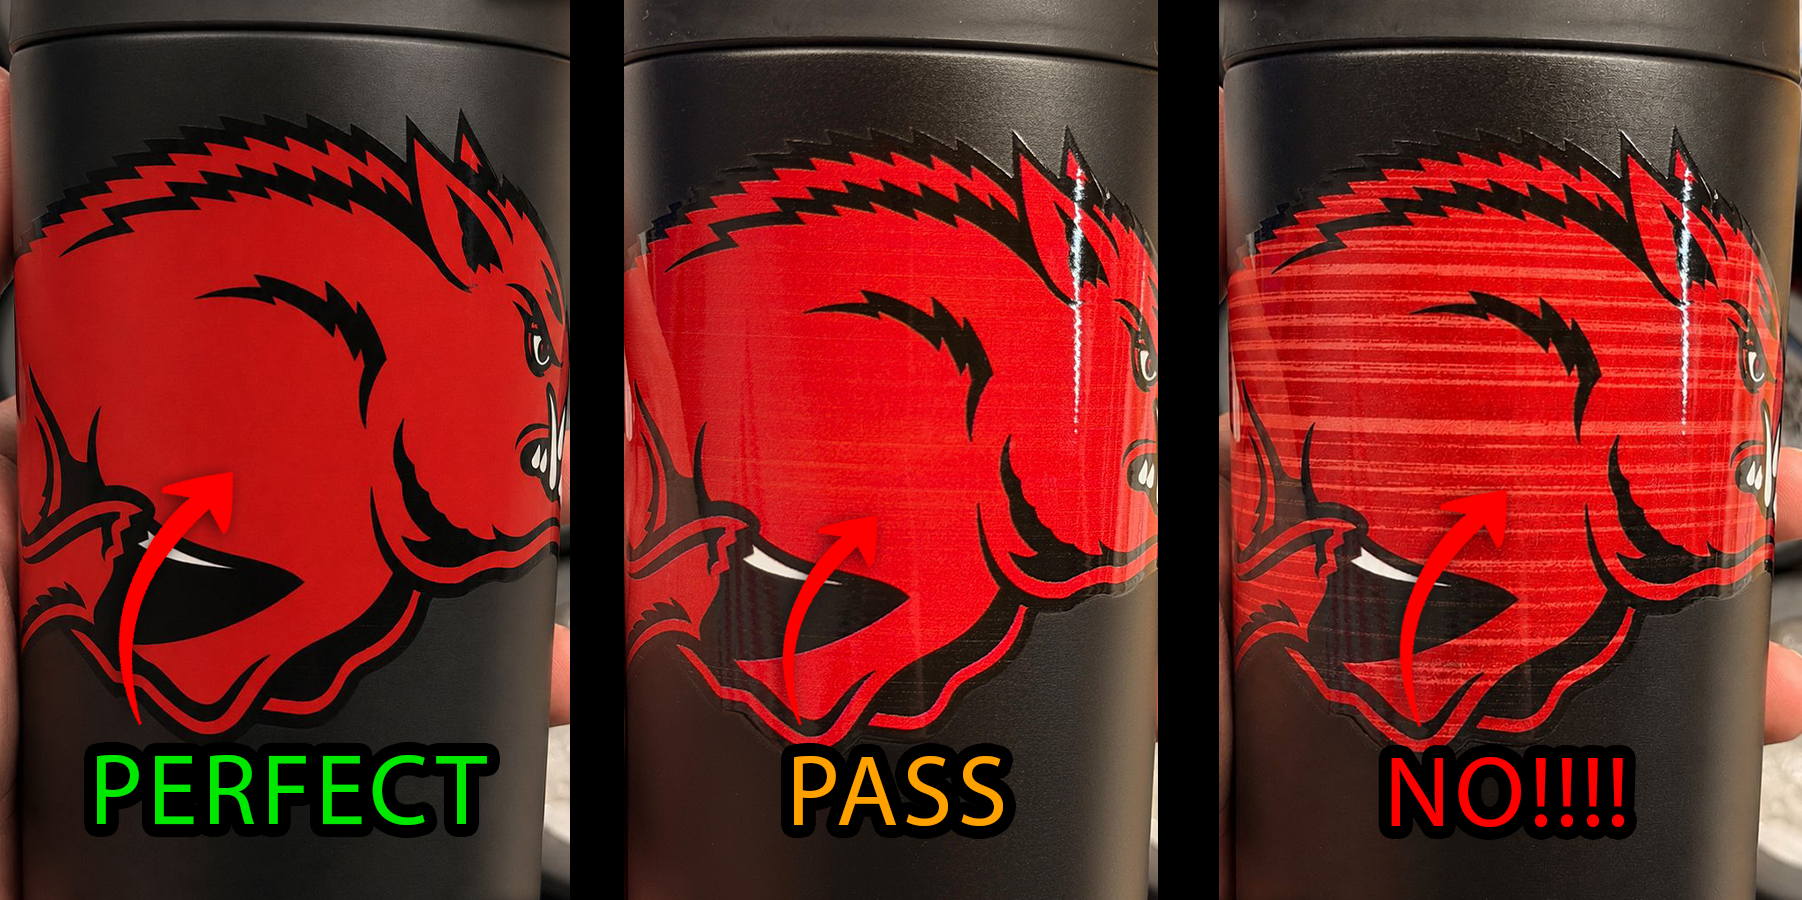
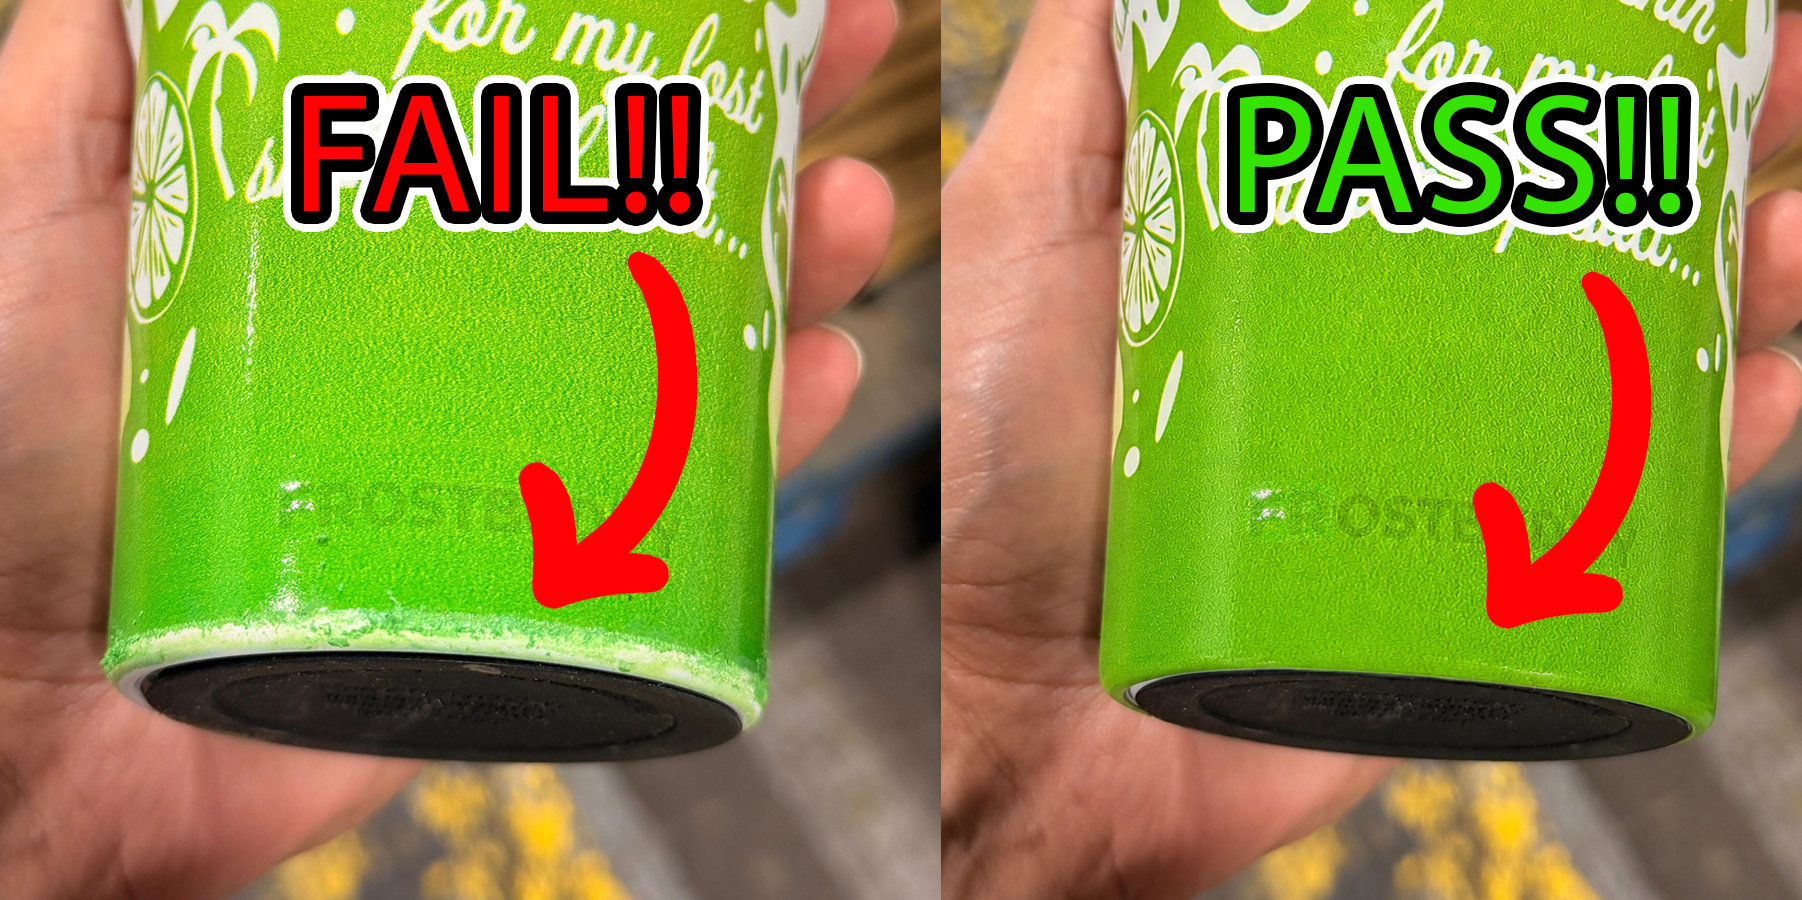
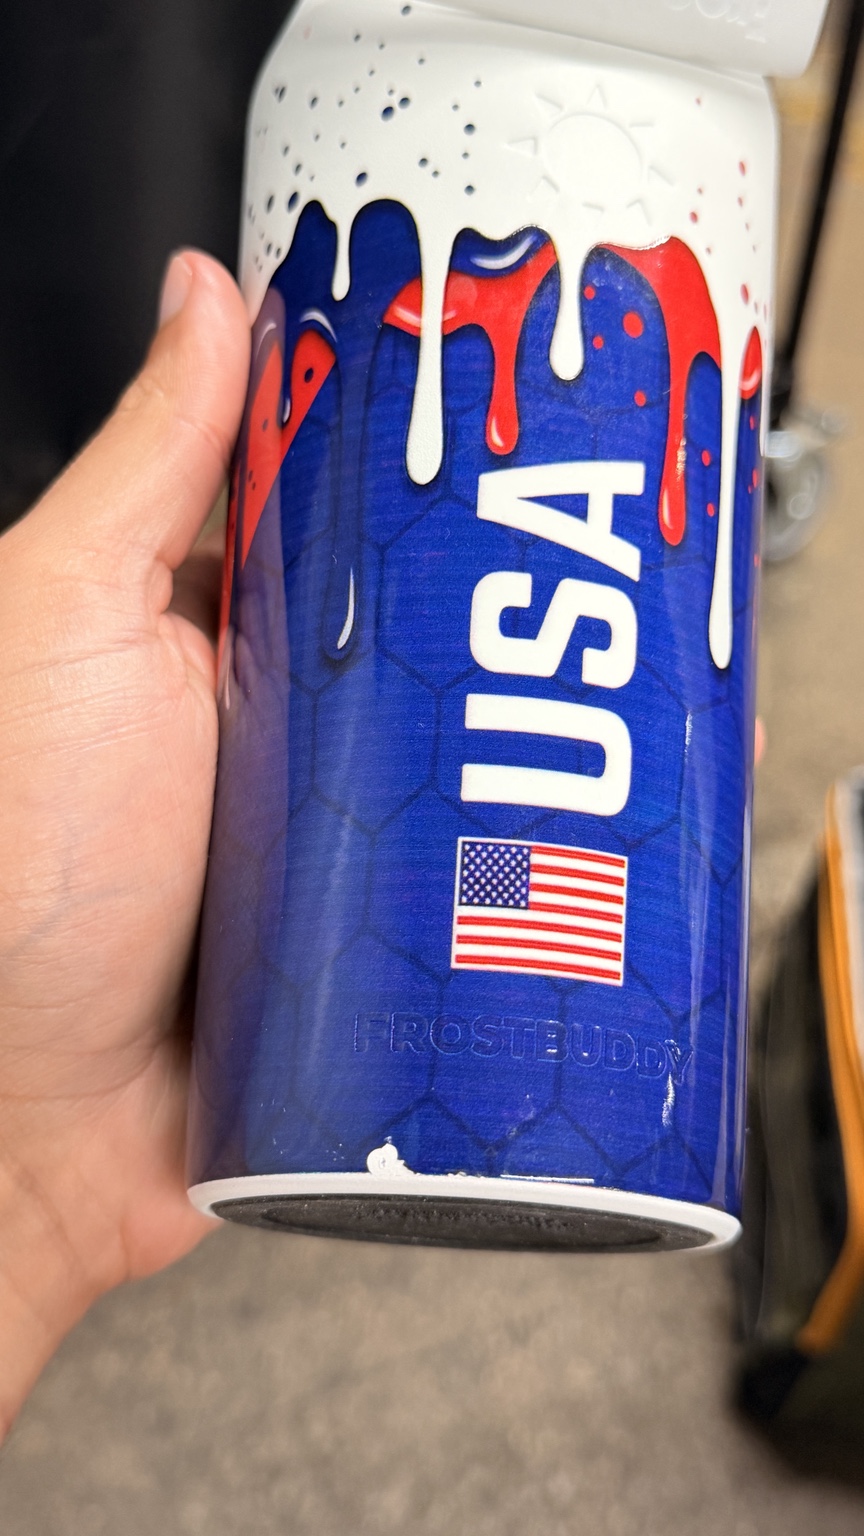
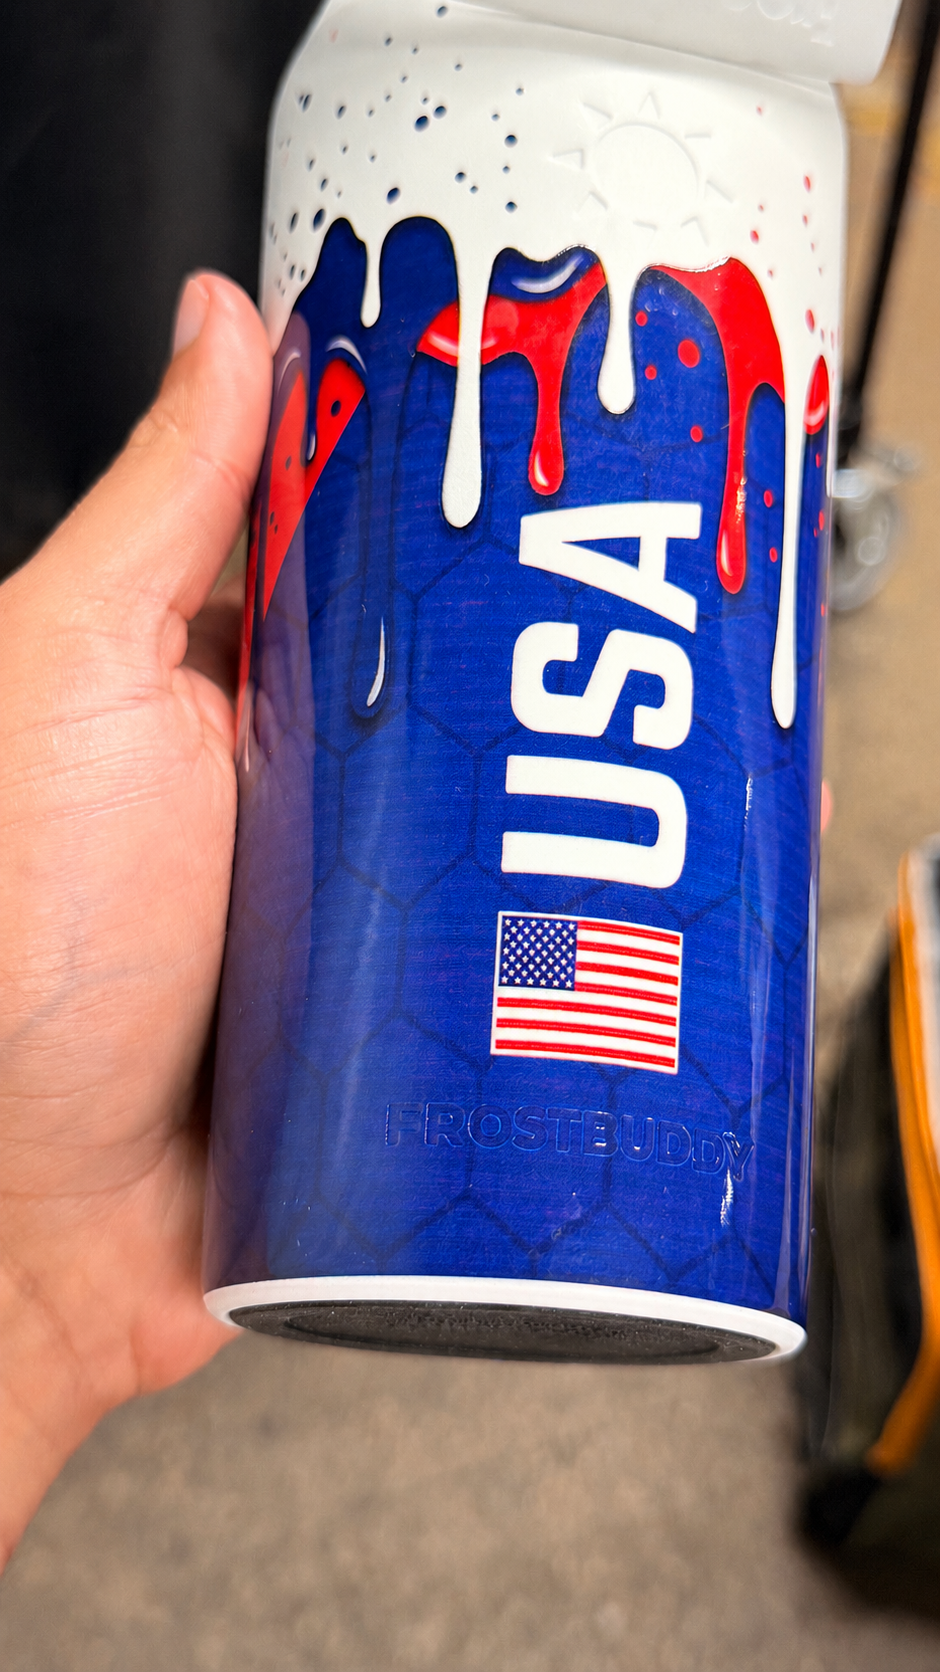
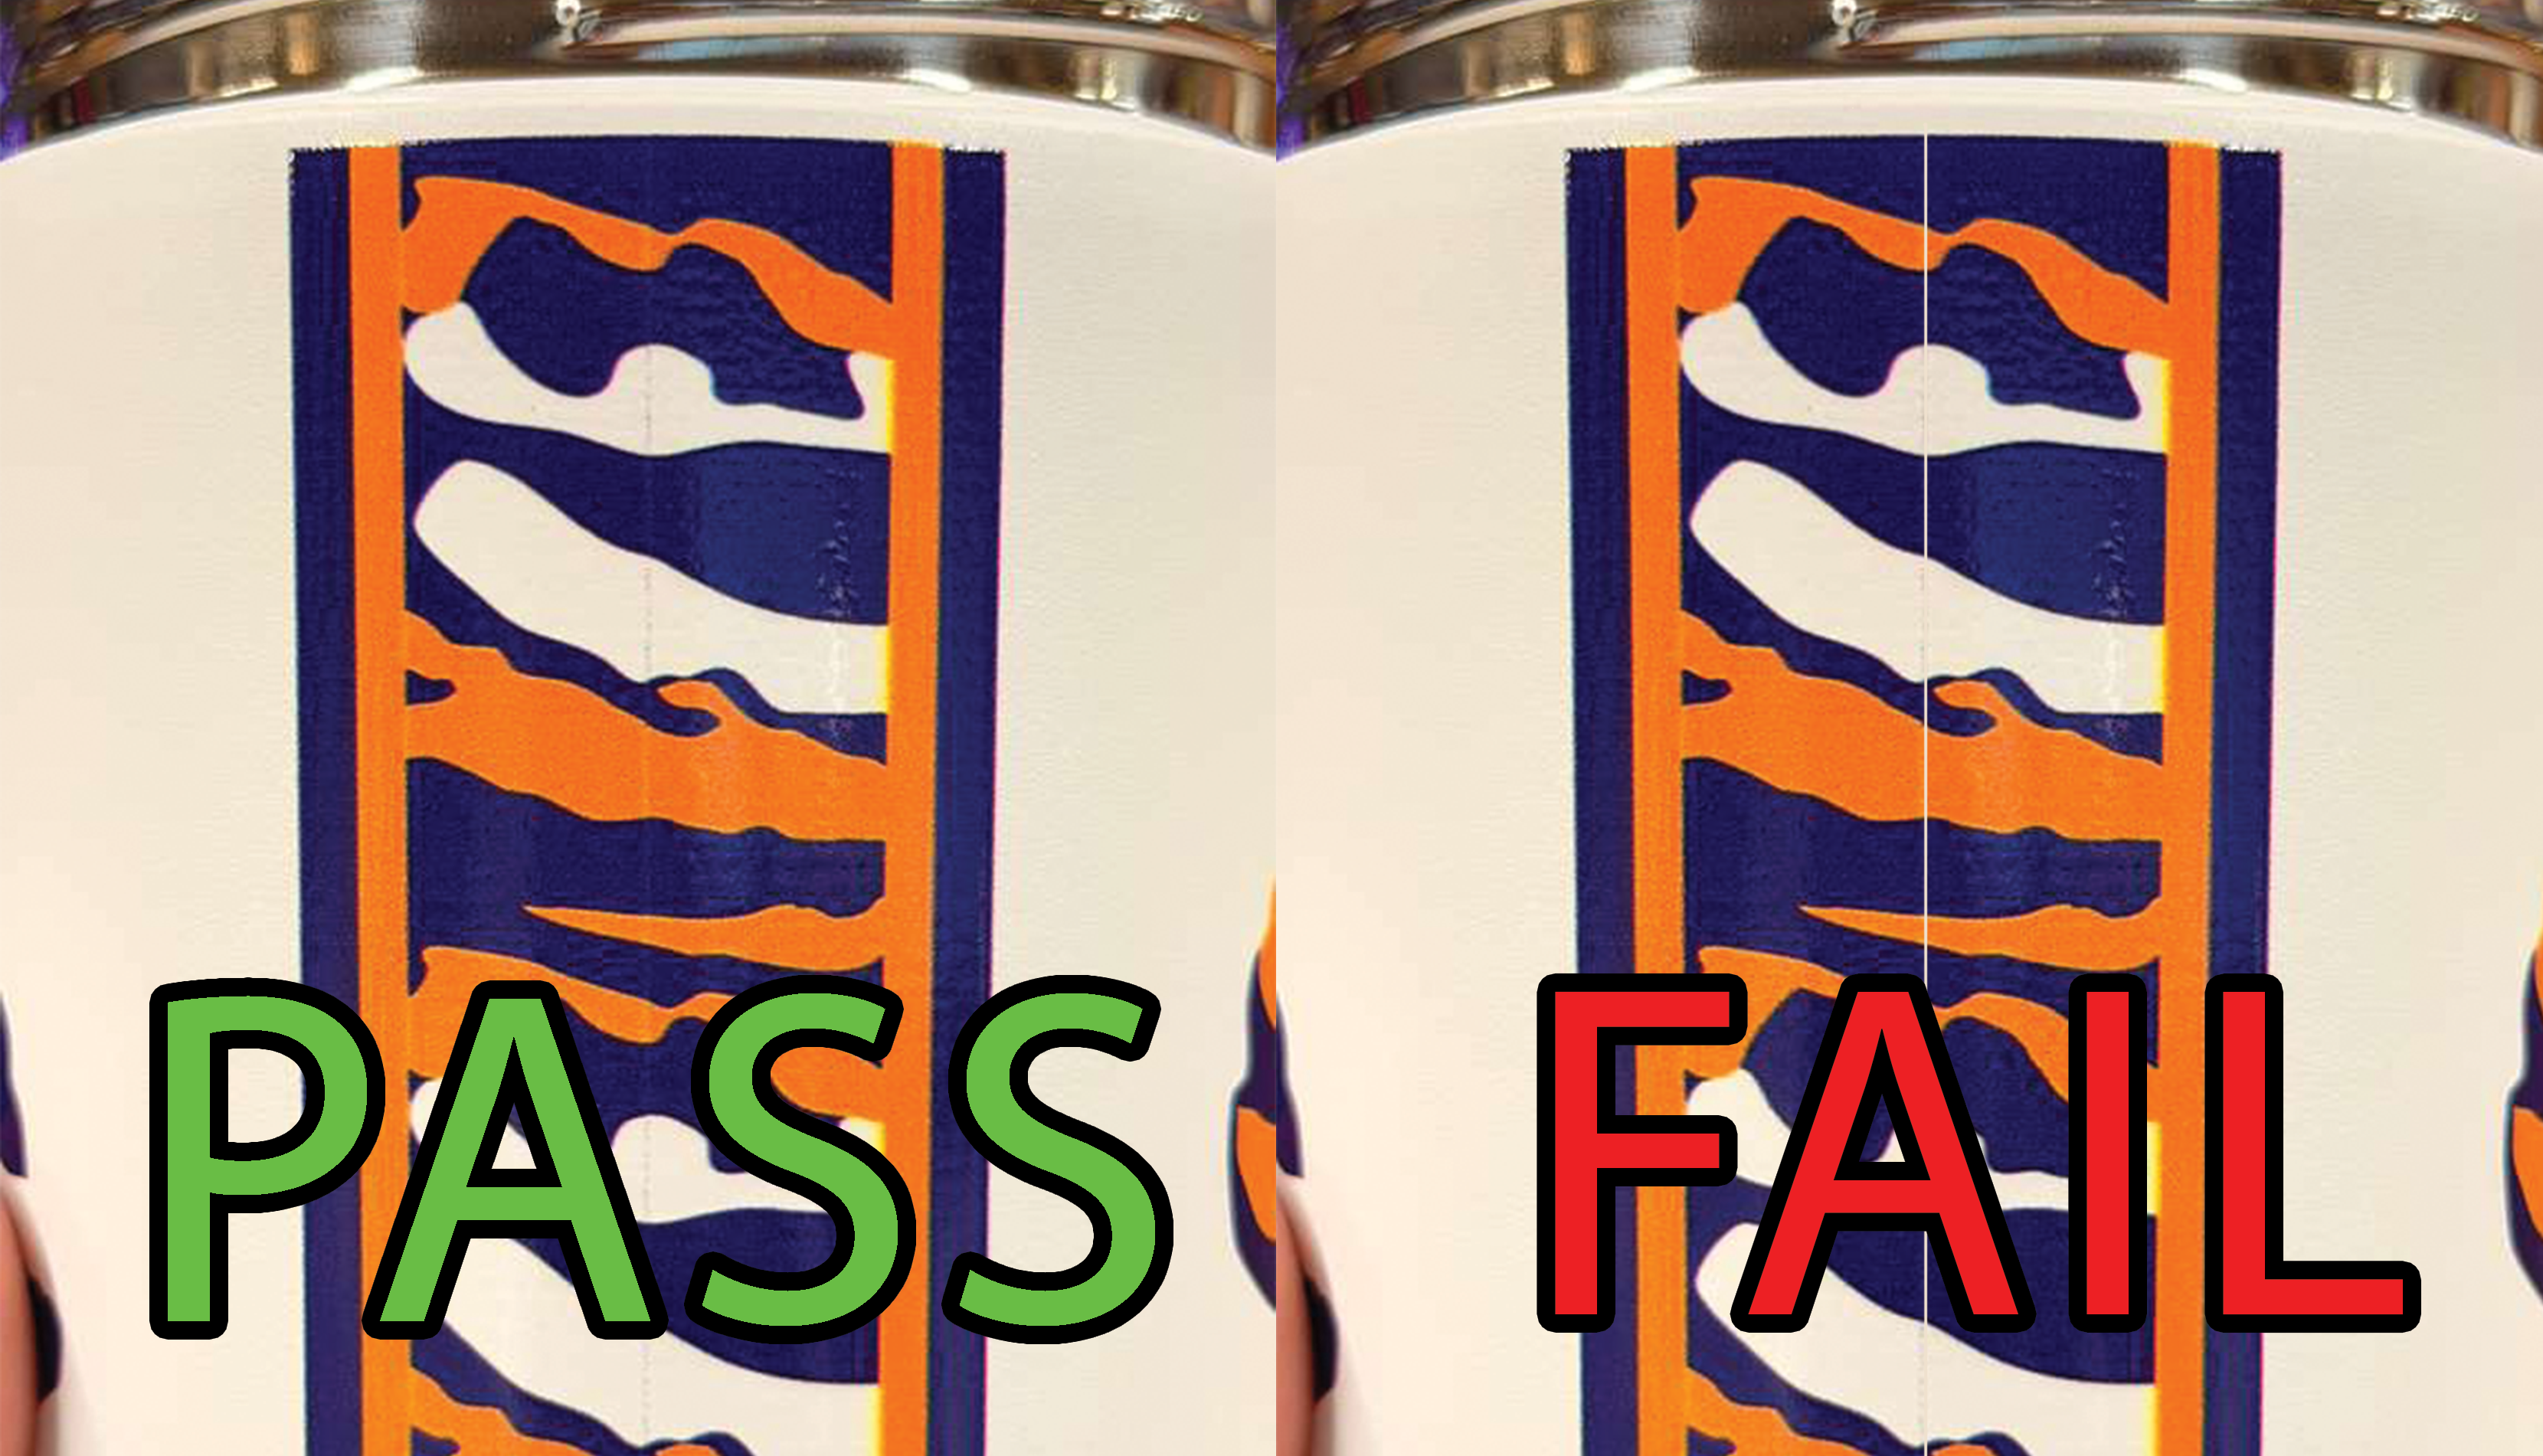
🥫 Cans request
Ask for cans at a machine — everyone with access gets a notification, and the newest request is always on top. Press ✓ Complete when the cans are there, or ✖ Cancel if they are not needed any more.
Library
Every design file in Drive — both master folders, the brighter set and anything else. Search, preview, download. No sign-in needed.
Art Review
File Tracker
Every fixed PNG, from the moment it is uploaded to a .prt sitting on the machine. Anything stuck part-way is a file that needs a look.
Manual Fix
For work that never came through PODHero — somebody brings a name, the design gets made, and it needs to land in exactly the same places. Nothing is resolved in PODHero, because there is nothing there to resolve.
PNG for the rip machines, PDF for Beast
Prep Ahead
Everything on backorder that cannot be printed yet — so the art gets made before a batch reaches it, not when the machine stops. Checked hourly against the real print files on the share.
Production KPI
Daily production from the KPI sheet. Pick any day on the calendar to see who ran what, on which machine, and how the day added up.
C-C Batches
Label Printer
Search ShipHero, build a list, download the CSV for the label printer. Printed Labels is the C-C -produced print SKUs; All ShipHero Stickers is every product with a barcode.
🧪 Blank guard — simulation
How the one-SKU setup keeps Shopify from overselling: every C-C design has "Continue selling when out of stock" ON (we print to order). The app watches each blank; when a blank drops under the threshold, it turns that setting OFF on every design that uses the blank, so they show sold out. When the blank is restocked, it turns it back ON.